How to setup an Interview Plan
Last updated: February 23, 2026
Establishing an Interview Plan before you begin accepting applications is essential for team alignment and a professional candidate experience. In Kula, every job is linked to a structured plan that defines the exact milestones a candidate must reach. By embedding specific Activities within these stages, you can automate your workflow, ensuring that as candidates progress, key tasks are triggered and managed without manual intervention.
Add an Interview Plan
Click the Settings icon at the bottom of the left-side menu.
Under the Interviews & Scheduling section, click Interview Plan.
Click the Add Interview Plan button in the top-right corner.

In the Details section, ensure all fields are correctly filled out based on your recruitment needs.

Click Next: Interview Plan to proceed.
You will see five fixed milestones — Kula structures the hiring journey into these clearly defined stages.
Prospect - For sourcing and early-stage engagement.
Application Review - For the initial screening of active applicants.
Interview - This is where the bulk of your evaluation happens. By default, you'll see Phone Screen, Assessment, and Face-to-Face. You can edit these or add your own using the Create Stage option.
Offer - For the final selection and negotiation.
Hired - For post-hire engagement.

The Prospect, Application Review, Offer, and Hired milestones include a default locked stage. However, you can add additional stages within these milestones based on your hiring workflow requirements.
To add additional stages, click "Add Stage", fill in the Stage Name and "Target Time in Stage", then click Create Stage.
Note: The target time in stage is a soft deadline to make a decision on the candidates in that stage


Adding activities to each stage
In each stage, you can add the below activities to streamline your process by clicking "Add Activity" in the respective stage section.

Add Interview: This creates an interview activity to be scheduled for candidates. You can usually add this activity to Stages added in the "Interview stages" milestone.
Select Add interview from the list of available activities.

Configure Interview Details such as Interview name, Interview type - One-on-One interview/Panel interview.
Assign Interviewers: You can manually select specific interviewers or choose an interviewer pool(There is a list of interviewer pools in Kula. You can choose one or add more by going to Settings → Interviewer pools).
Schedule Options: Select the duration of the interview and your preferred meeting platform (e.g., Zoom, Google, Phone, or Onsite/Physical).
Toggle the Enable AI notetaker switch if you want automated meeting summaries and key point captures.

Click Next: Calendar invites to proceed.
Set Up Calendar Invites for Candidate and Interviewer.

Click Next: Scorecard.
Select scorecard template: Choose a pre-defined template from the dropdown menu to standardize evaluations.
You can add specific questions or descriptions for this particular interview activity without changing the master template.

Click Add interview to finalize and save the activity to your plan.
Add Email: You can write an email to be sent to the candidates at this stage.
Select Add Email from the list of available activities.

Configure Email Details by giving a Email activity name.
Choose a pre-defined email template from the dropdown menu to maintain consistent communication.
Configure Sender and Subject: Select the email address the message should be sent from and confirm or edit the subject line/email body as needed.

Click the Add email button in the bottom-right corner to finalize the activity.
Add Assessment: You can configure an assessment to be sent to the candidates in this stage.
Select Add Assessment from the list of available activities.

Enter the assessment name and Select the required reviewers from the dropdown (e.g., Recruiters (on job)).
You can enter the assessment questions and include placeholders as well.
If you have the questions in a file, you can also upload using - "Attach files". Drag and drop files or click "Click to upload".
Supported formats include: Documents (PDF, Word, Excel, etc.), Images (JPG, PNG, etc.), Text & Archive files.

Click Next: Scorecard.
Choose a scorecard template from the dropdown. You can customize it but changes will only apply to this assessment.

Click the Add Assessment button in the bottom-right corner to finalize the activity.
Add review: You can setup a candidate review with scorecards at this stage.
Select Add review from the list of available activities.

Enter the review name and Select the required reviewers from the dropdown (e.g., Recruiters (on job)).

Choose a scorecard template from the dropdown. You can customize it but changes will only apply to this assessment.
Click the Add review button in the bottom-right corner to finalize the activity.
Add Survey: You can configure a survey to be sent to candidates or Hiring Managers
Navigate to the specific stage (Hired), click the + Activity button on the right side of the stage block, and select Add Survey from the list of available activities.

Select the Survey type - Candidate Survey or Hiring Manager Survey.
Select survey: Choose the required survey template from the available templates(Settings --> Surveys).
You could see the Preview of the questions configured in the selected Survey template.

Click Next: Email.
Select email template: Choose a pre-defined email template from the dropdown menu to maintain consistent communication.
Configure Sender and Subject: Select the email address the message should be sent from and confirm or edit the subject line/email body as needed.

Click the Add Survey button in the bottom-right corner to finalize the activity.
Integrated Assessment activity: Assessment platforms integrated under Settings → Organization → Integrations will automatically be available
Once the integration is successfully connected, you can select the respective assessment provider (e.g., HackerRank, HackerEarth, Criteria Corp, etc.).


Edit an Interview Plan
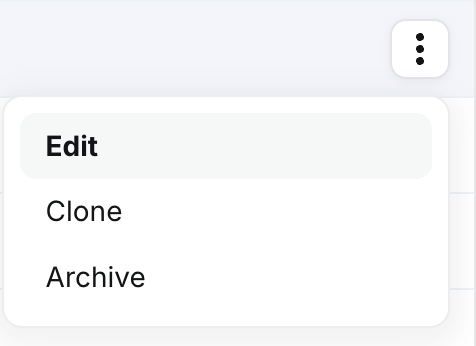
On the Interview Plan homepage, hover over the plan you want to edit.
Click the Ellipsis (three dots) icon and select Edit.
Update the Details and Scorecard sections as needed.
Click Save to confirm your changes.
Clone an Interview Plan
On the Interview Plan homepage, hover over the plan you want to clone.
Click the Ellipsis icon and select Clone.
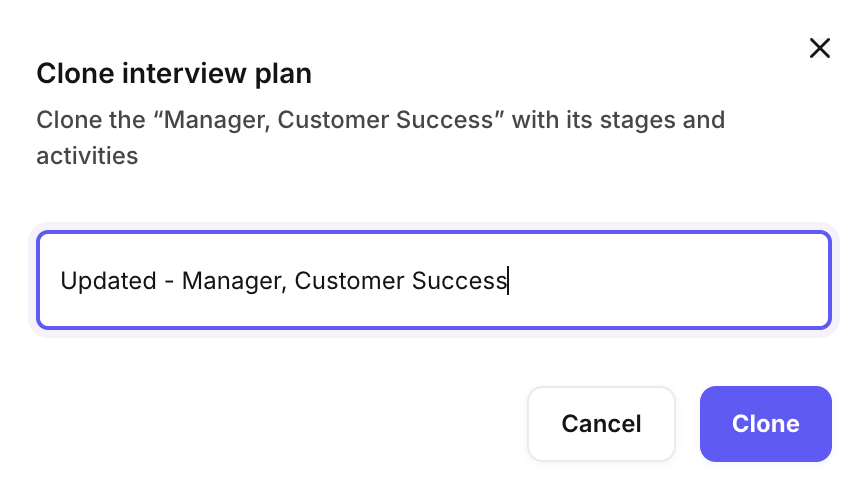
Enter the new interview plan name in the Add Name Here field.
Click Clone to complete the action.
Archive an Interview Plan
On the Interview Plan homepage, hover over the plan you wish to archive.
Click the Ellipsis icon and select Archive.
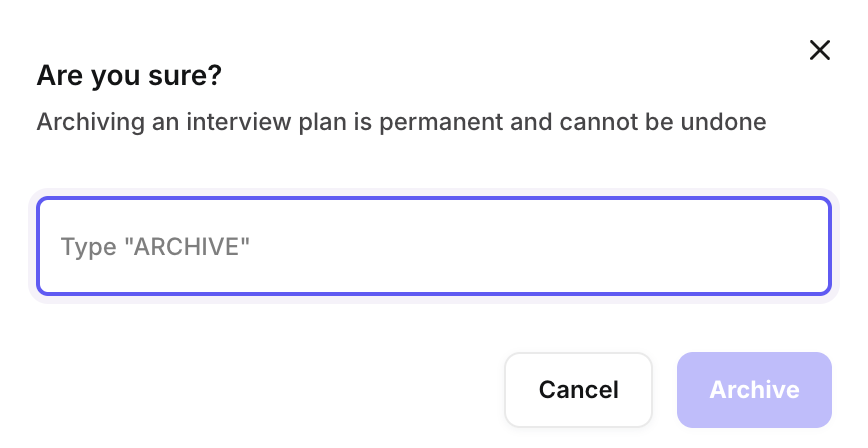
In the confirmation modal, type ARCHIVE.
Click Archive to finalize the process.
Need Help?
If you have questions or need assistance with setup, feel free to reach out to us at support@kula.ai or use the in-app chat for assistance.