Scheduling an interview manually
Last updated: September 26, 2026
Manual scheduling is the default route: you pick the slot yourself from a calendar showing who is free, then confirm the invites and the scorecard. This article covers scheduling from an interview plan activity and scheduling ad-hoc.
Who can do this: Super Admin, Admin, Recruiter, and anyone on the job's hiring team who can manage candidates
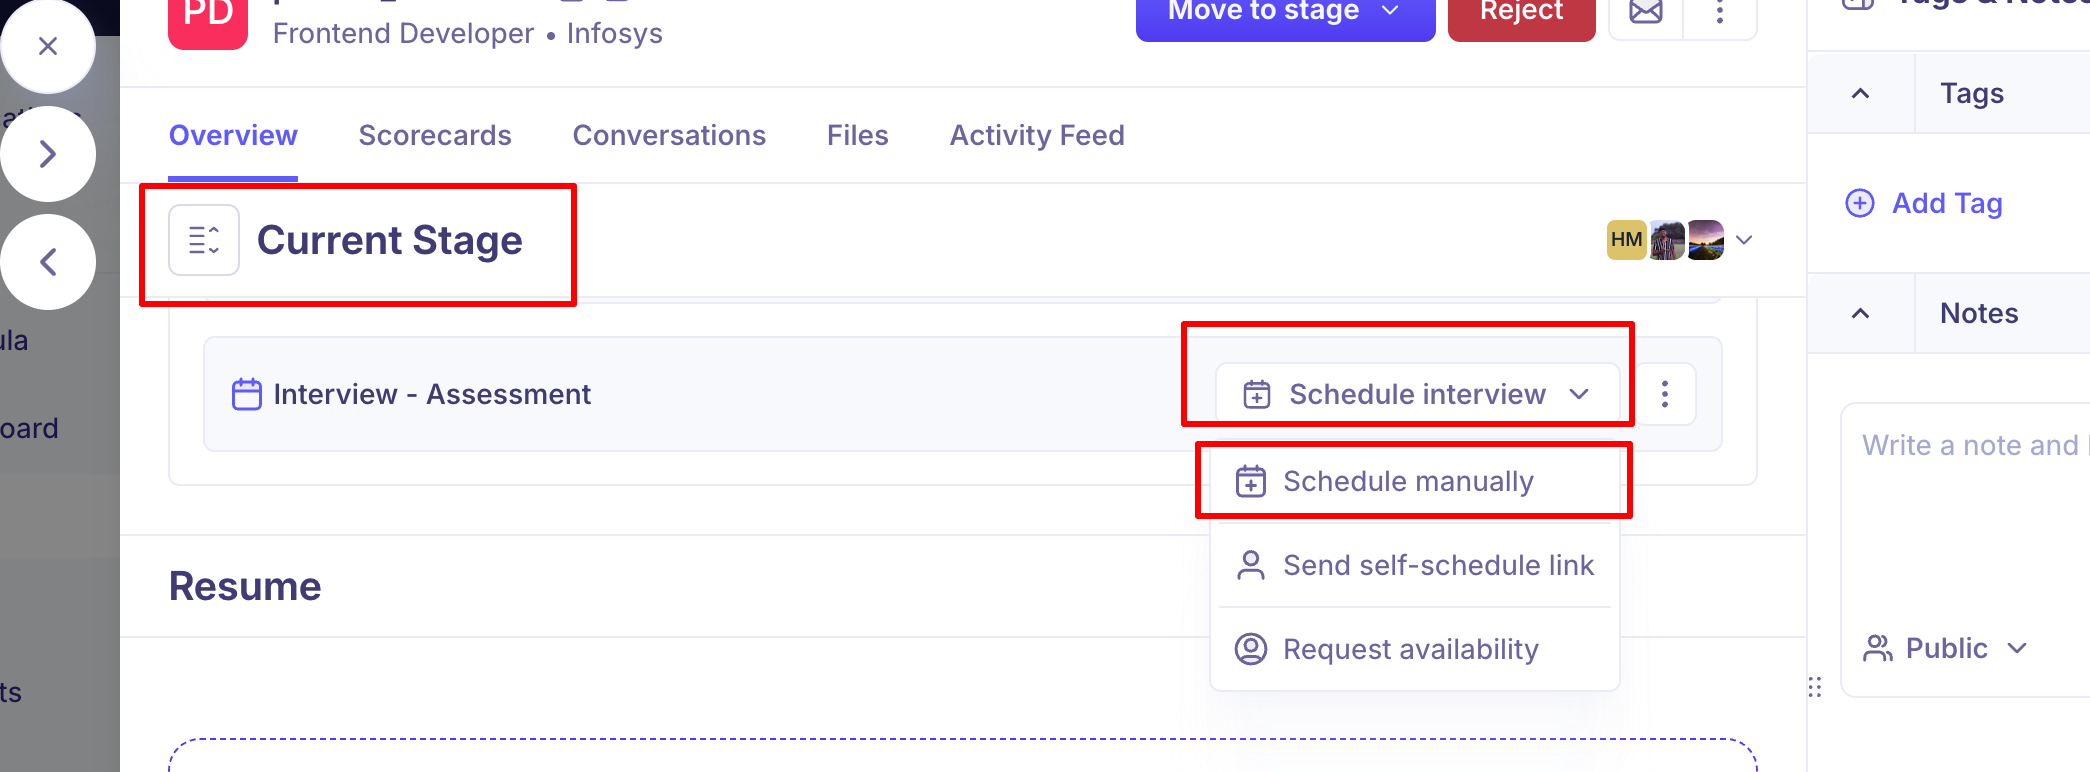
Where to find it: A candidate's Overview tab → the interview row → Schedule interview → Schedule manually
Two ways in
From an interview plan activity. Open the candidate, find the interview on the Current Stage card, and use Schedule interview → Schedule manually. The activity's settings arrive already filled in — see What the interview plan prefills.
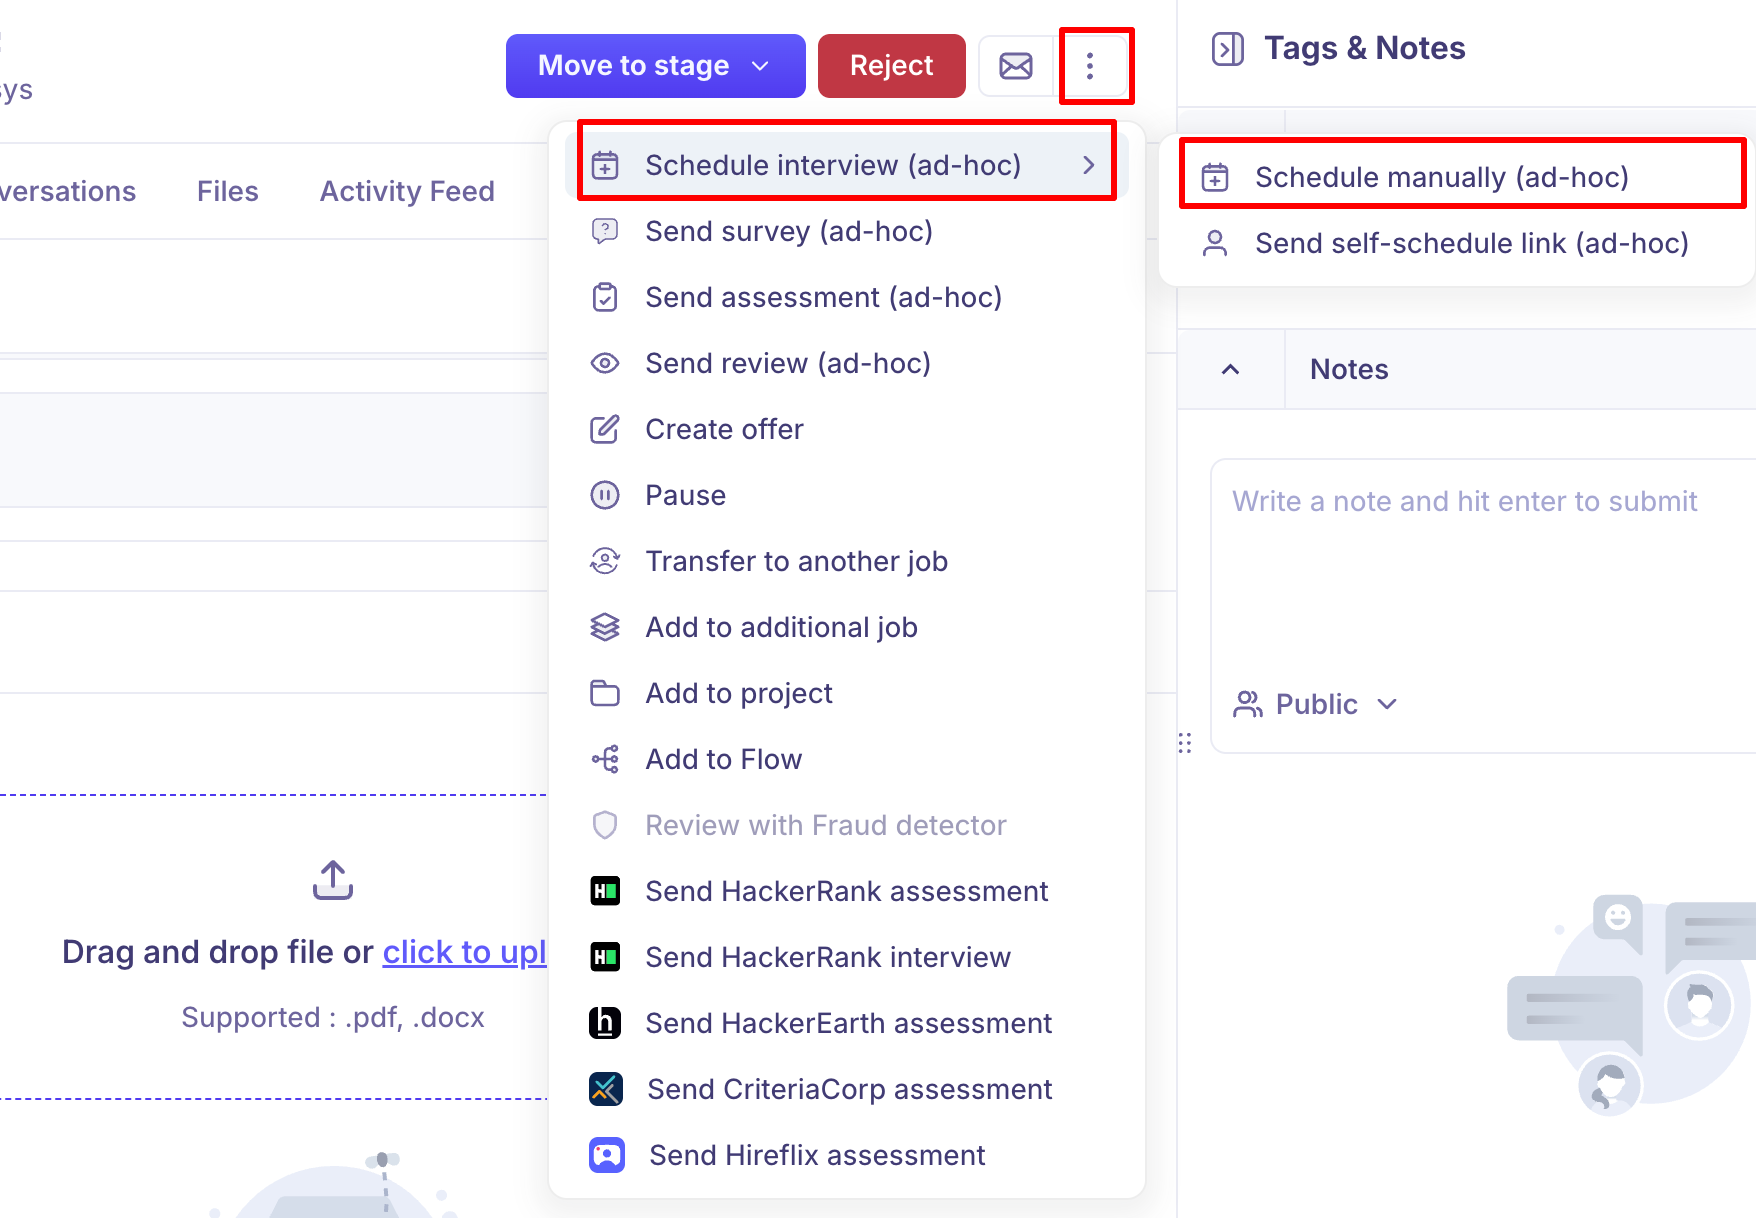
Ad-hoc, for an interview that is not in the plan. Click ⋮ (More) → Schedule interview (ad-hoc) → Schedule manually (ad-hoc). Nothing is prefilled, so you fill in every field yourself.
Both open the same three-step drawer: Details, Invites & emails, then Scorecard.
Step 1: Details
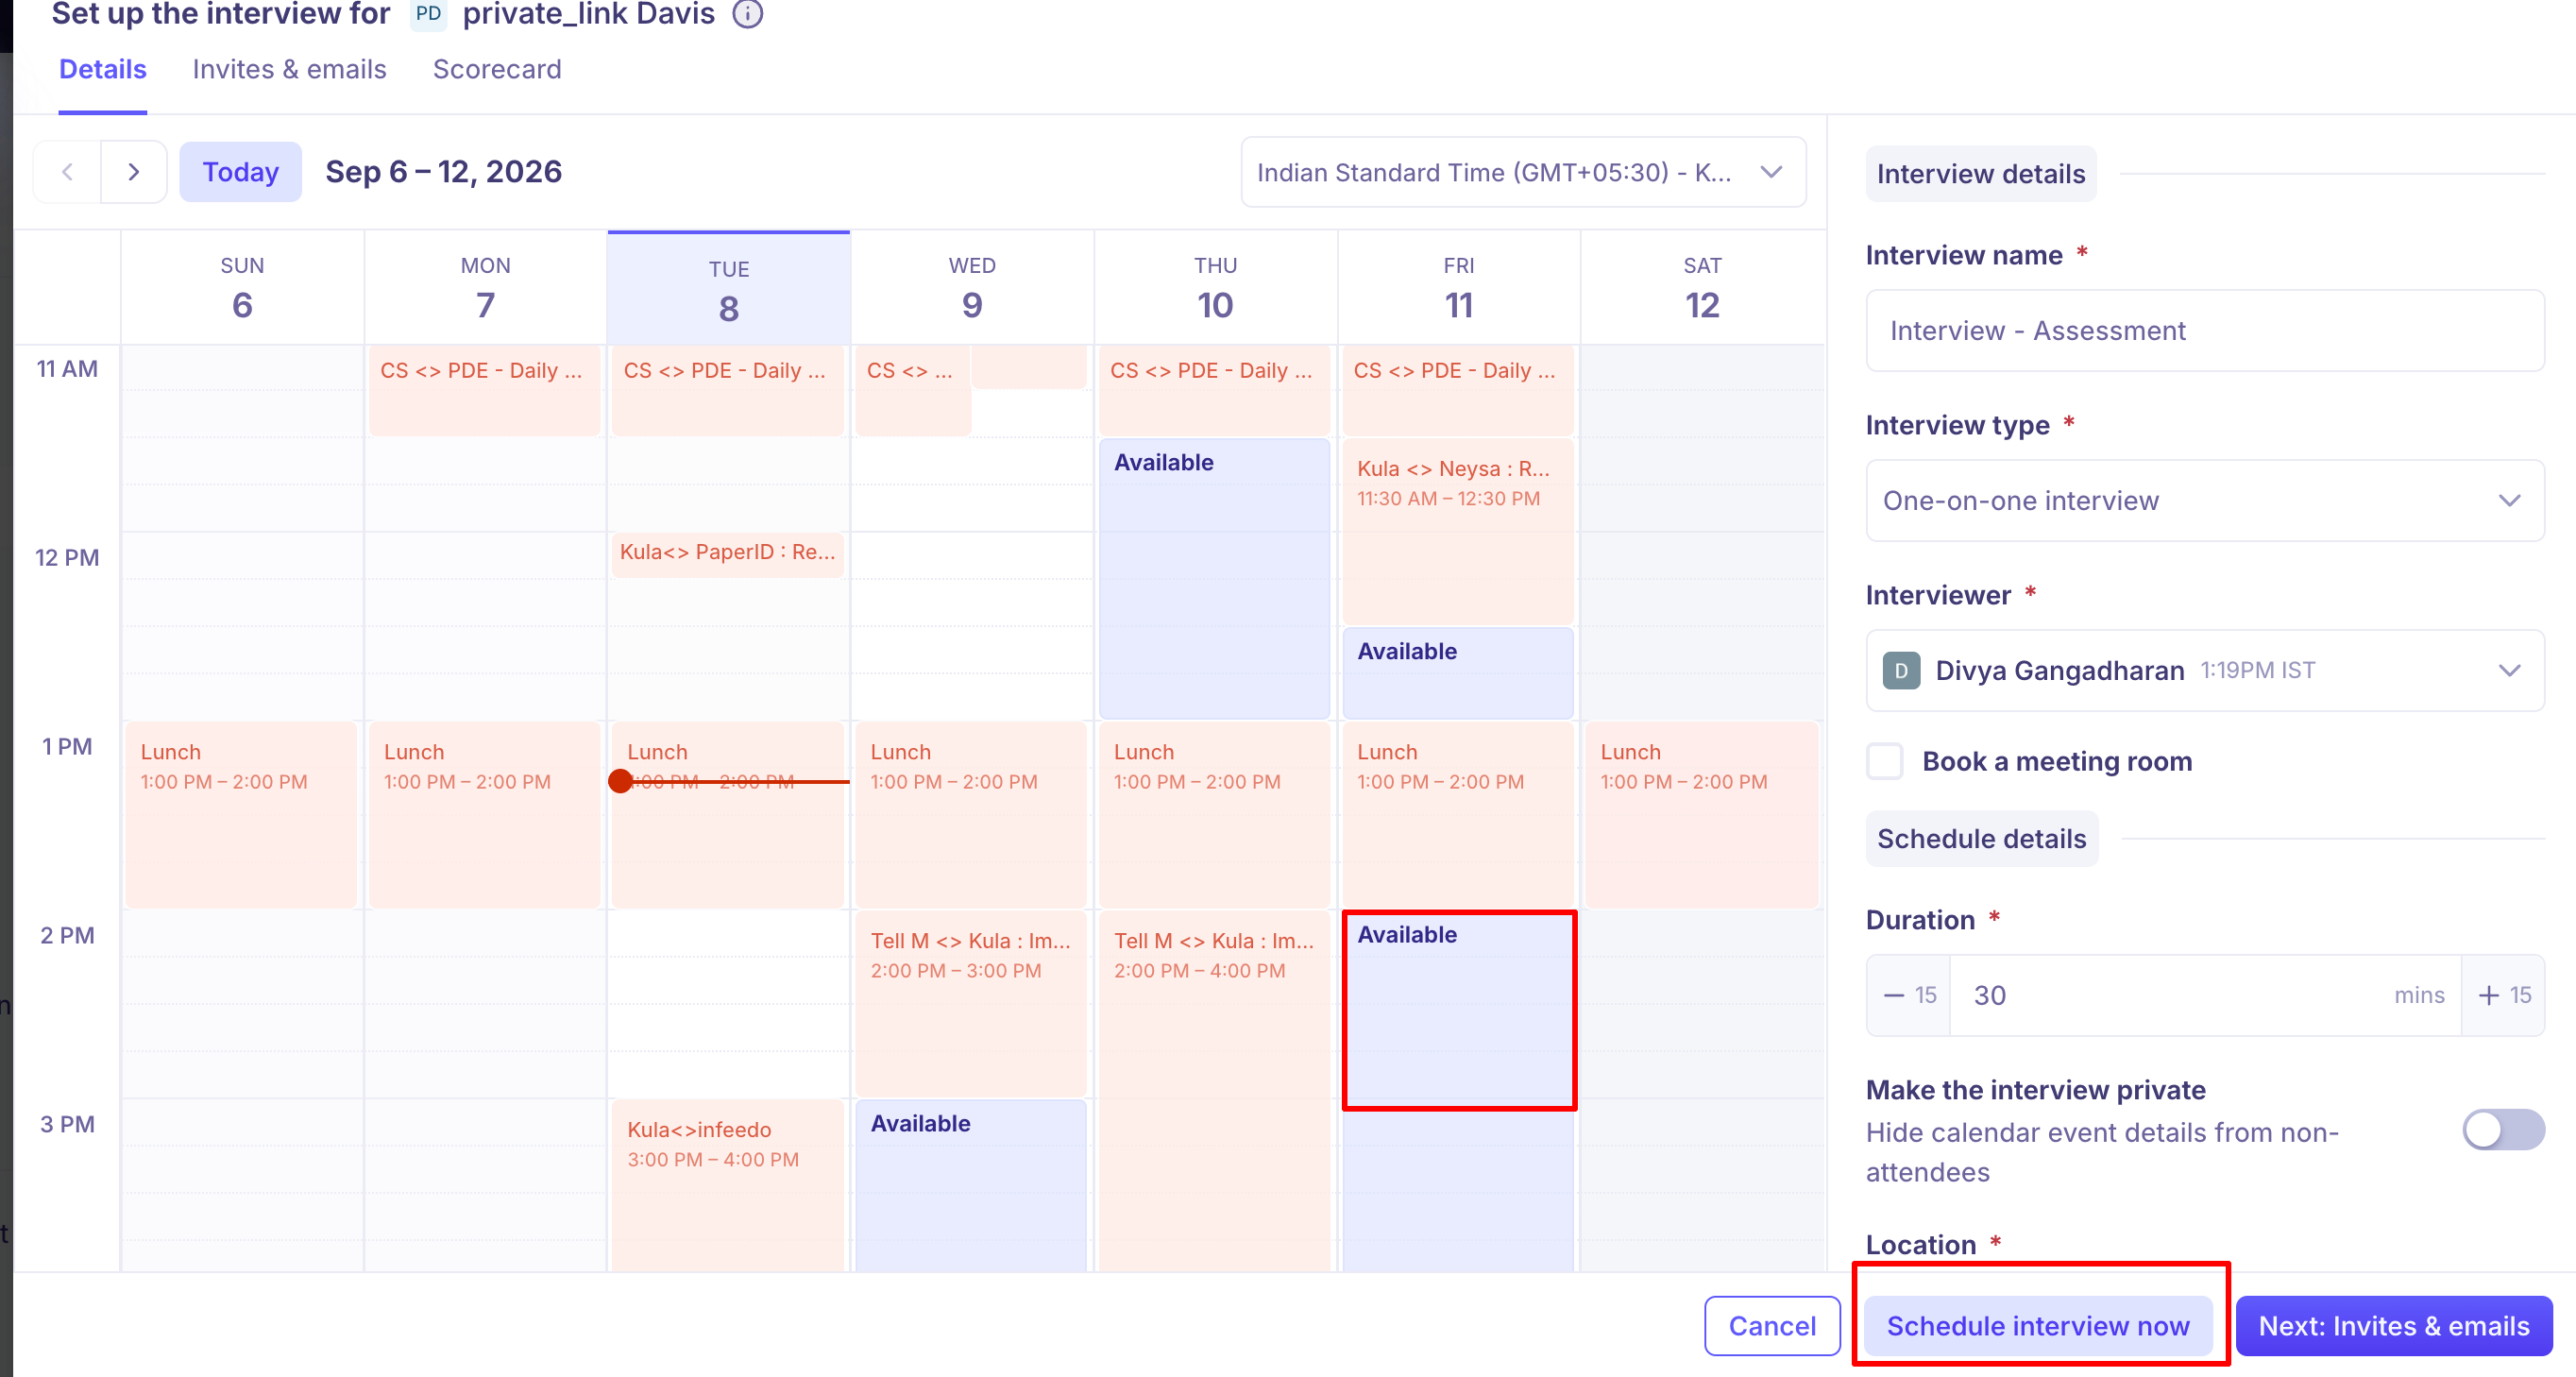
The left side is a week calendar; the right side is the interview's settings.
Set the Interview name, Interview type and Interviewer. From a plan activity these are already filled in.
Check the timezone at the top right of the calendar and change it if you are booking for another region.
Find a slot on the calendar — see how to read it below.
Click the slot you want. It appears as a time chip, such as
12:00 PM.Set the Duration. It moves in 15-minute steps.
Choose the Location — Zoom, Google Meet, Teams, Phone interview or Onsite.
Pick the Host if the location needs one.
Tick Book a meeting room if you need a room.
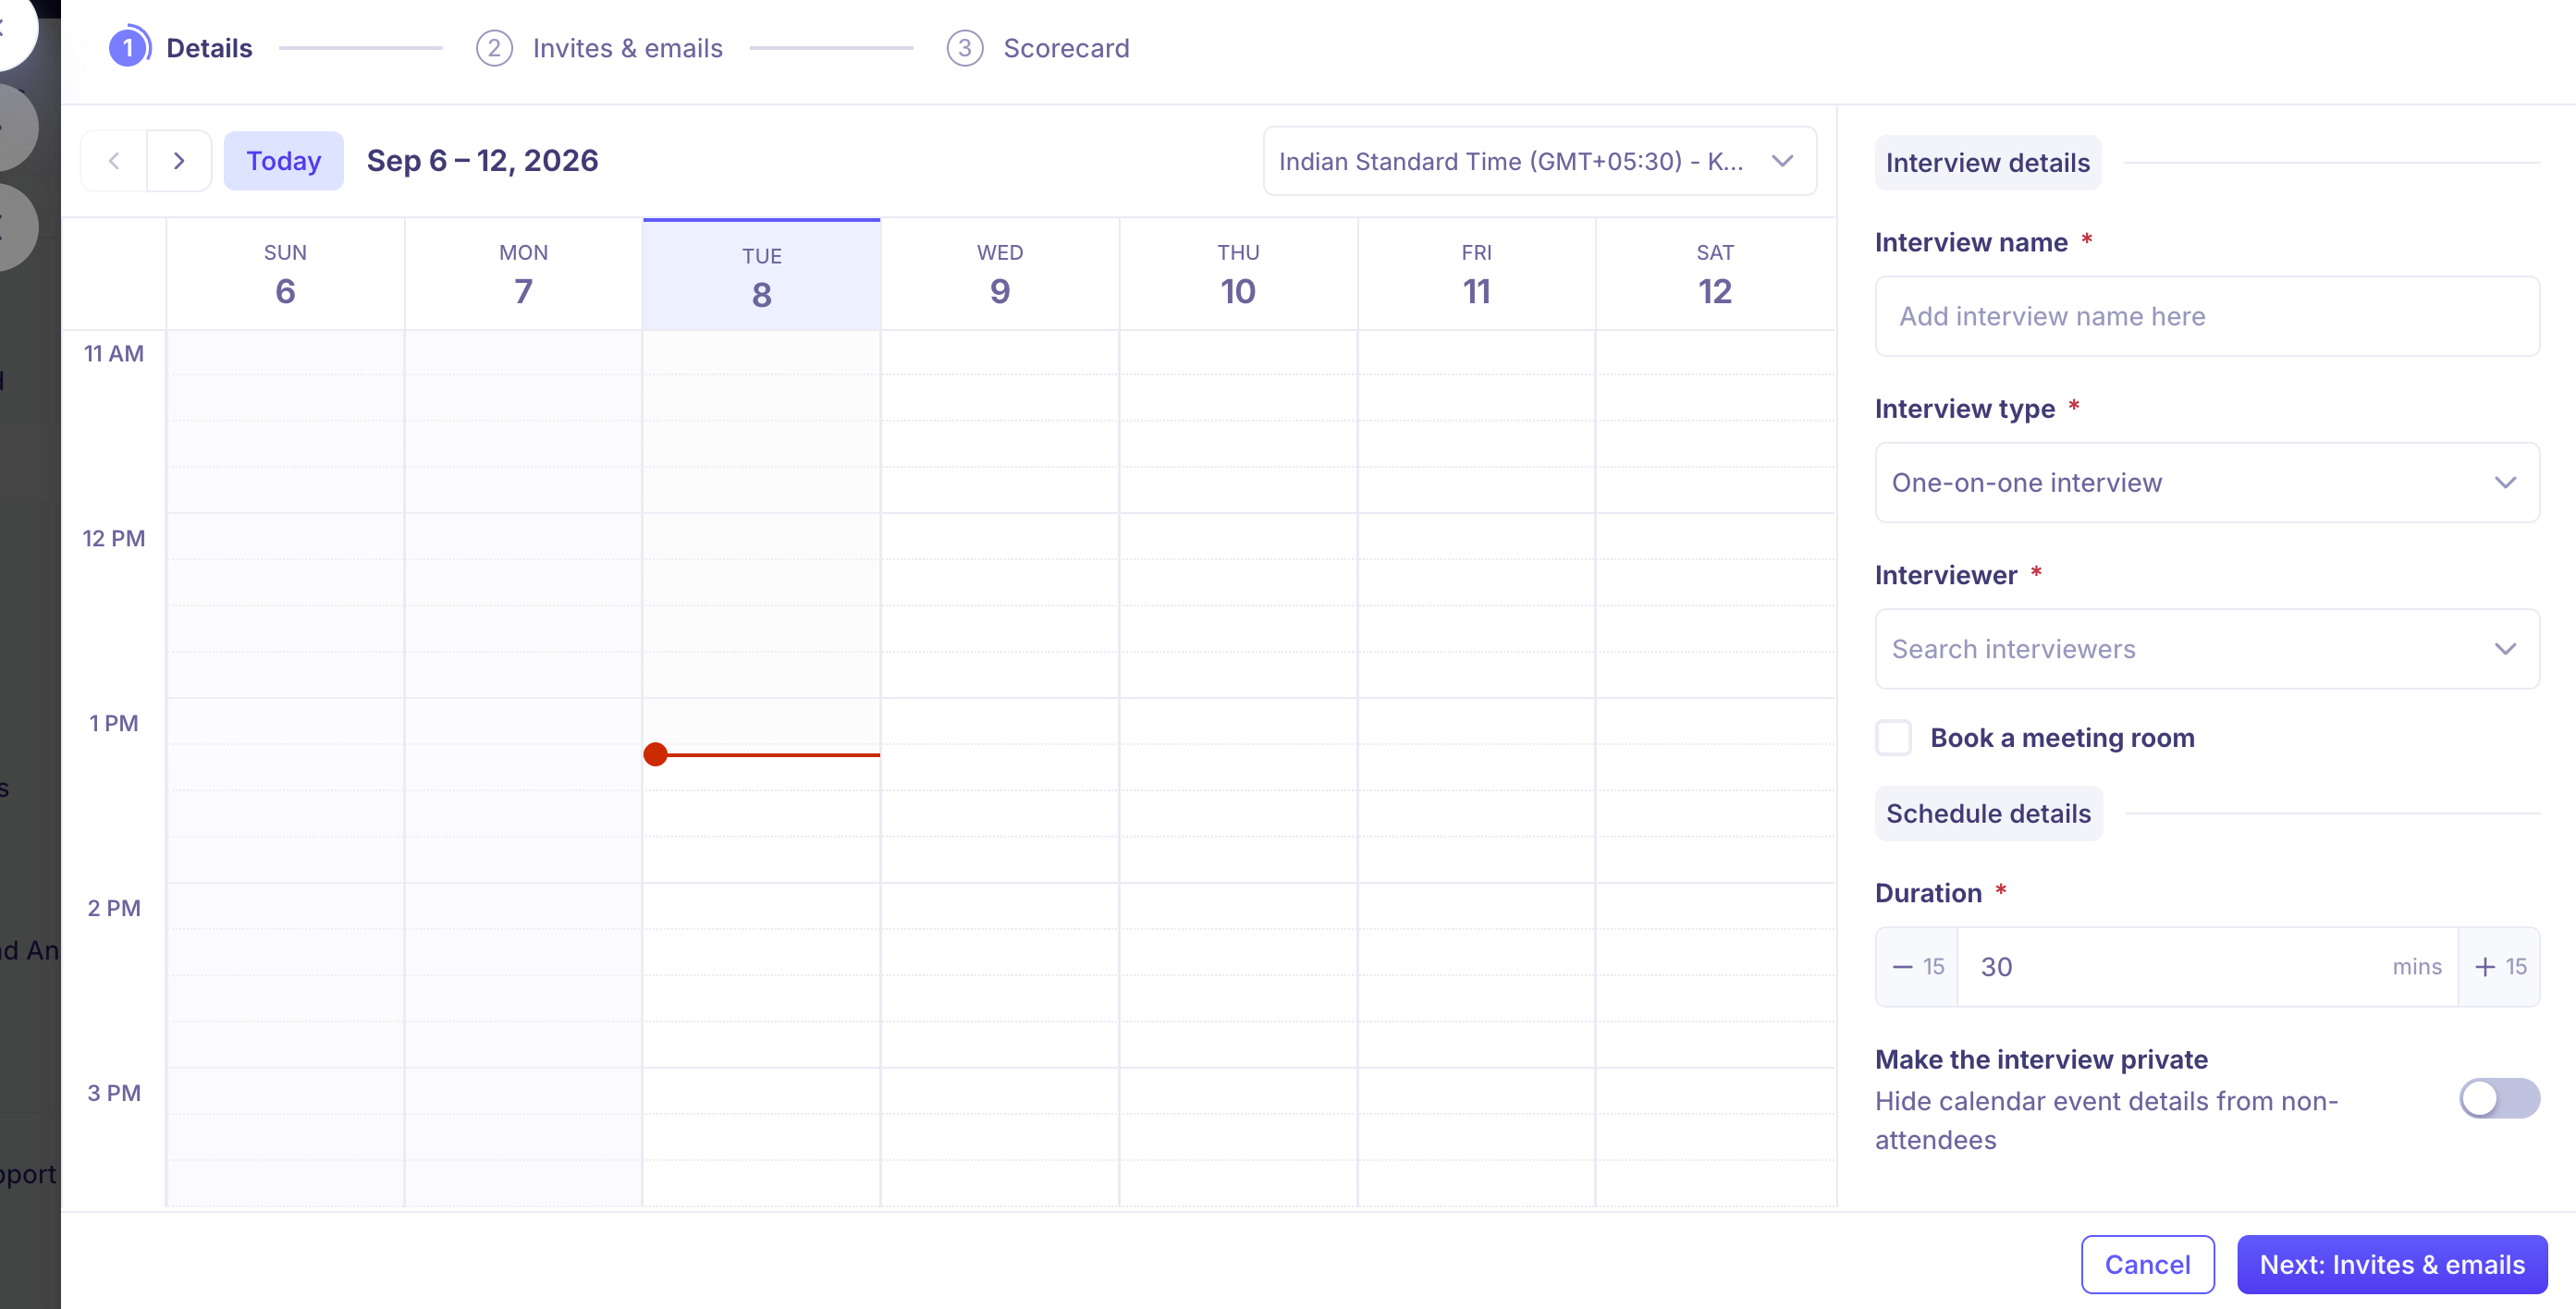
Two smaller controls sit in the same panel:
Make the interview private hides the calendar event's details from anyone not attending.
Enable AI notetaker decides whether Kula joins and takes notes. If your organisation has the notetaker switched on, this toggle is locked.
How to see when the interviewers are free
Pick the interviewer first. The calendar cannot show availability until it knows whose availability to show — with nobody selected you see an empty week. As soon as you add an interviewer, Kula pulls their calendar for the visible week and shades it.
Once they are selected, the calendar tells you four things:
What you see | What it means |
|---|---|
Busy blocks, colour-coded per person | Events already on that interviewer's calendar. Each interviewer gets their own colour, so on a panel you can tell who is blocking what. |
Available blocks | Time inside everyone's working hours. Anything outside is shaded grey. |
A pulsing highlight | A bookable gap. Hover it to preview a slot of your chosen duration; click to take it. |
Greyed-out time | The past, or time inside your organisation's minimum-notice window. Neither can be clicked. |
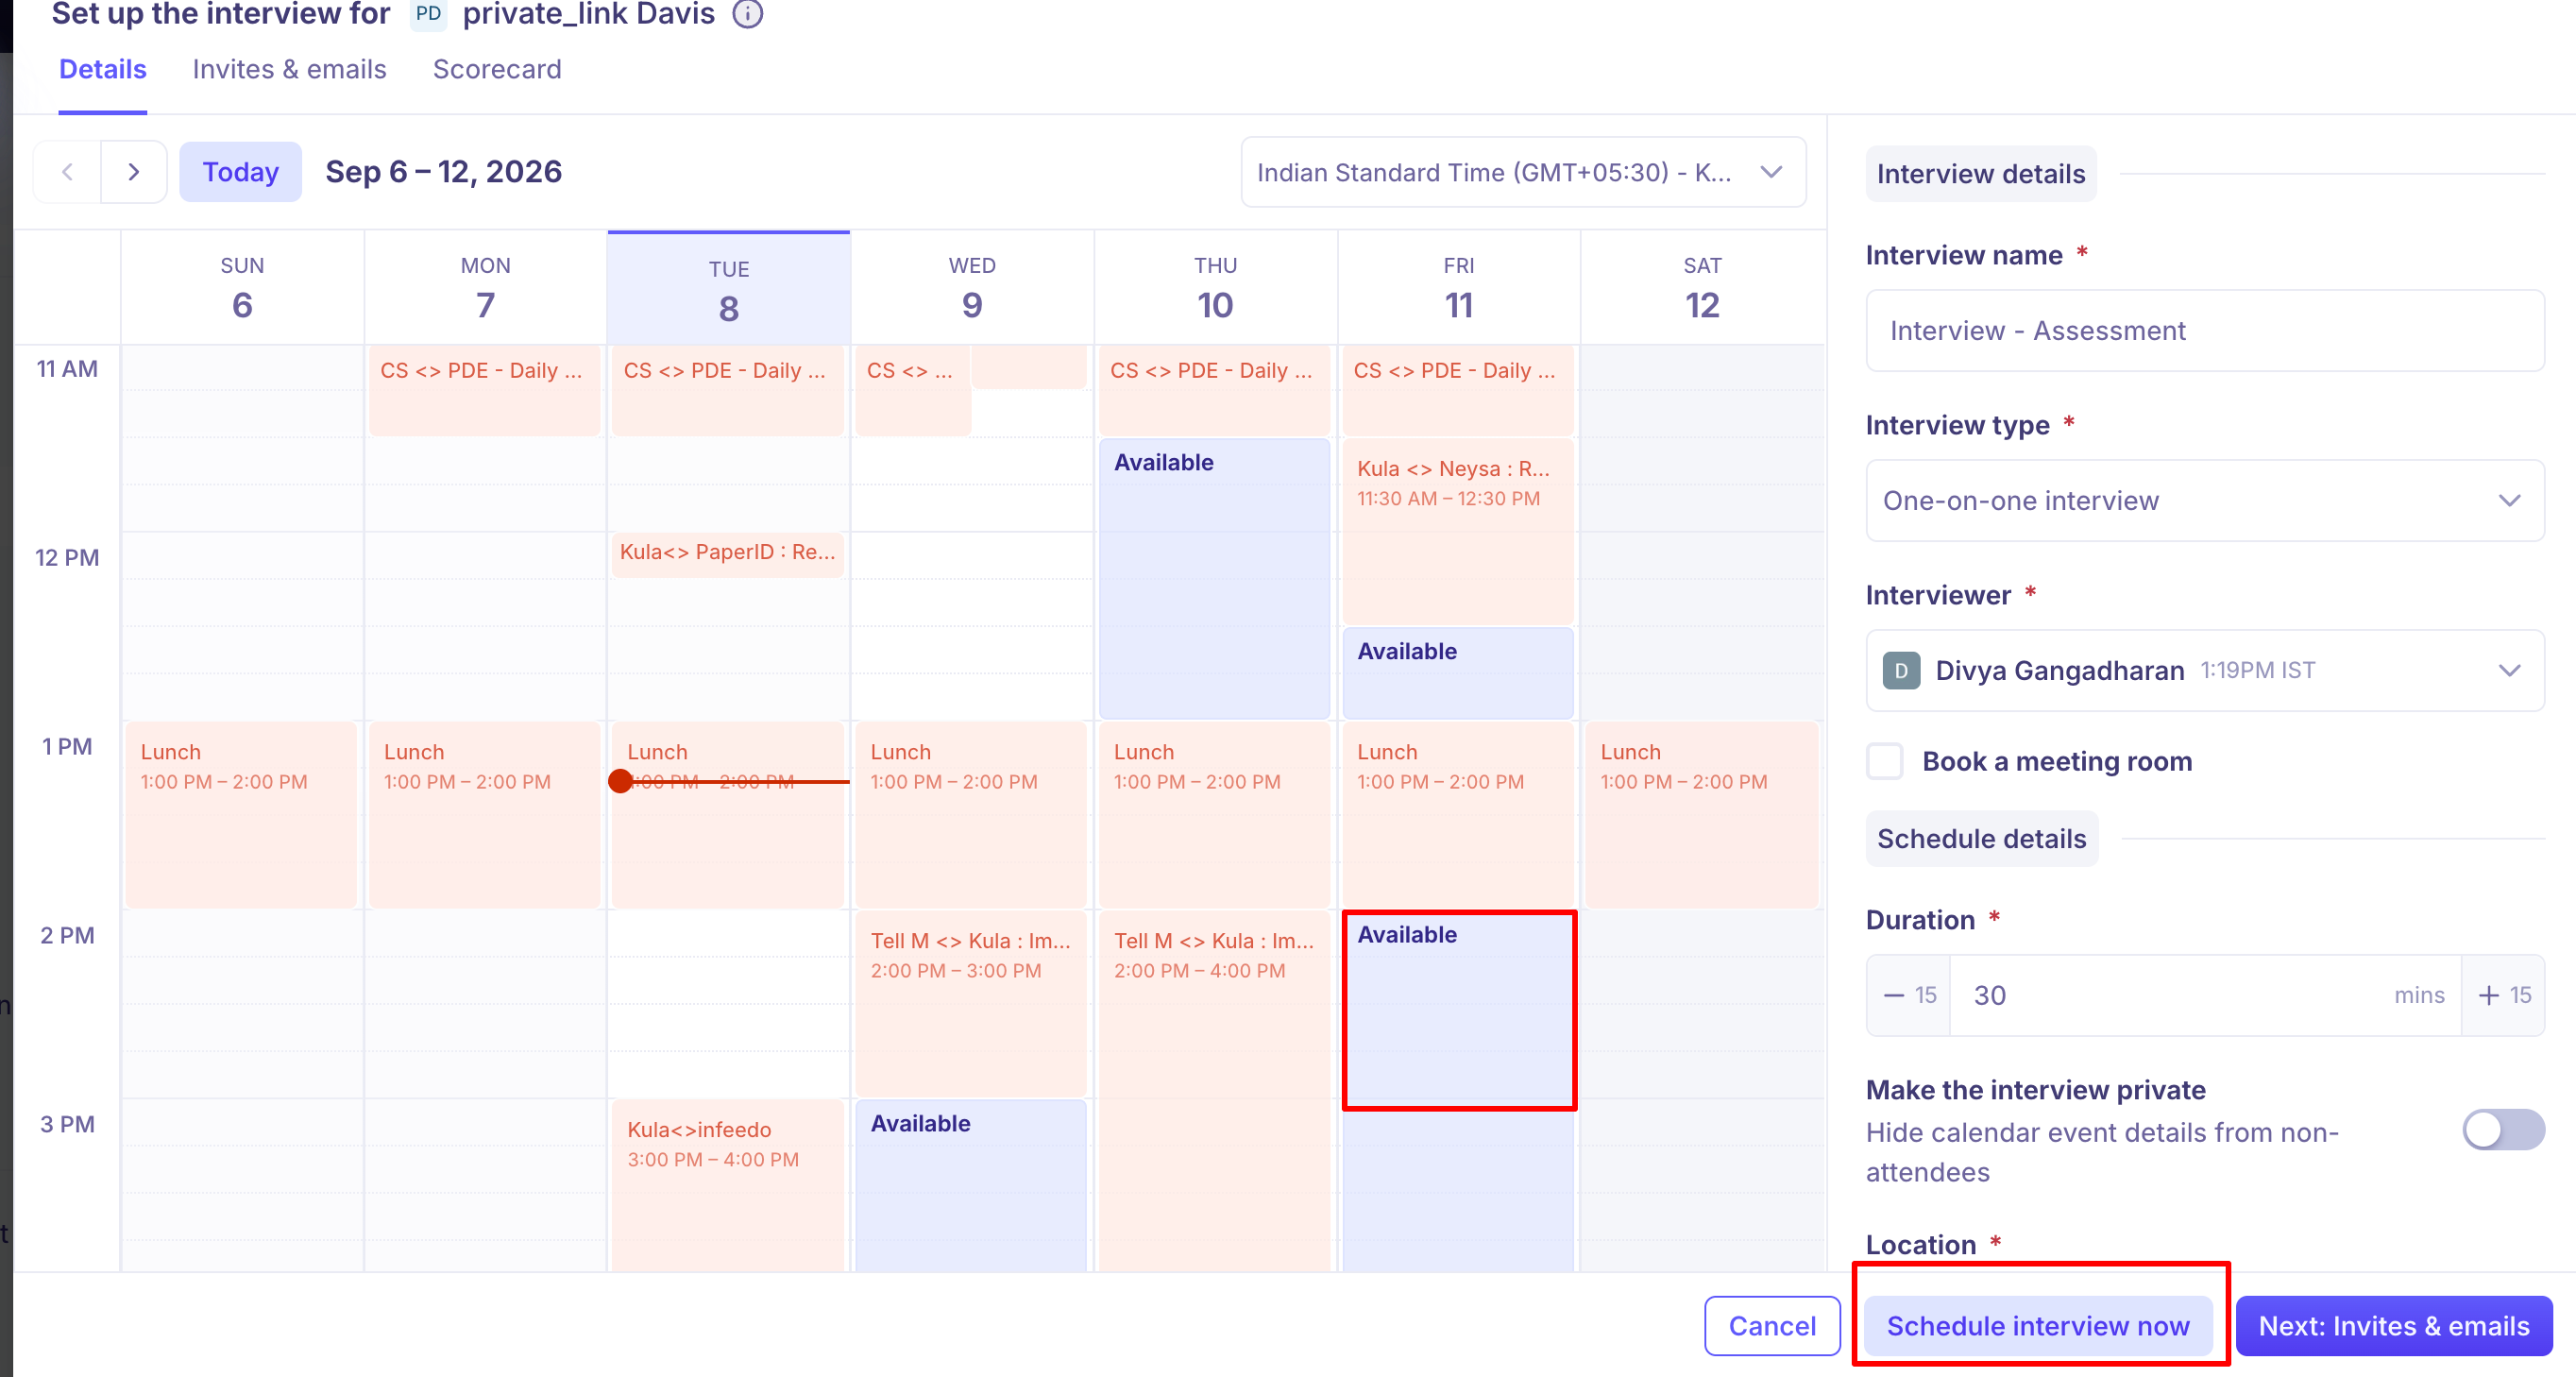
For a panel, "Available" means everyone at once. Kula shows the overlap of all the selected interviewers' free time, not the combination of it — so adding a fourth interviewer usually shrinks what is left. For a one-on-one it is that person's free time.
Each interviewer's name also shows their current local time, so you can avoid booking someone at an unreasonable hour.
Once you have picked a slot you can adjust it on the calendar rather than in the form — drag it to a new time, or drag its edge to make it longer or shorter. The Duration field updates as you do, and changing the duration field moves the slot's end in the same way.
If you tick Book a meeting room, each room's existing bookings appear too, in their own colour with a hatched pattern so you do not confuse a busy room with a busy person.
Full-day events do not block the day. A full-day event such as "Working from Home" shows as a chip on the interviewer's row instead of blacking out their whole day, so the bookable time around it is still selectable. An interviewer who is genuinely unavailable is greyed out instead.
If everything is prefilled from the plan and you are happy with the slot, click Schedule interview now to book without going through the remaining steps. Otherwise click Next: Invites & emails.
Step 2: Invites & emails
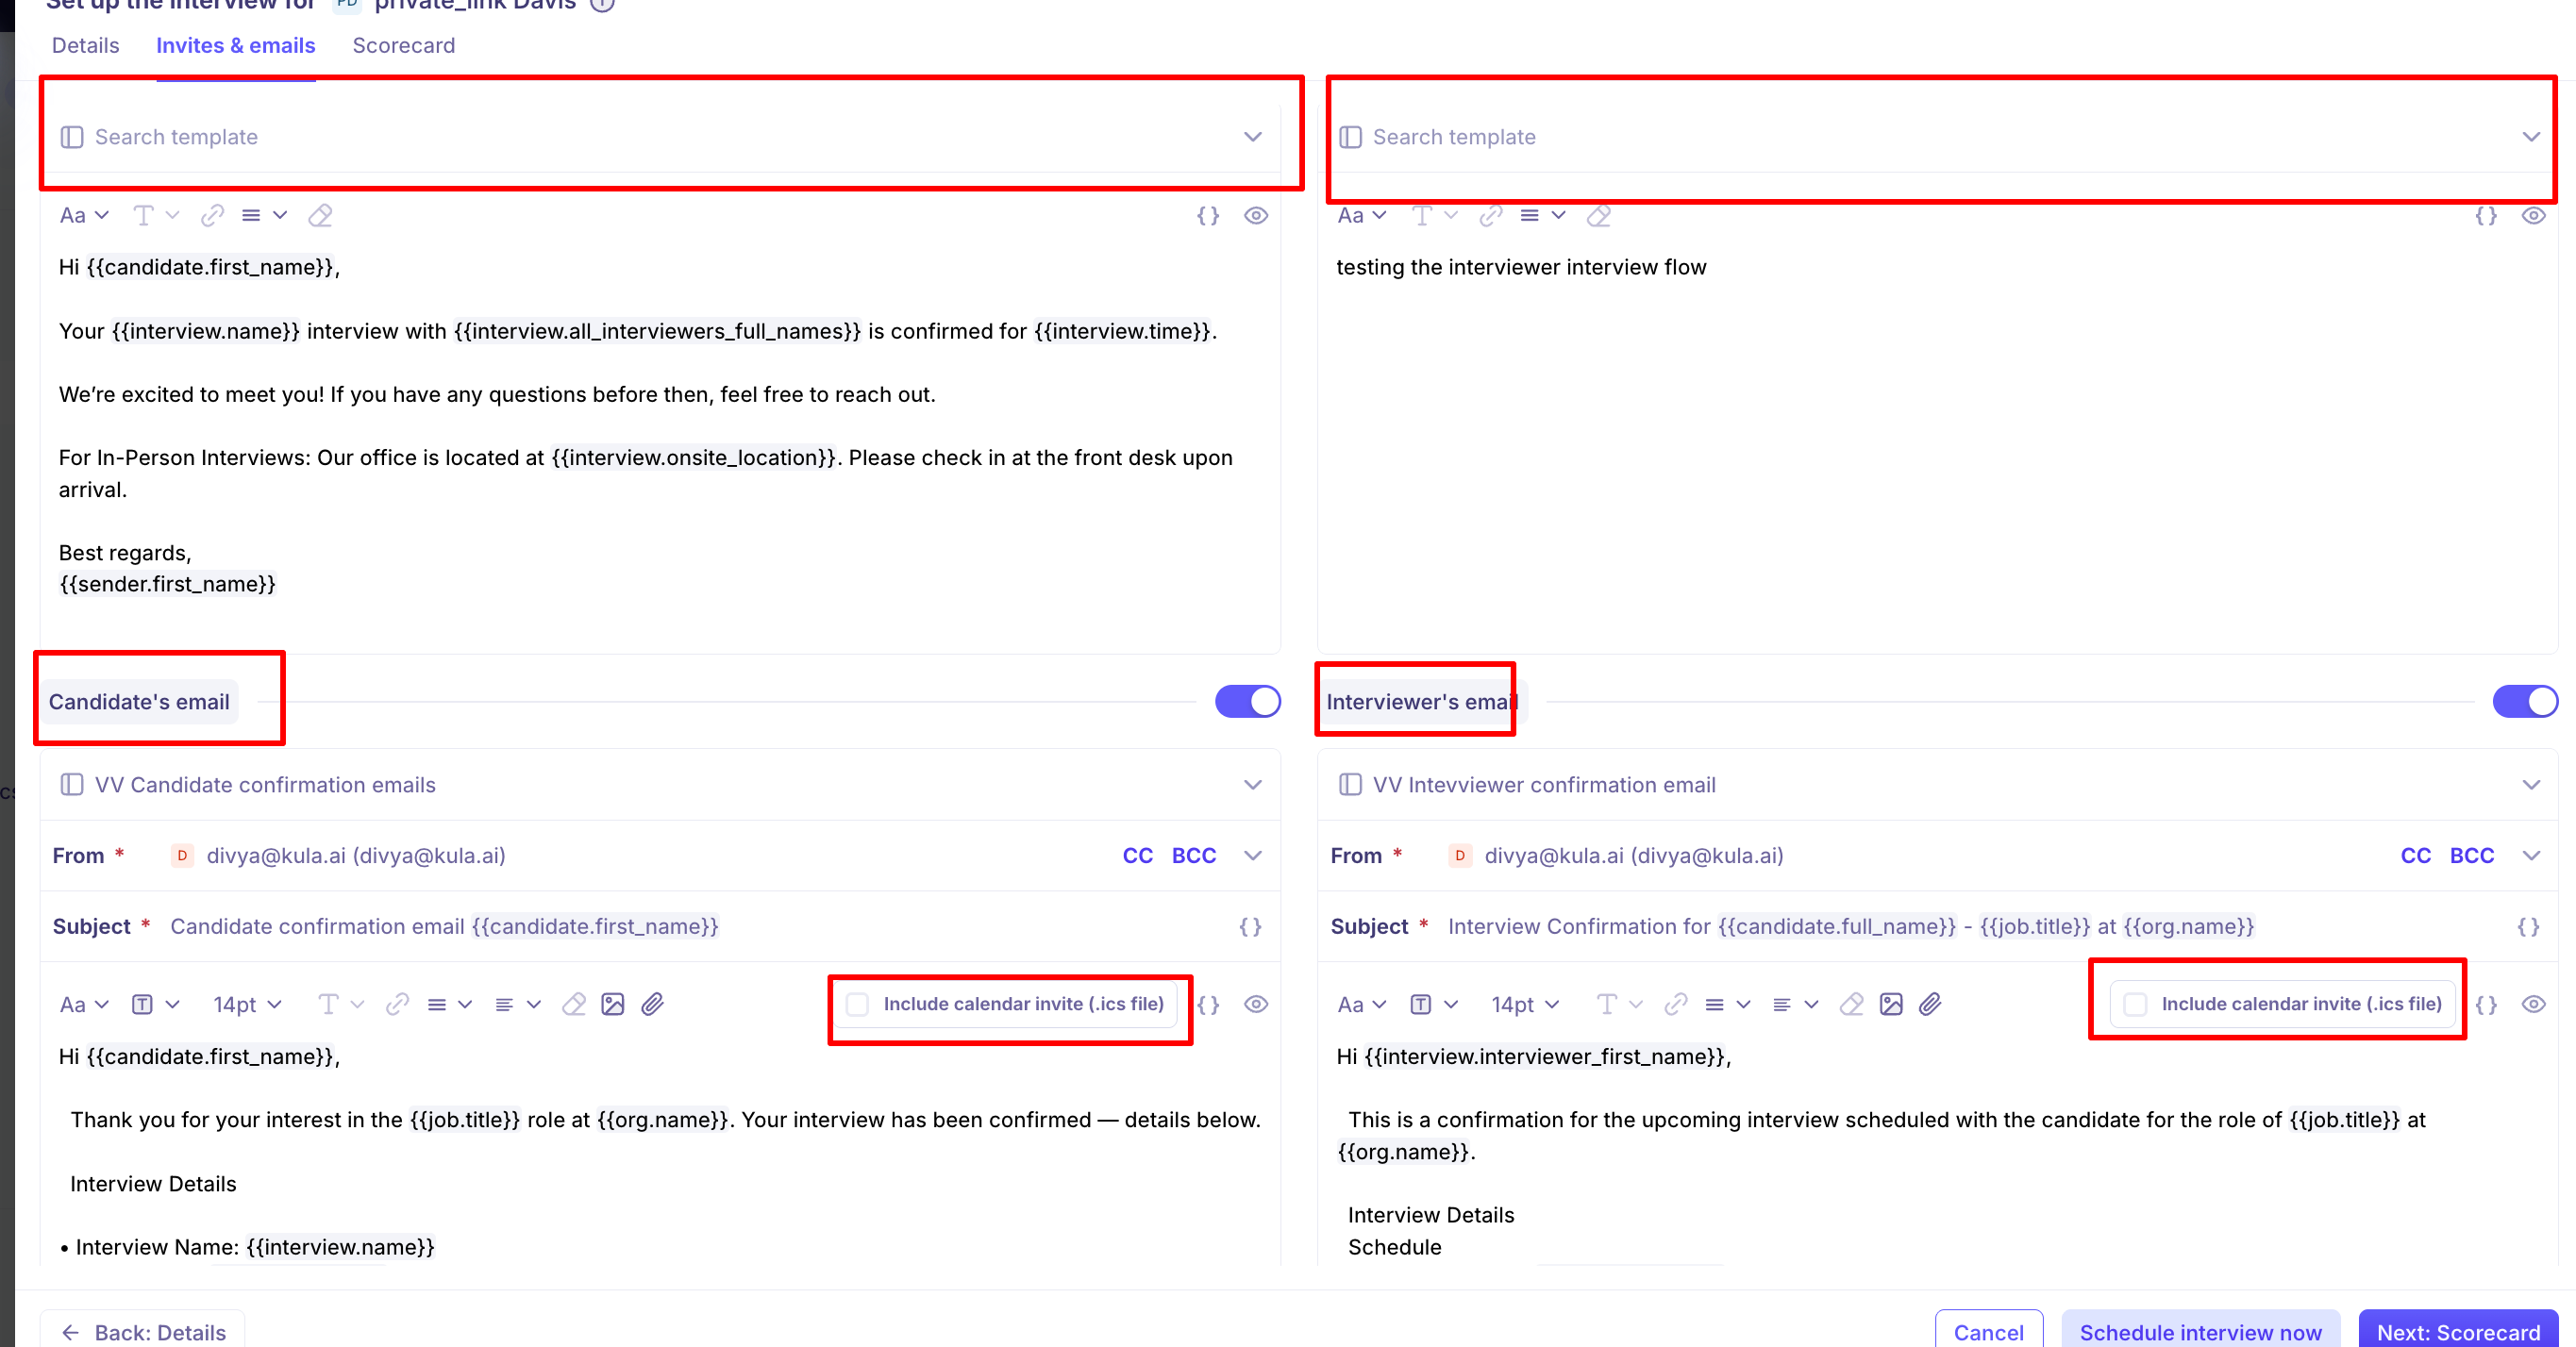
This step holds four separate messages. Two are calendar invites and two are ordinary emails, and the difference matters.
Invites and emails are not the same thing
Calendar invite | ||
|---|---|---|
What it is | The calendar event itself. What you write becomes the event's description. | A normal email, sent alongside the invite. |
Is it optional? | No. Scheduling the interview sends it. | Yes. Both are off by default — switch them on if you want them. |
Where it lands | The recipient's calendar. | The recipient's inbox. |
Formatting | Plain. Calendar apps strip fonts and styling, so those controls are switched off for invite templates. | Full formatting is kept. |
Attachment | — | Can carry an |
The practical reason to switch an email on: a calendar invite is easy to skim past, and its body gets flattened by whatever calendar app the person uses. If you need to say something that must actually be read — joining instructions, what to prepare, who they are meeting — put it in the email.
The four messages
Message | Who gets it | Sent by default? |
|---|---|---|
Candidate's calendar invite | The candidate | Yes |
Interviewer's calendar invite | The interviewer | Yes |
Candidate's email | The candidate | No |
Interviewer's email | The interviewer | No |
Each one can be edited here for this interview only, which does not change the underlying template. Templates use variables such as {{candidate.first_name}} and {{interview.time}} that fill in when the message sends — use the preview control to check how it will read.
Which template category each dropdown reads
Each of the four dropdowns only lists templates from one category. A template filed in the wrong category will not appear, however well it is written.
This dropdown | Lists templates in this category |
|---|---|
Candidate's calendar invite | Candidate calendar invites |
Interviewer's calendar invite | Interviewer calendar invites |
Candidate's email | Candidate confirmation emails |
Interviewer's email | Interviewer confirmation emails |
The two self-schedule routes read different categories again: a booking link uses Self-schedule email templates, and an availability request uses Availability email templates.
If a dropdown is empty, the category is almost always the reason. Create or re-file the template under the matching category in Settings → Organisation → Templates. See Using email templates.
Click Next: Scorecard.
Step 3: Scorecard
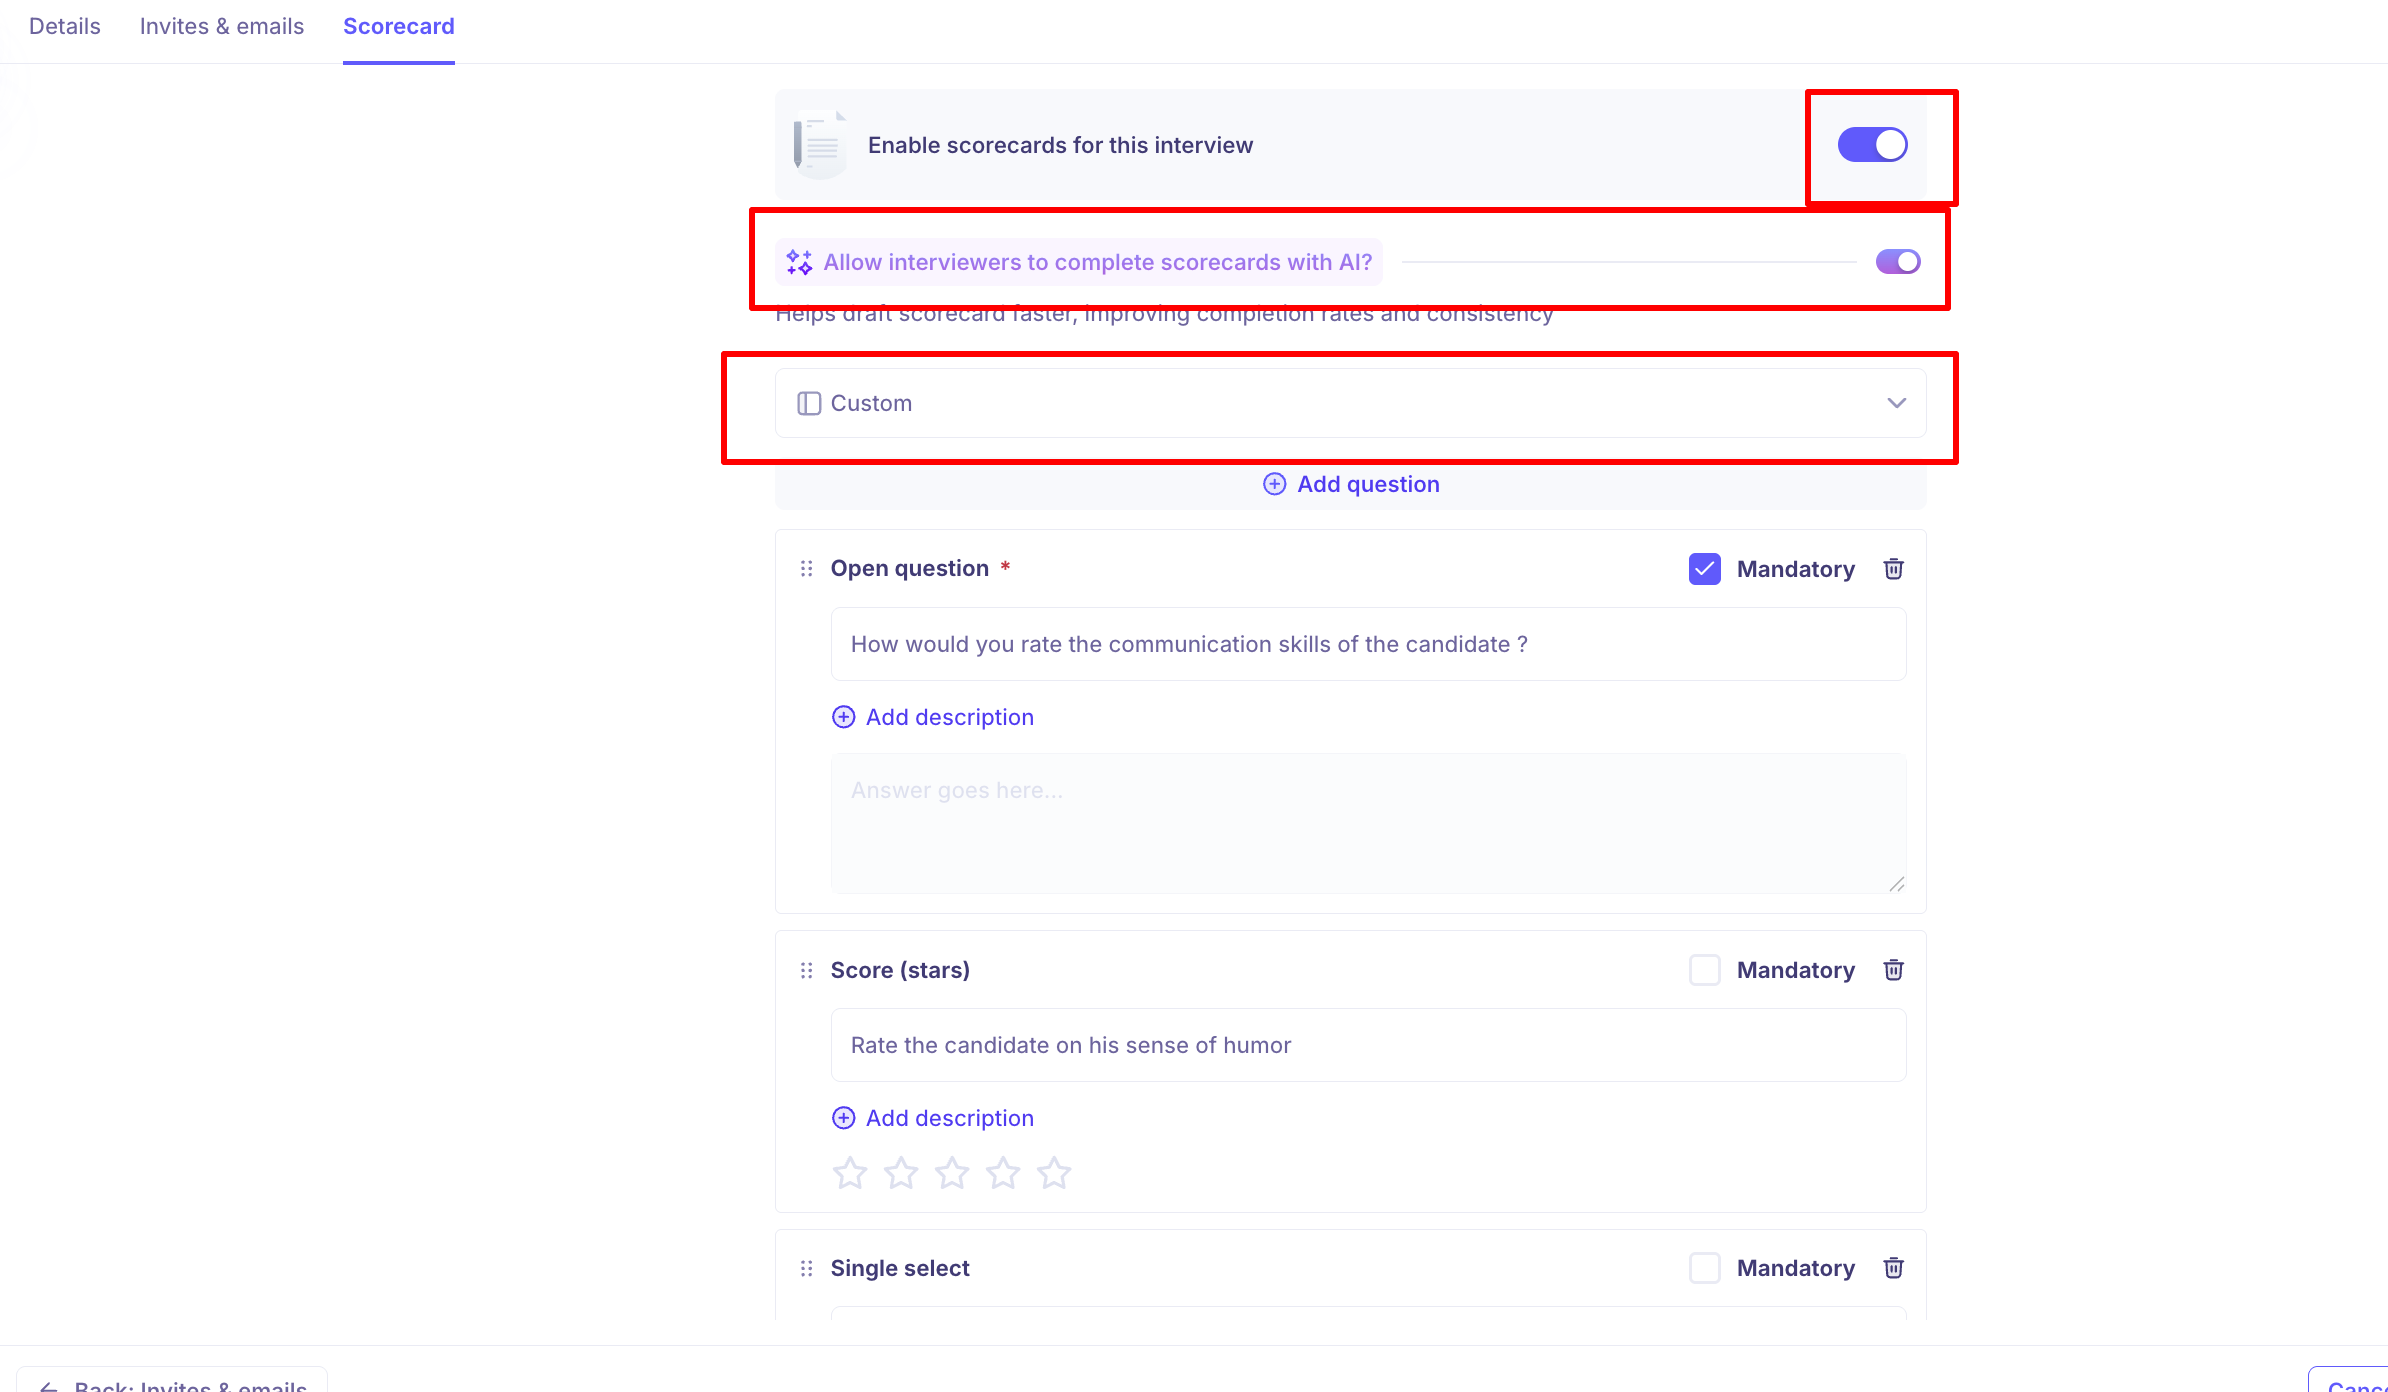
Leave Enable scorecards for this interview on if the interviewer should fill one in.
Pick a Scorecard Template, or use the one the plan attached. See Creating scorecard templates.
Add questions with Add question if this interview needs something extra.
Decide whether Feedback is mandatory.
Click Schedule interview.
There is also Allow interviewers to complete scorecards with AI, which lets interviewers draft their scorecard from the interview rather than writing it from scratch.
Good to know
The candidate and interviewer emails are off by default. Only the two calendar invites go out unless you switch the emails on in Invites & emails.
Edits in the drawer apply to this interview only. Changing a message here doesn't change the underlying template, and changing a prefilled setting doesn't change the interview plan.
Pick the interviewer before looking for a slot. The calendar can't show availability until it knows whose calendar to read.
The candidate needs an email address. Schedule interview (ad-hoc) is greyed out for a candidate with no email address on their profile.
FAQ
I changed the interviewer on a scheduled interview. Did the candidate get an email about it? No. An interviewer swap notifies the interviewers only — the candidate hears nothing. Kula shows exactly who will be notified in a confirmation popup before you save any change.
Can I edit an interview or its scorecard without resending invites to everyone? Yes. Kula works out who a change actually affects, and an internal-only edit such as adjusting the scorecard sends nothing to anyone.
I created a template, but it doesn't show up in the dropdown when I schedule. Where has it gone? It is almost certainly filed under the wrong category. Each dropdown reads one category only — a candidate calendar invite reads Candidate calendar invites, the candidate's email reads Candidate confirmation emails, and so on. Re-file it under the matching category, and it appears.
Need help?
If you have questions or need assistance, reach out to us at support@kula.ai or use the in-app chat.