Running a background check
Last updated: September 14, 2026
Kula integrates with four background check providers — Checkr, Certn, Zinc, and SpringVerify. Once one is connected (Settings → Integrations), you send a check the same way for all of them: from the candidate's application, open the actions menu and choose Send [Provider] assessment. What happens next differs by provider — Checkr uses its own embedded form, while Certn, Zinc, and SpringVerify share a package-picker built into Kula.
Who can do this: Any user with access to the candidate's application and the relevant provider connected on the account.
Where to find it: On the candidate's application, open the actions menu → Send Checkr assessment / Send Certn assessment / Send Zinc assessment / Send SpringVerify assessment (only the ones your account has connected will appear).
Running a background check with SpringVerify
Send a candidate for a background check through SpringVerify, right from their profile in Kula. This article covers connecting SpringVerify and sending a check.
Before you start
SpringVerify needs to be turned on for your organisation before it appears as an option — ask your Kula contact if you don't see it under Integrations.
Connect SpringVerify
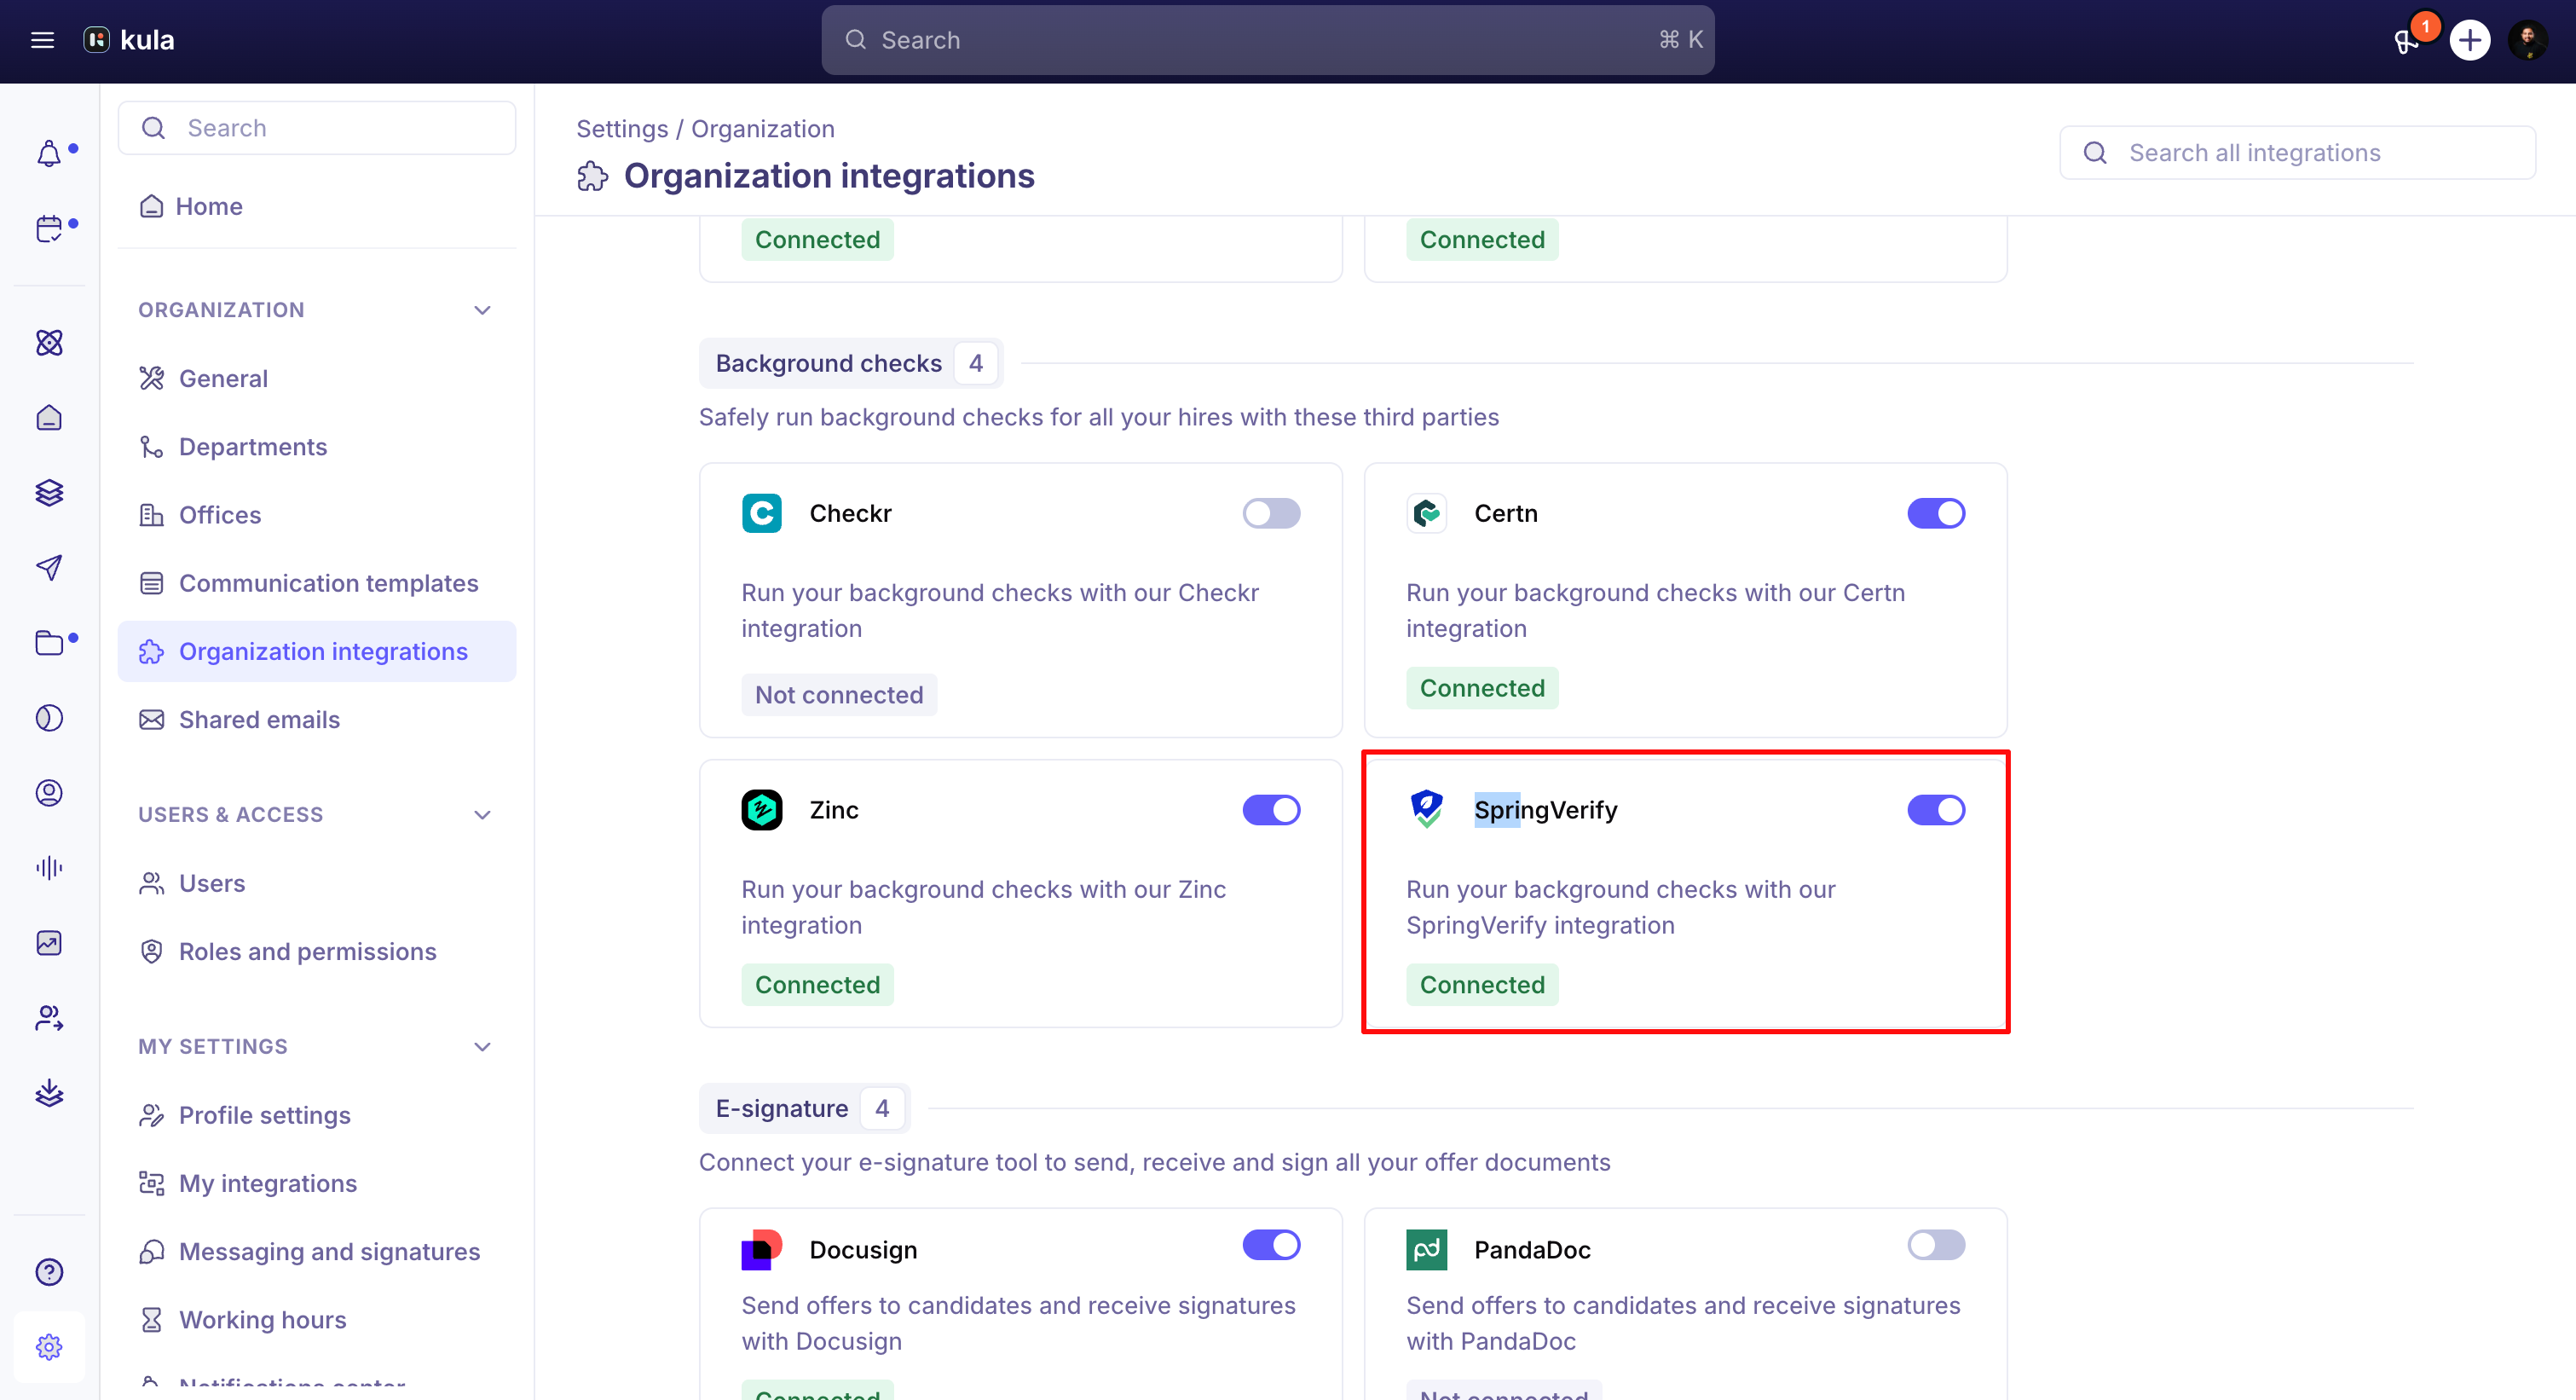
Go to Settings → Organisation → Integrations → Background checks → SpringVerify.
Enter your API Token from your SpringVerify account settings — note this is a token, not the API key format some other integrations use.
Save.
Send a SpringVerify assessment
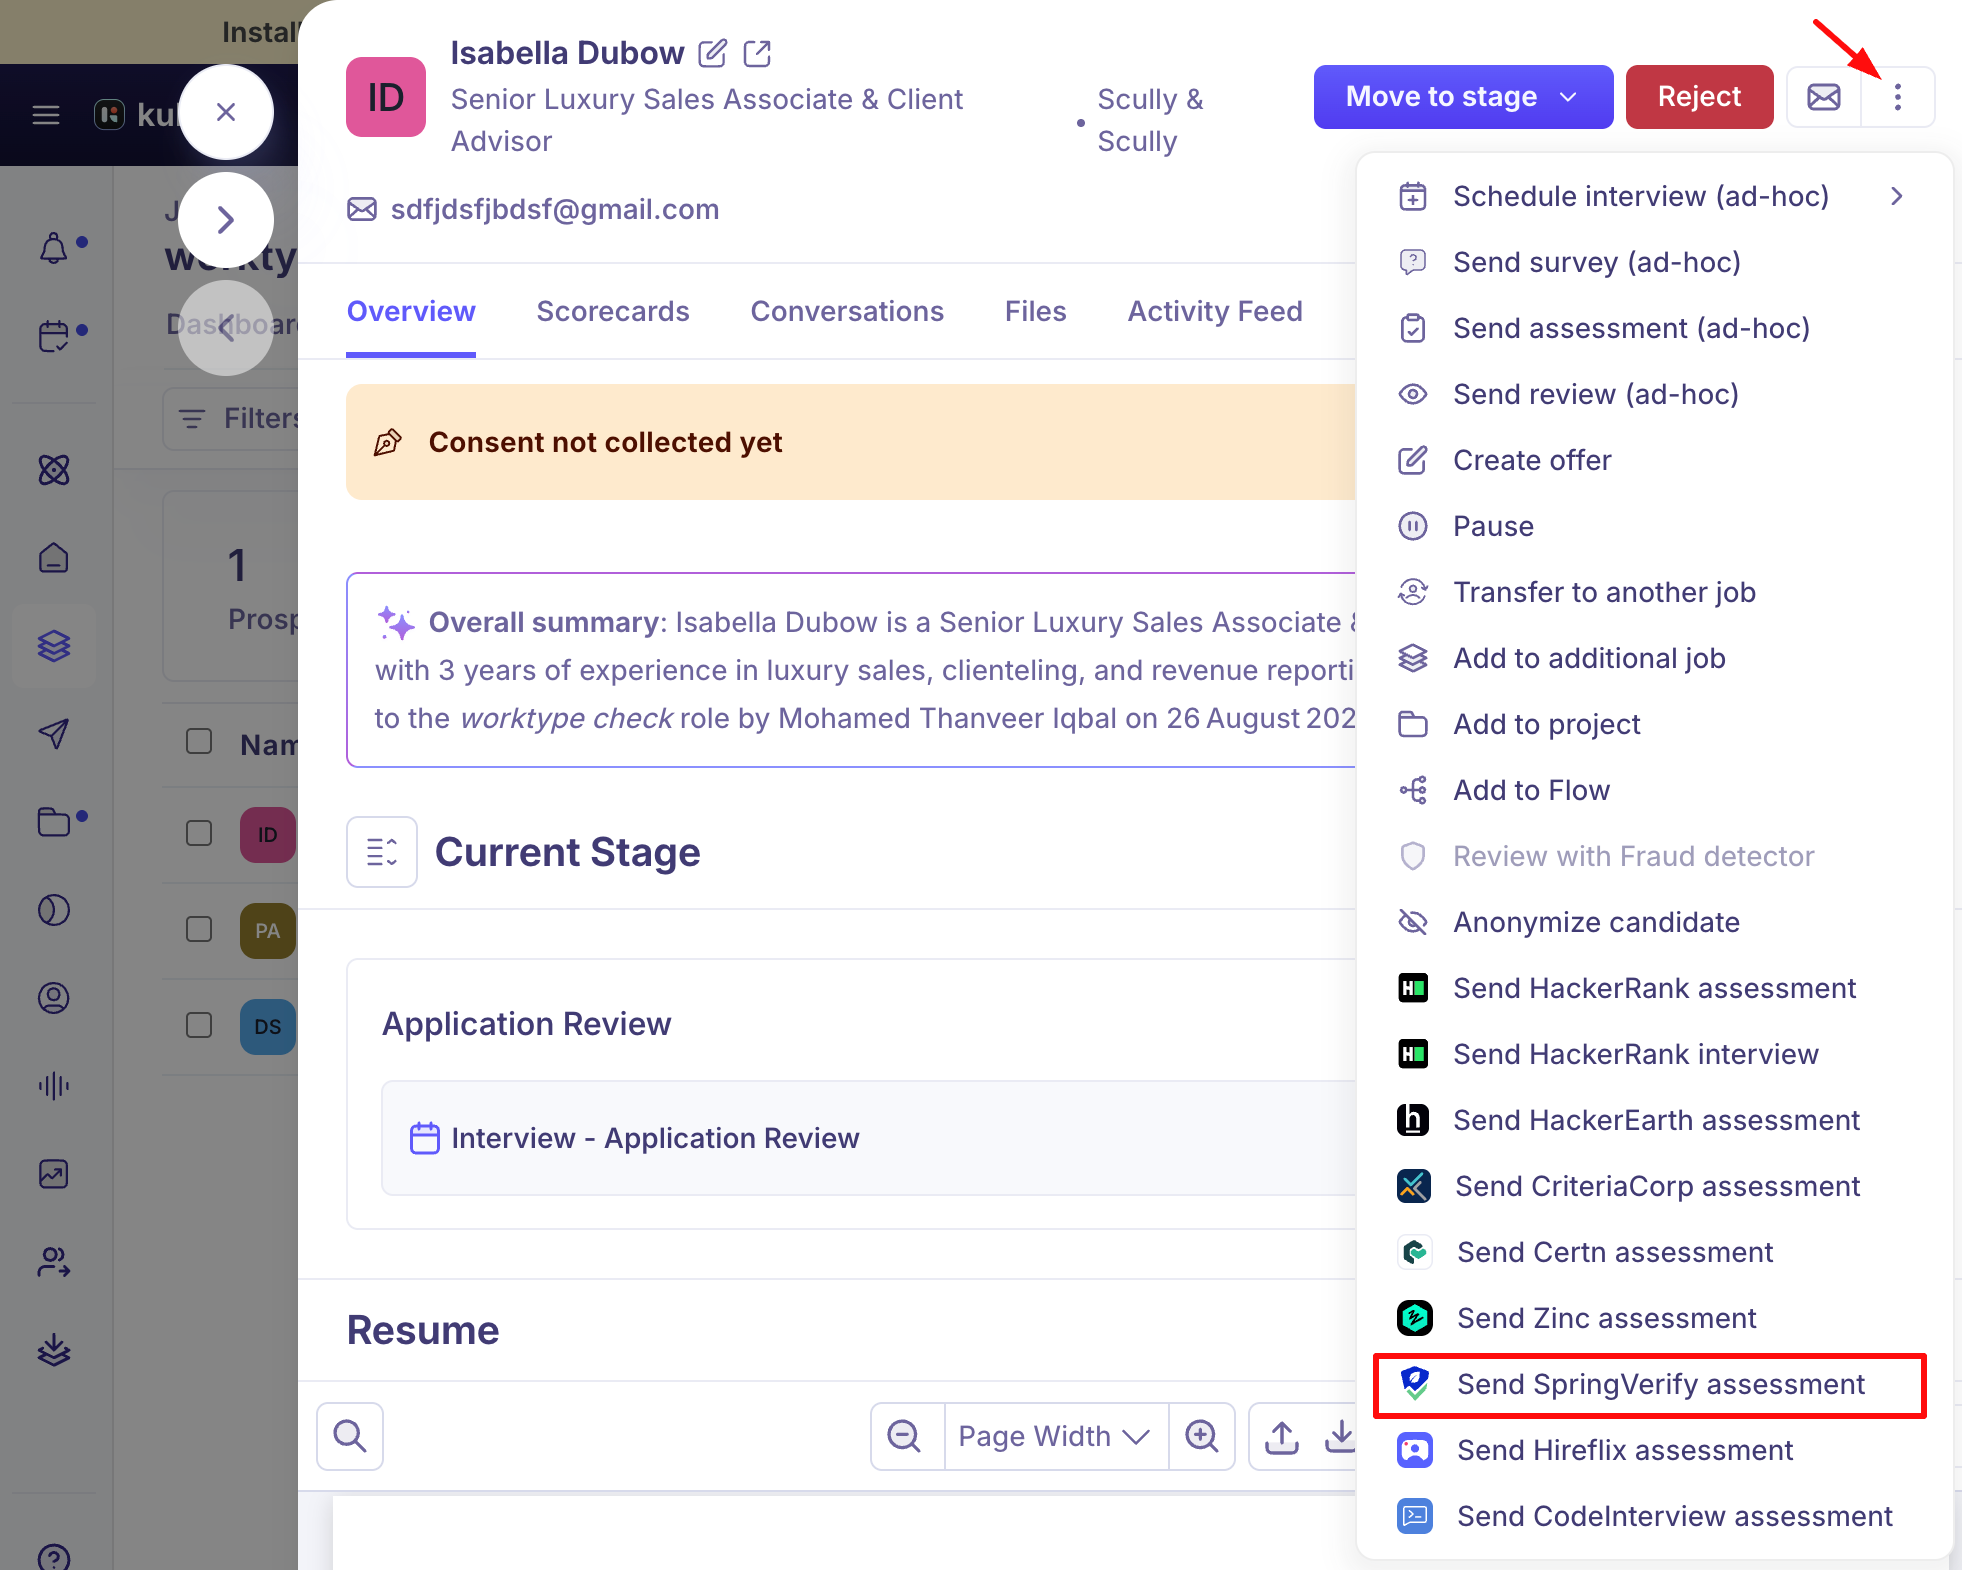
Open the candidate's profile and choose Send SpringVerify assessment from the actions menu. This is unavailable if the candidate has no email address.
Select a package from the dropdown — the checks included show underneath.
Click Submit.
Good to know
SpringVerify doesn't send Kula live updates the way some other providers do — Kula checks in on progress roughly once an hour, so a status change on SpringVerify's side may take up to an hour to show up in Kula.
Disconnecting SpringVerify while checks are in progress will affect them — Kula warns you before you disconnect.
View progress and the finished report from the candidate's background check card — see Reading a background check report.
Running a background check with Zinc
Send a candidate for a background check through Zinc, right from their profile in Kula. This article covers connecting Zinc and sending a check.
Who can do this: Recruiter, Hiring Manager send a check. Super Admin, Admin: connect Zinc.
Where to find it: Candidates → open a candidate → actions menu → Send Zinc assessment. To connect: Settings → Organisation → Integrations → Background checks → Zinc
Connect Zinc
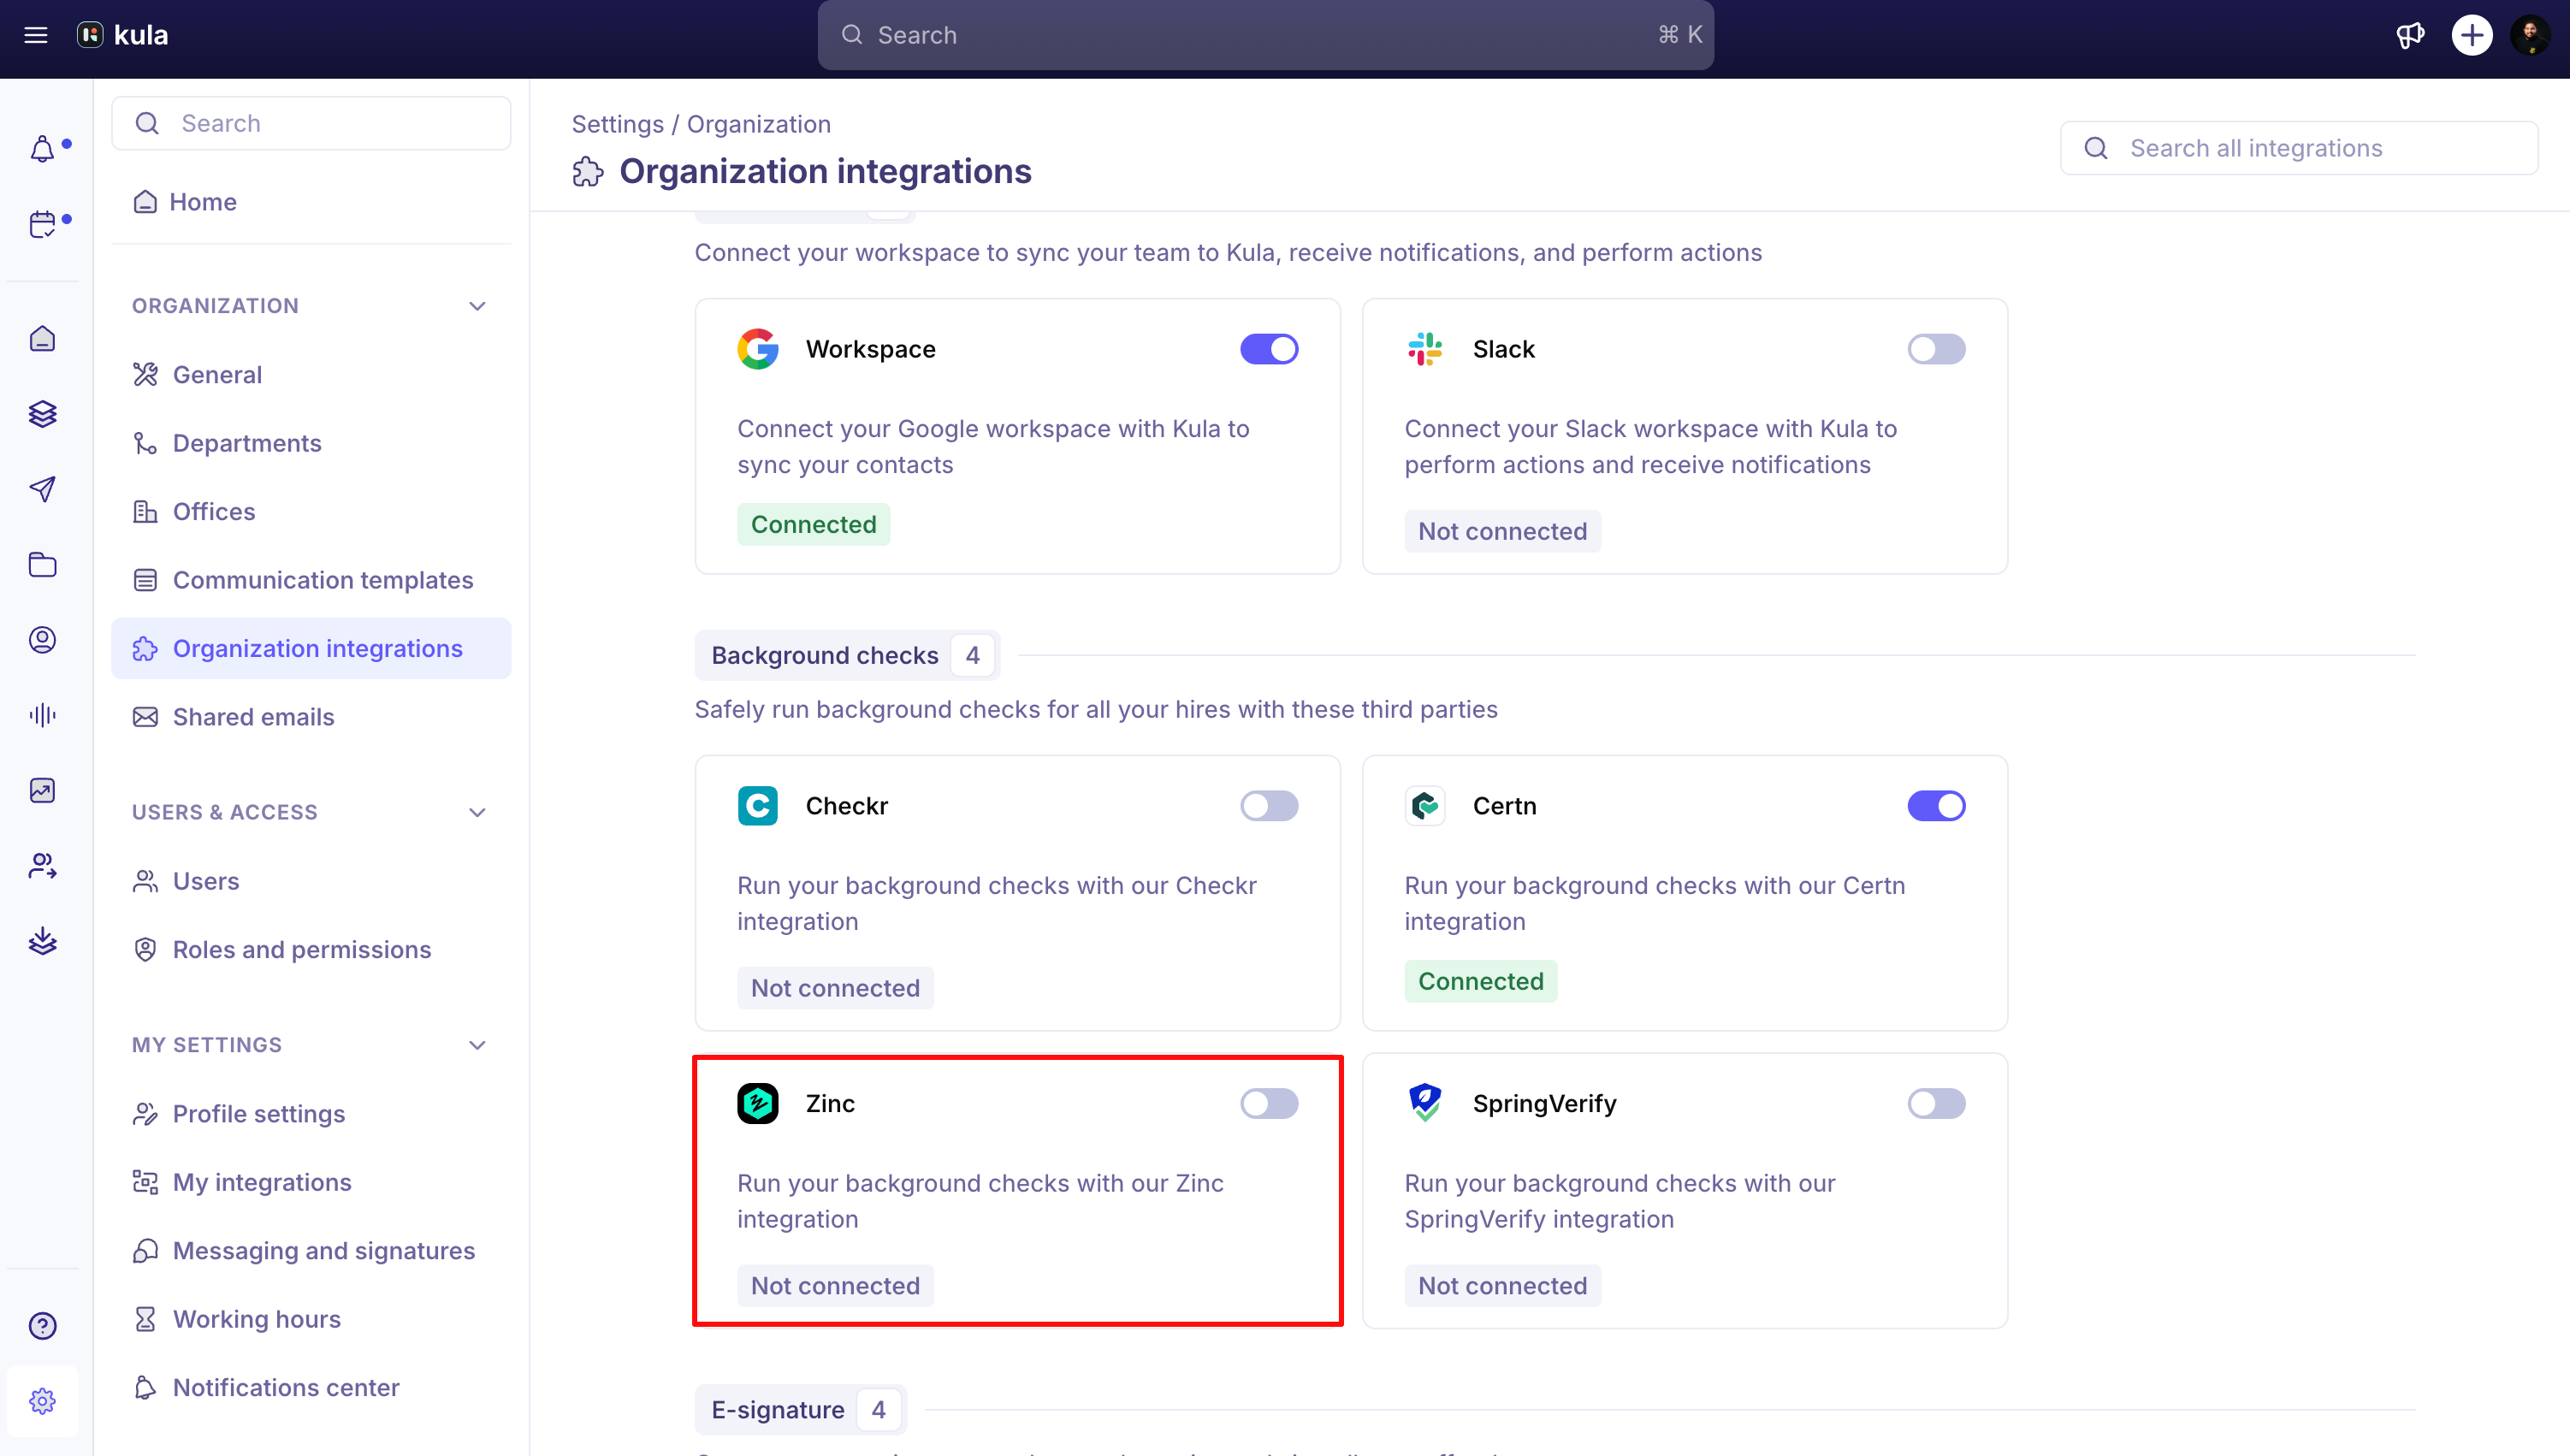
Go to Settings → Organisation → Integrations → Background checks → Zinc.
Enter your API key from your Zinc account settings.
Save.
Send a Zinc assessment
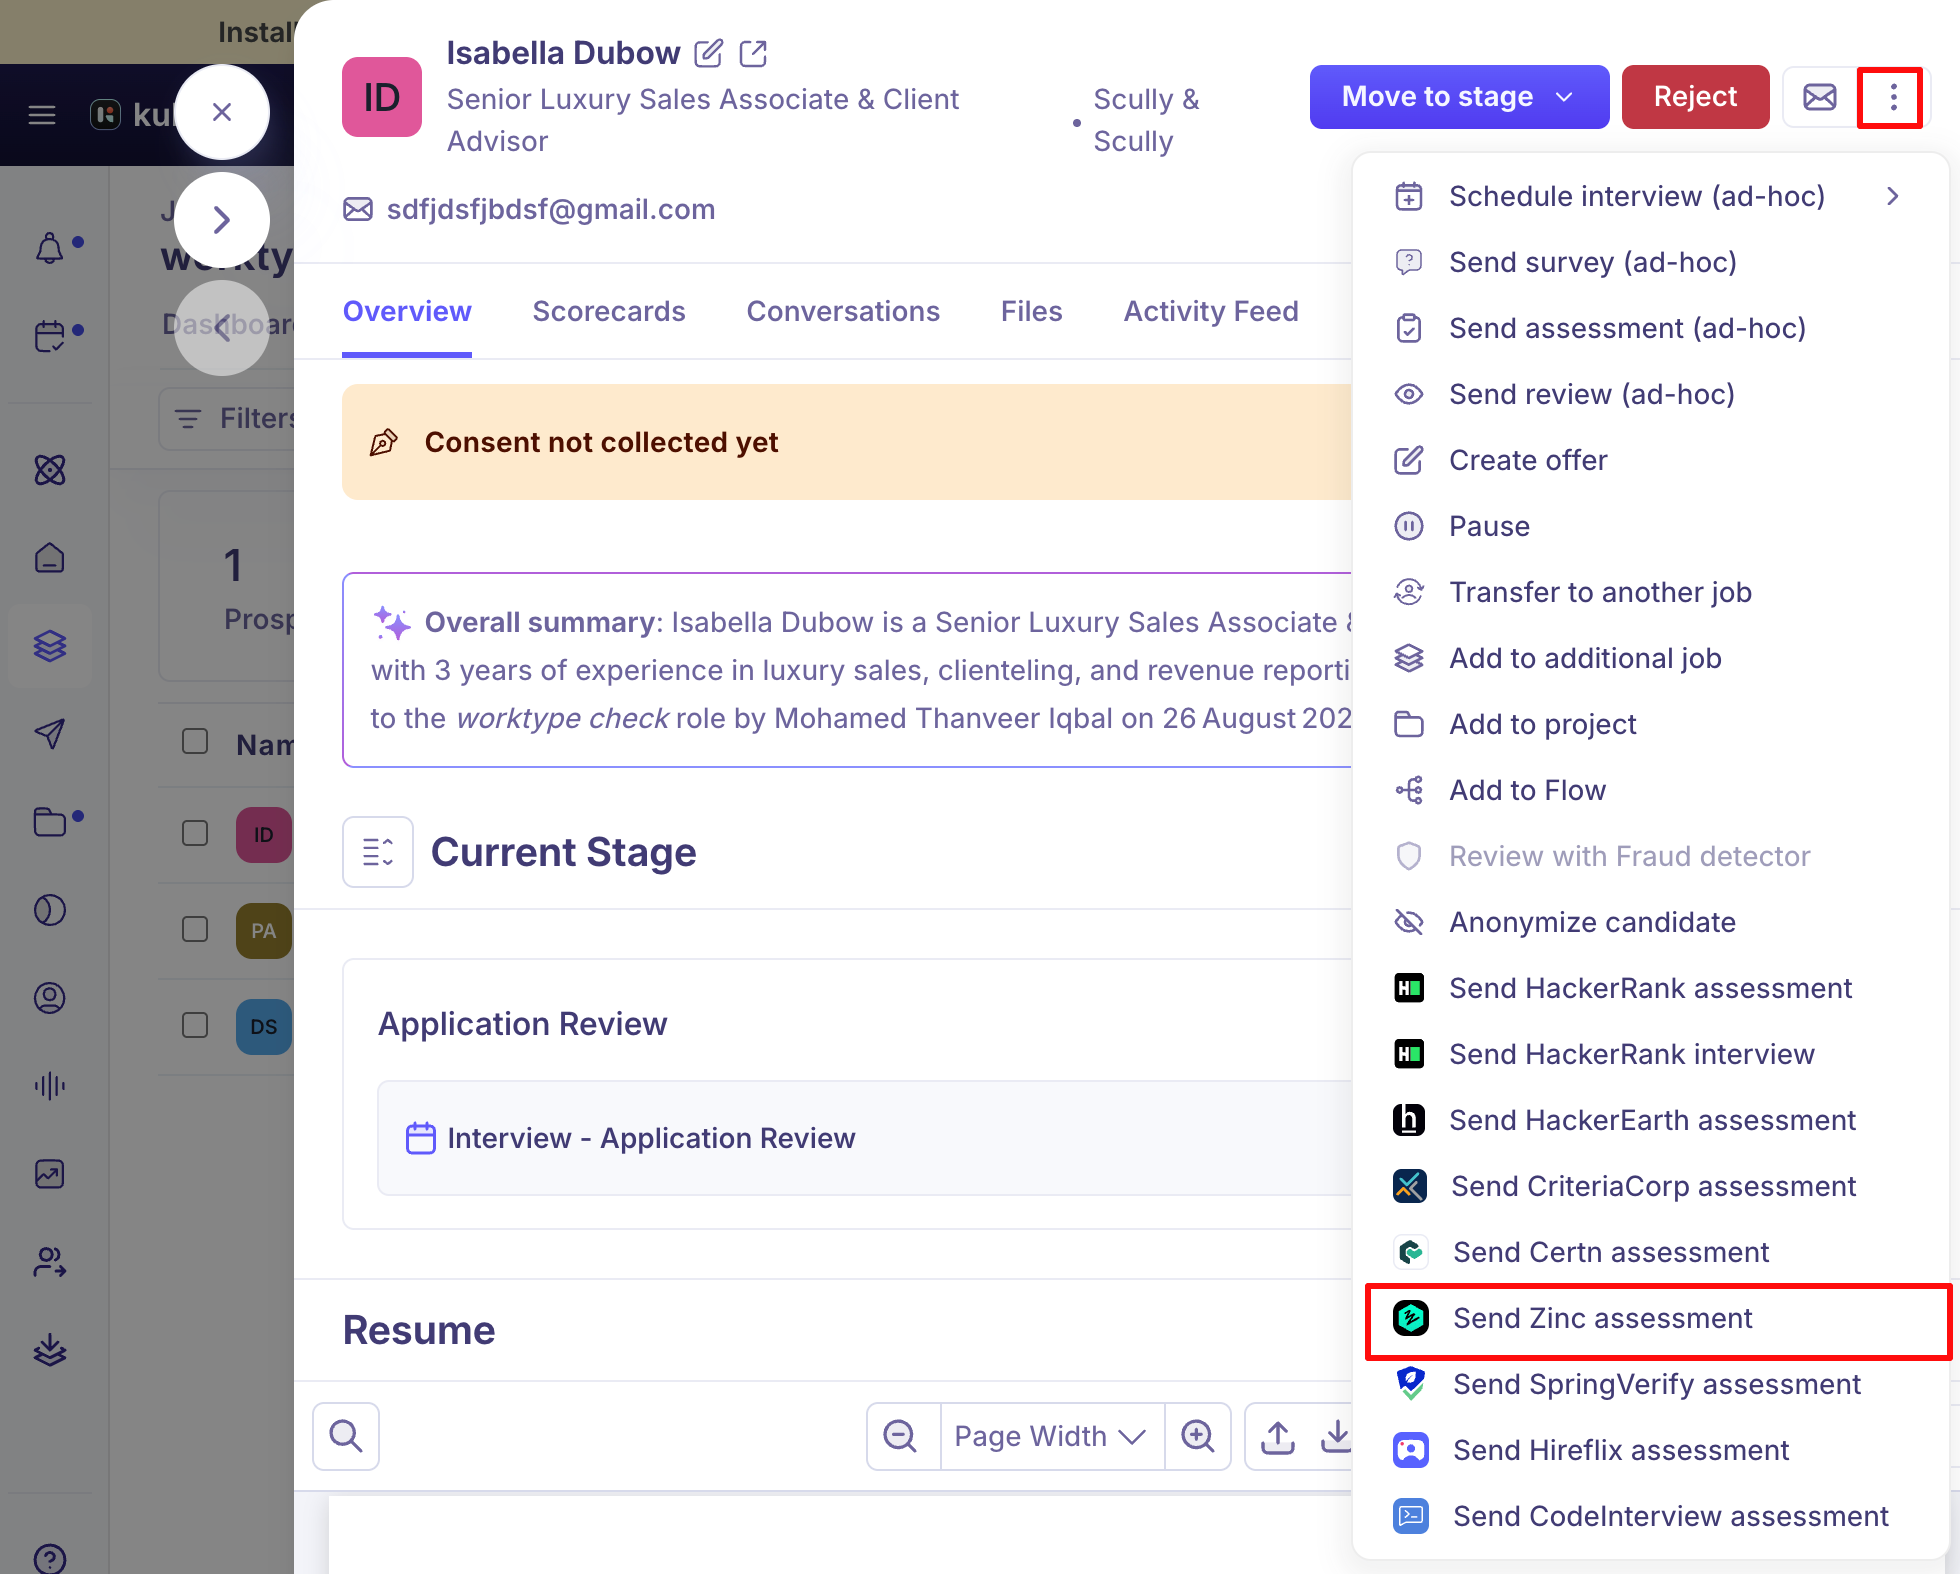
Open the candidate's profile and choose Send Zinc assessment from the actions menu. This is unavailable if the candidate has no email address.
Select a package from the dropdown — the checks included show underneath.
Click Submit.
Good to know
Disconnecting Zinc while checks are in progress will affect them — Kula warns you before you disconnect.
View progress and the finished report from the candidate's background check card — see Reading a background check report.
Running a background check with Certn
Send a candidate for a background check through Certn, right from their profile in Kula. This article covers connecting Certn and sending a check.
Who can do this: Recruiter, Hiring Manager send a check. Super Admin, Admin connect Certn.
Where to find it: Candidates → open a candidate → actions menu → Send Certn assessment. To connect: Settings → Organisation → Integrations → Background checks → Certn
Connect Certn
Certn needs three pieces of information from your Certn account settings.
Go to Settings → Organisation → Integrations → Background checks → Certn.
Enter your API key.
Select your region — North America, Europe/Middle East/Africa, or Asia Pacific.
Enter your webhook secret.
Click Verify API Key, then save.
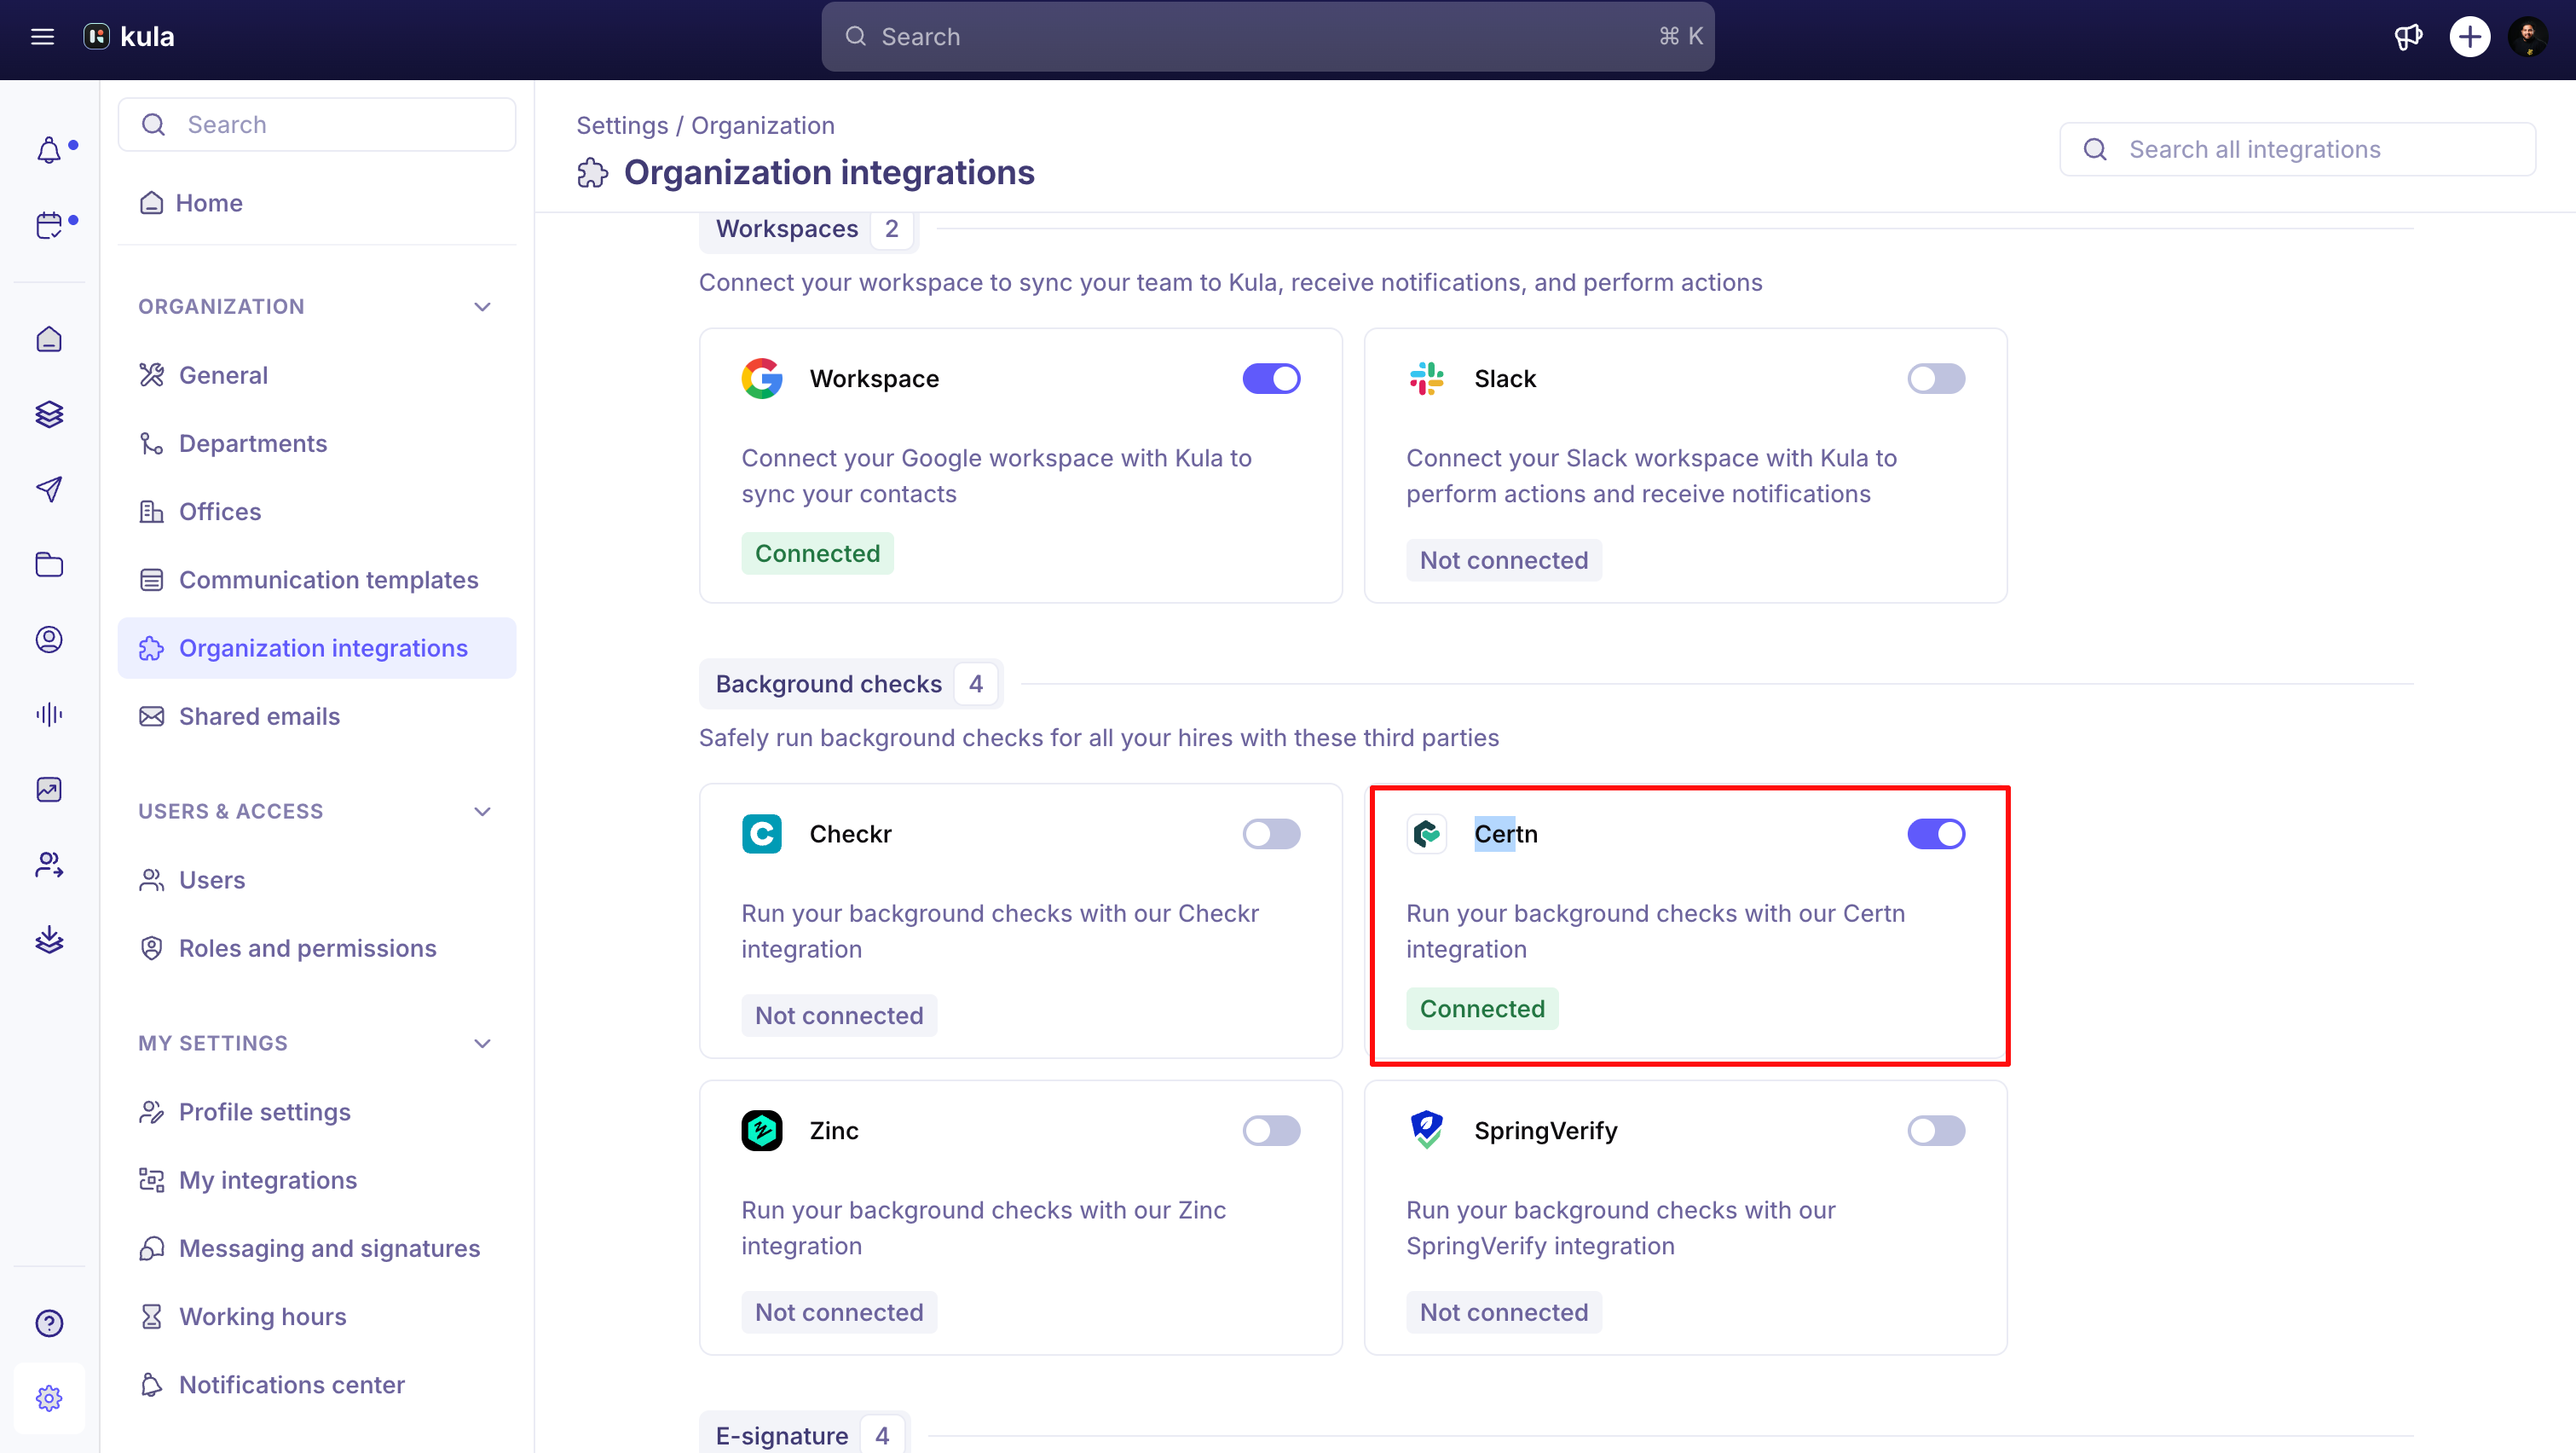
Refer to Connect to Certn for a detailed Walkthrough
Send a Certn assessment
Open the candidate's profile and choose Send Certn assessment from the actions menu. This is unavailable if the candidate has no email address.
Select a package from the dropdown — the checks included in the package (for example criminal, employment verification, or education) show underneath.
Click Submit.
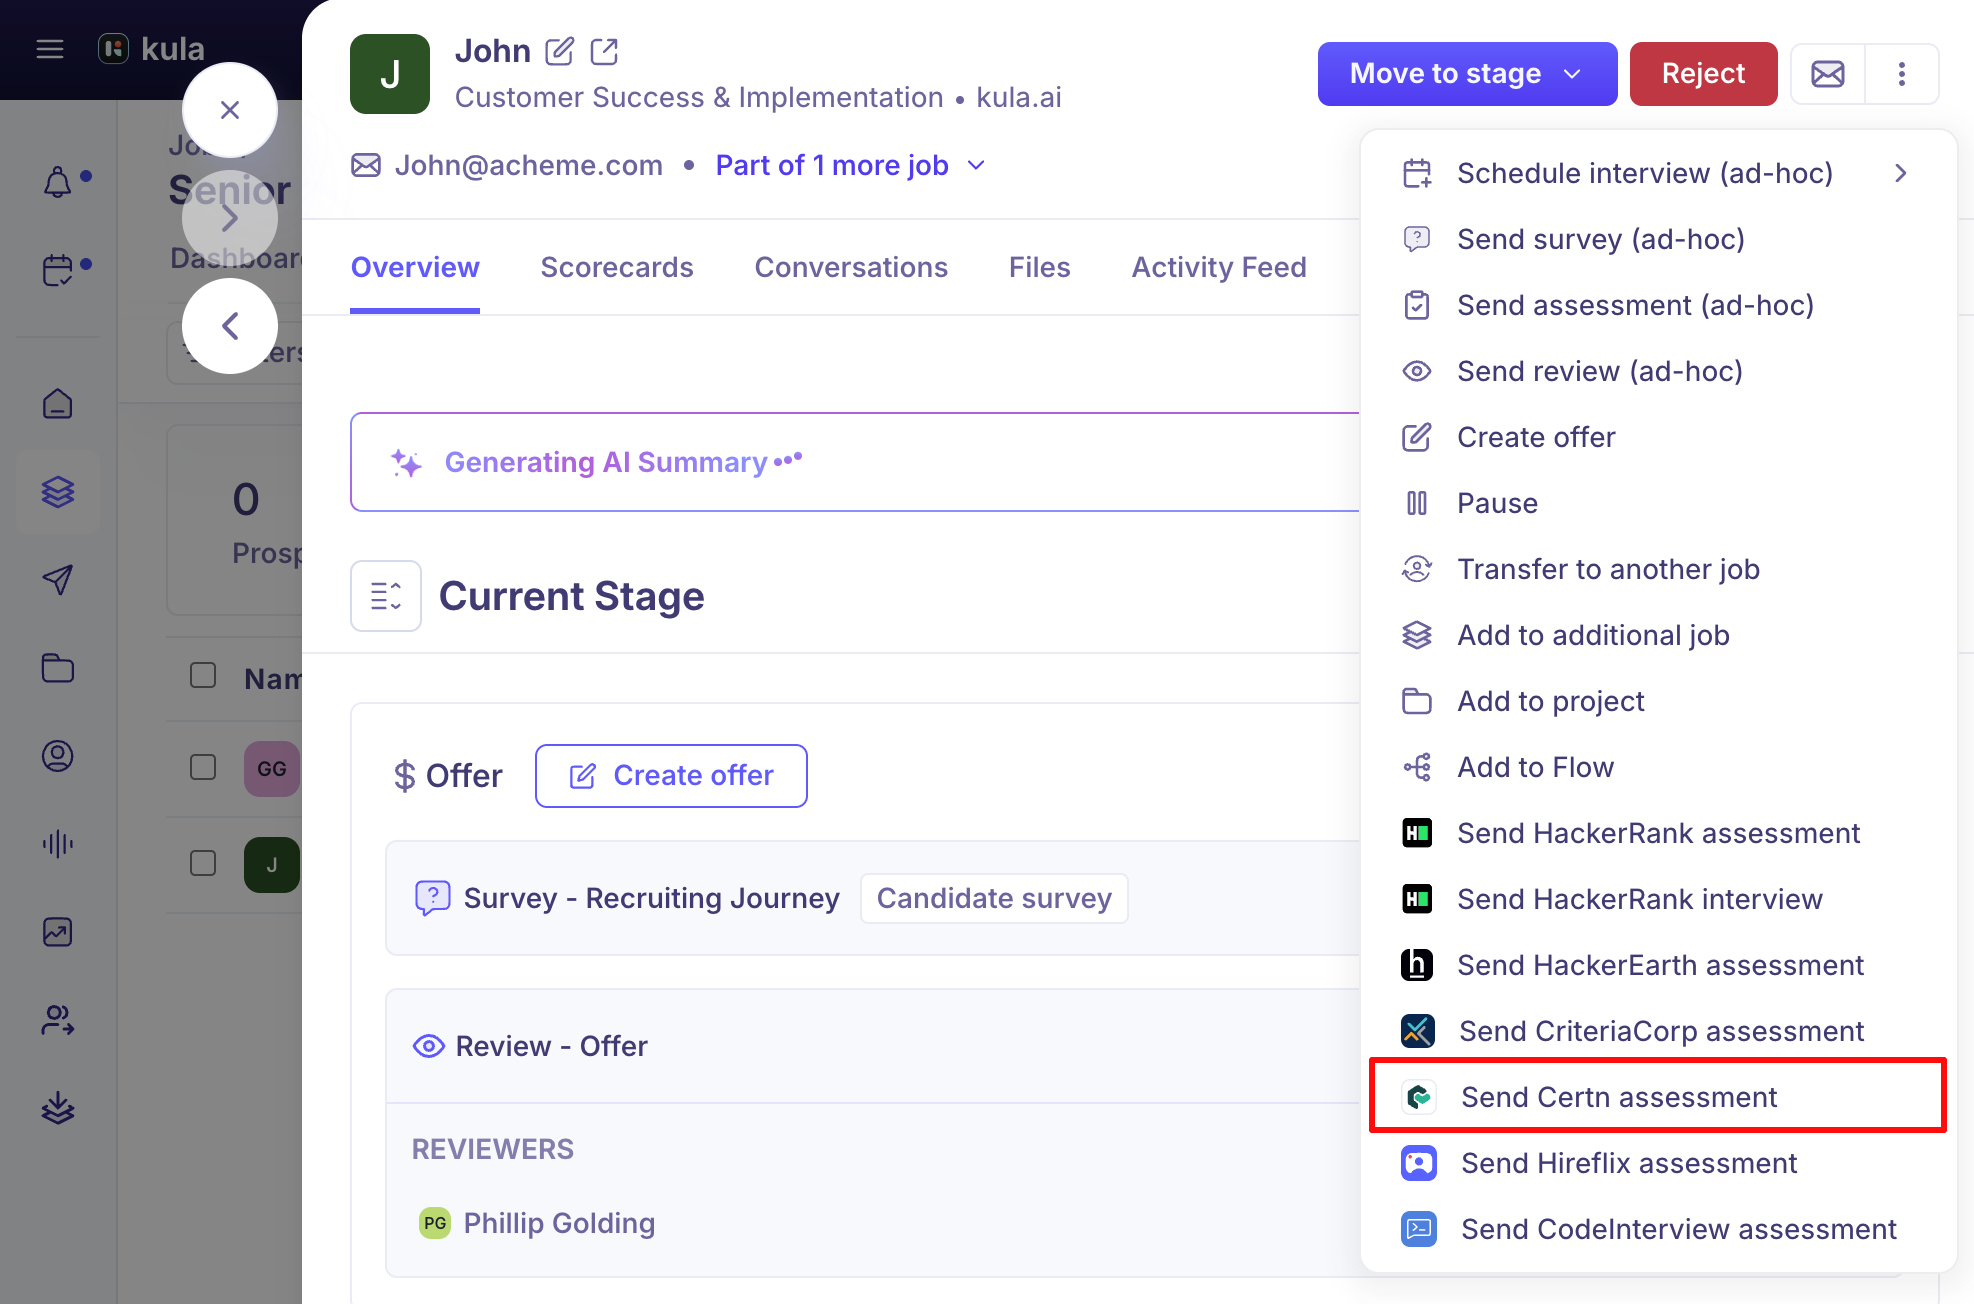
Good to know
Certn is the only one of Kula's background check integrations that needs a region and a webhook secret, not just an API key.
Disconnecting Certn while checks are in progress will affect them — Kula warns you before you disconnect.
Once submitted, view progress and the finished report from the candidate's background check card — see Reading a background check report.
Running a background check with Checkr
Send a candidate for a background check through Checkr, right from their profile in Kula. This article covers connecting Checkr and sending a check.
Who can do this: Recruiter, Hiring Manager send a check. Super Admin, Admin connect Checkr.
Where to find it: Candidates → open a candidate → actions menu → Send Checkr assessment. To connect: Settings → Organisation Integrations → Background checks → Checkr
Connect Checkr
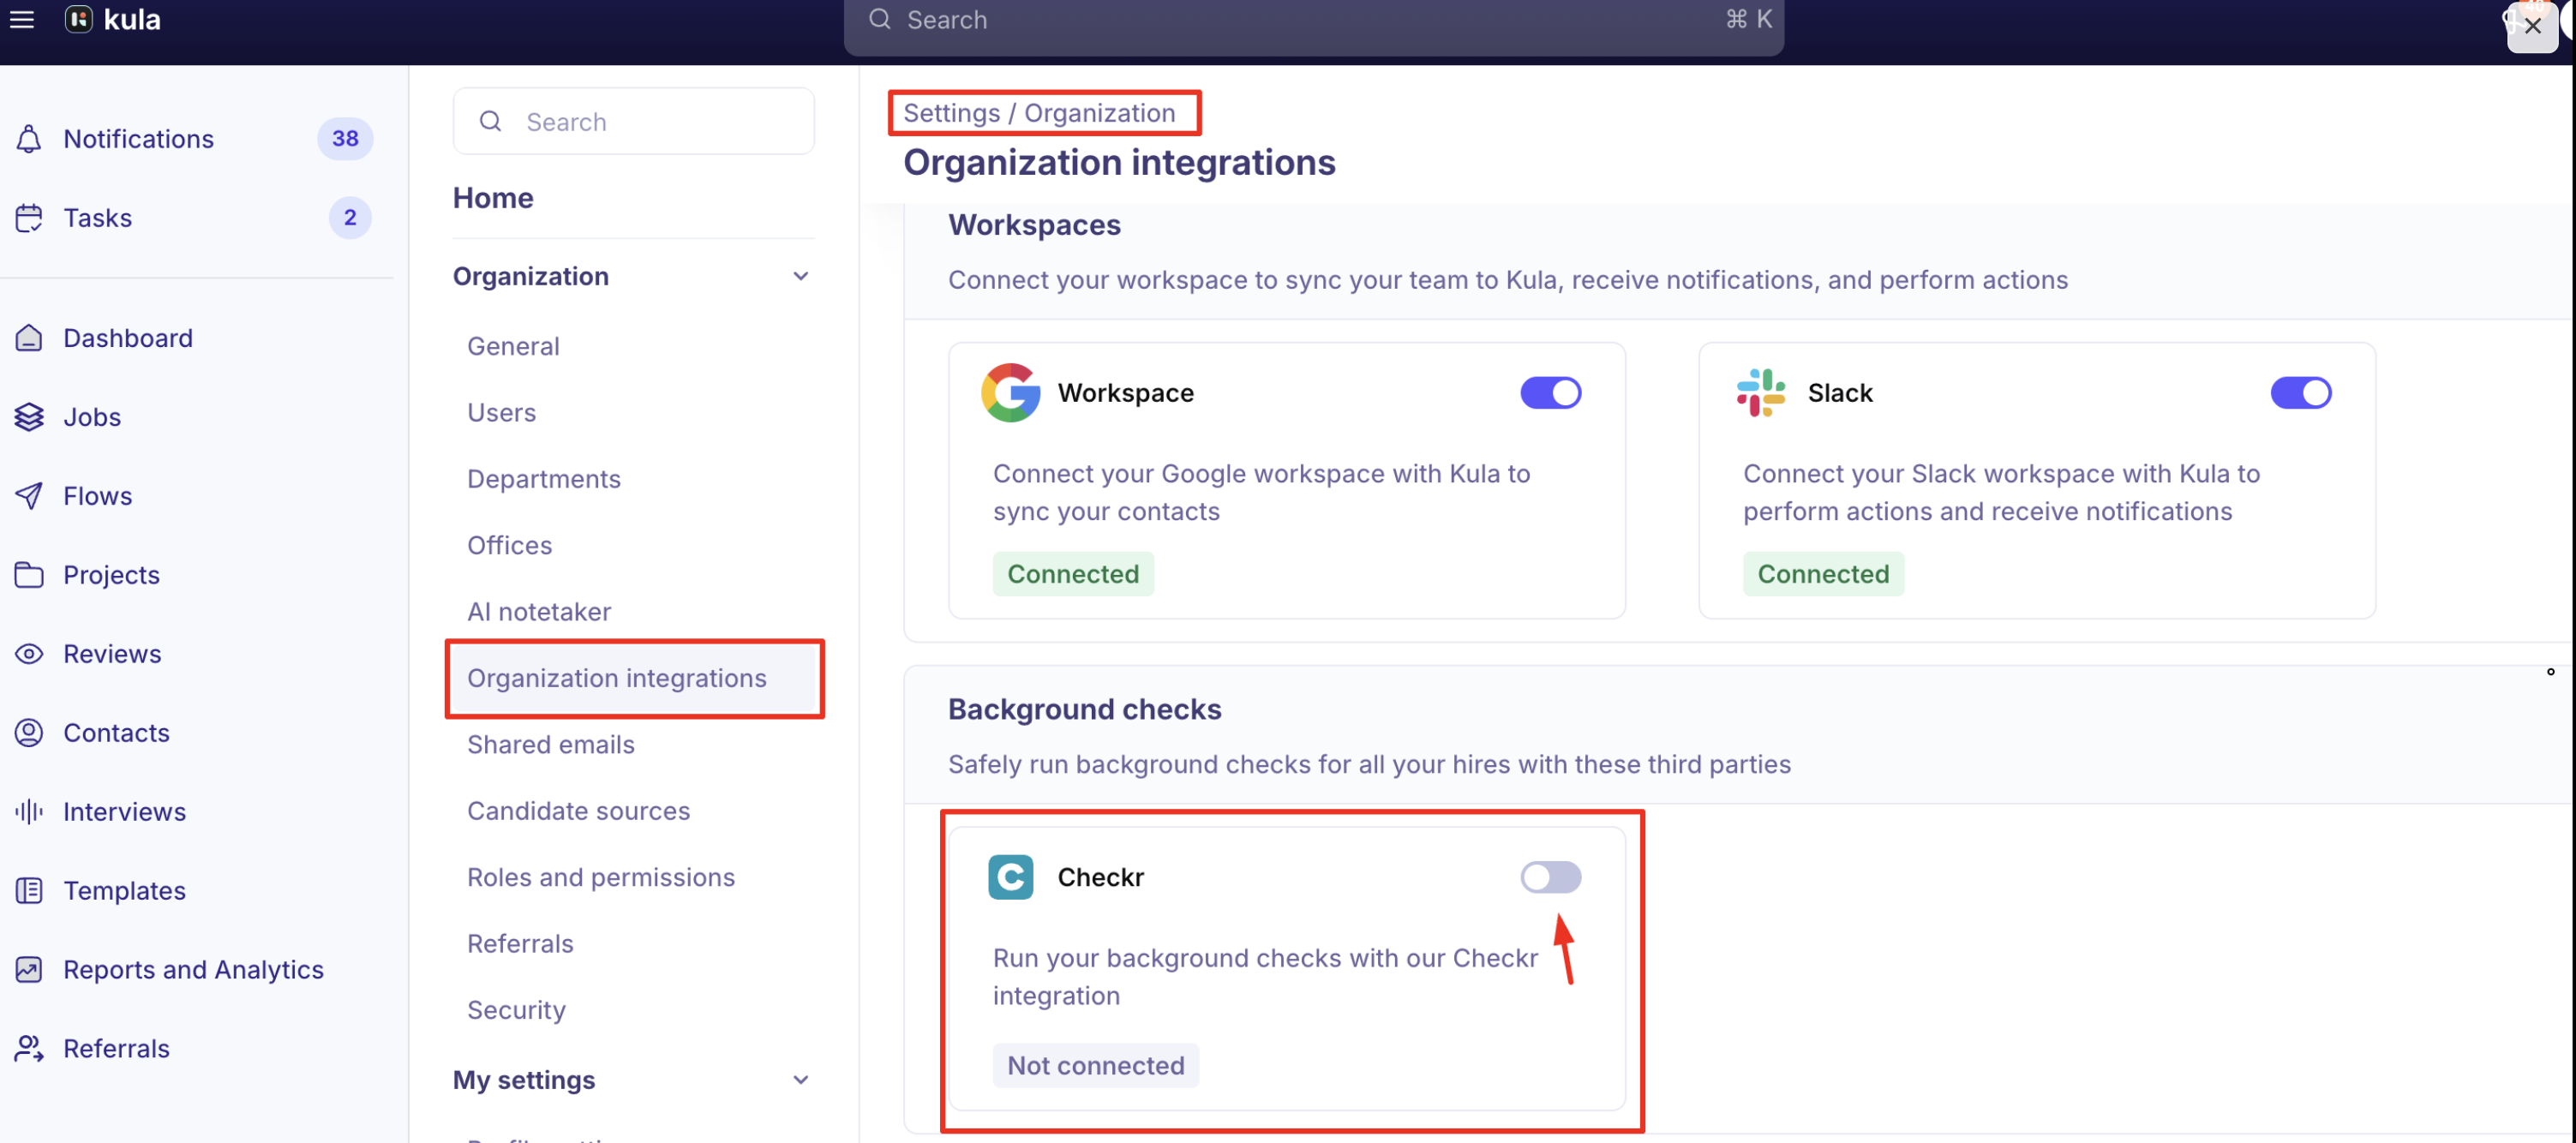
Go to Settings → Organisation → Integrations → Background checks → Checkr.
Click Connect and follow Checkr's sign-up flow to authorise Kula.
Your connection stays pending until Checkr confirms your account is credentialed.
Send a Checkr assessment
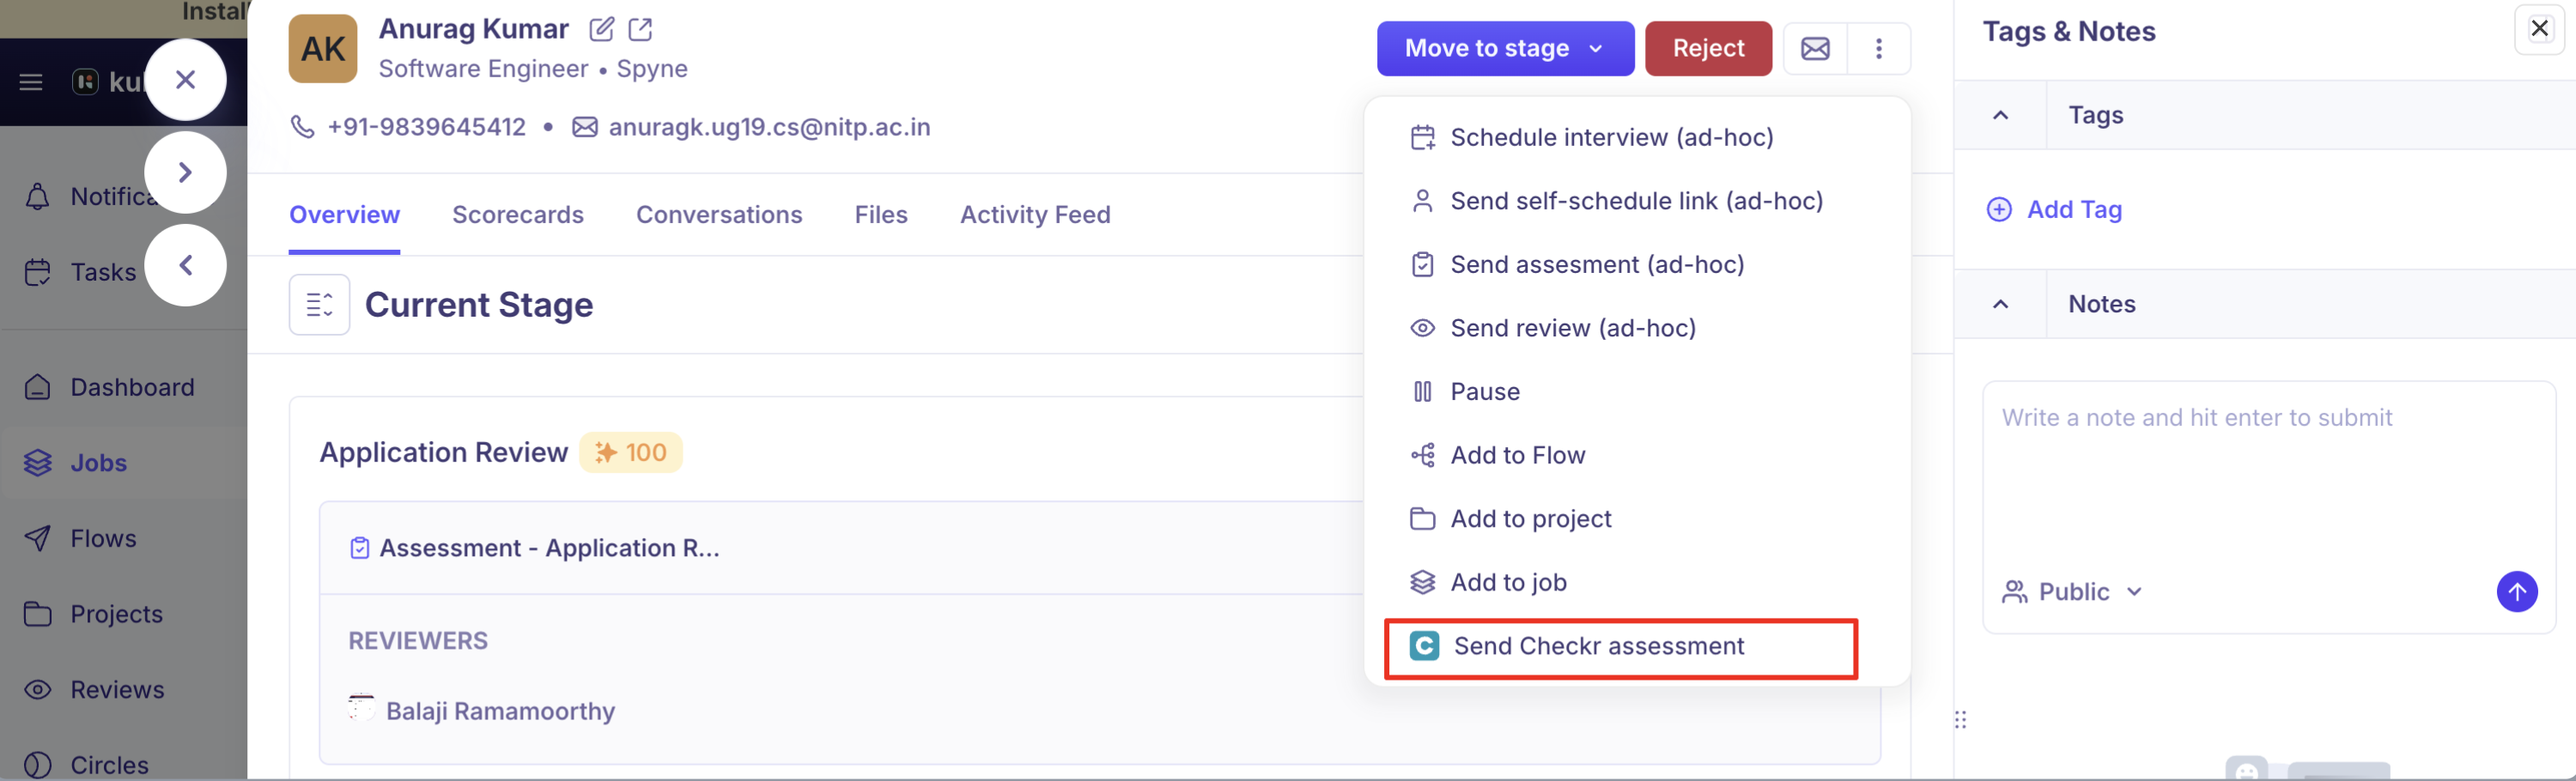
Open the candidate's profile and choose Send Checkr assessment from the actions menu.
Choose the package inside Checkr's own screen, which opens right there in Kula.
Submit.
Good to know
Checkr works a bit differently from Kula's other background check integrations — you pick the package inside Checkr's own screen, not a Kula-built form, and viewing the finished report also opens Checkr's own report screen. See Reading a background check report.
Disconnecting Checkr while checks are in progress will affect them — Kula warns you before you disconnect.
If your organisation later reconnects with a different Checkr account, background checks created under the old account can no longer be opened from Kula.
FAQ
Q: How do I enable Checkr in Kula?
A: Go to Settings > Integrations > Background Checks, select Checkr, and connect using your Checkr Admin credentials.
Q: Can I run background checks from Kula?
A: Yes. Open the candidate’s profile → Actions (⋮) → Run Background Check.
Q: How are candidates notified?
A: Candidates will receive a consent email directly from Checkr.
Q: Where do I see the results?
A: Results are available in the candidate’s Background Check tab in Kula.
Q: What do the statuses mean?
A: Pending = awaiting candidate action, In Progress = check is running, and Clear/Consider = final result.
Q: Who handles billing for background checks?
A: Checkr manages billing directly.
Q: Who do I contact if I have an issue with Checkr?
A: Contact Kula Support for setup or integration-related issues, and Checkr Support for questions about results or billing.
Q: I only have an API key — where do I get the region and webhook secret Kula is asking for?
A: All three credentials — the API key, region, and webhook secret — come from your Certn account settings. If you can't find the region or webhook secret, please check Certn's settings pages or contact Certn Support.
Q: Why is the Send Certn assessment option greyed out for this candidate?
A: Certn assessments require a candidate email address to send an invitation. Add an email address to the candidate’s profile first.
Q: Why is the Send Zinc assessment option greyed out for this candidate?
A: Zinc assessments require a candidate email address to send an invitation. Add an email address to the candidate’s profile first.
Q: How do I know which checks are included before I send a Zinc assessment?
A: The checks included in the selected package — such as criminal, employment verification, or education checks — are listed underneath the package dropdown before you submit the assessment.
Q: I don't see SpringVerify as an option under Integrations — why?
A: SpringVerify needs to be enabled for your organization first. Contact Kula Support if you'd like it enabled.
Q: The status on SpringVerify's own site changed, but Kula still shows the old status — why?
A: Kula checks with SpringVerify approximately once an hour rather than receiving instant updates, so there may be a short delay before the latest status appears in Kula.
For more information, refer to Reading a background check report in the Kula documentation.
Need help?
If you have questions or need assistance, reach out to support@kula.ai or use the in-app chat.