Your personal settings
Last updated: September 25, 2026
Your personal settings control how Kula looks and works for you: your profile and timezone, your password, your connected mailbox and calendar, your working hours, your email signature and your notifications. Your timezone matters most — it decides the times you see and when you can be booked for interviews
Who can do this: Every user, for their own account. A Recruiter can also set a missing interviewer's timezone while scheduling.
Where to find it: Settings → My Settings → Profile settings, My integrations, Working hours, Messaging and signatures and Notifications center
These are not the same as , which a Super Admin sets for everyone. Date format, time format and timezone appear on both screens — yours wins.
What you can change here
Field | What to know |
|---|---|
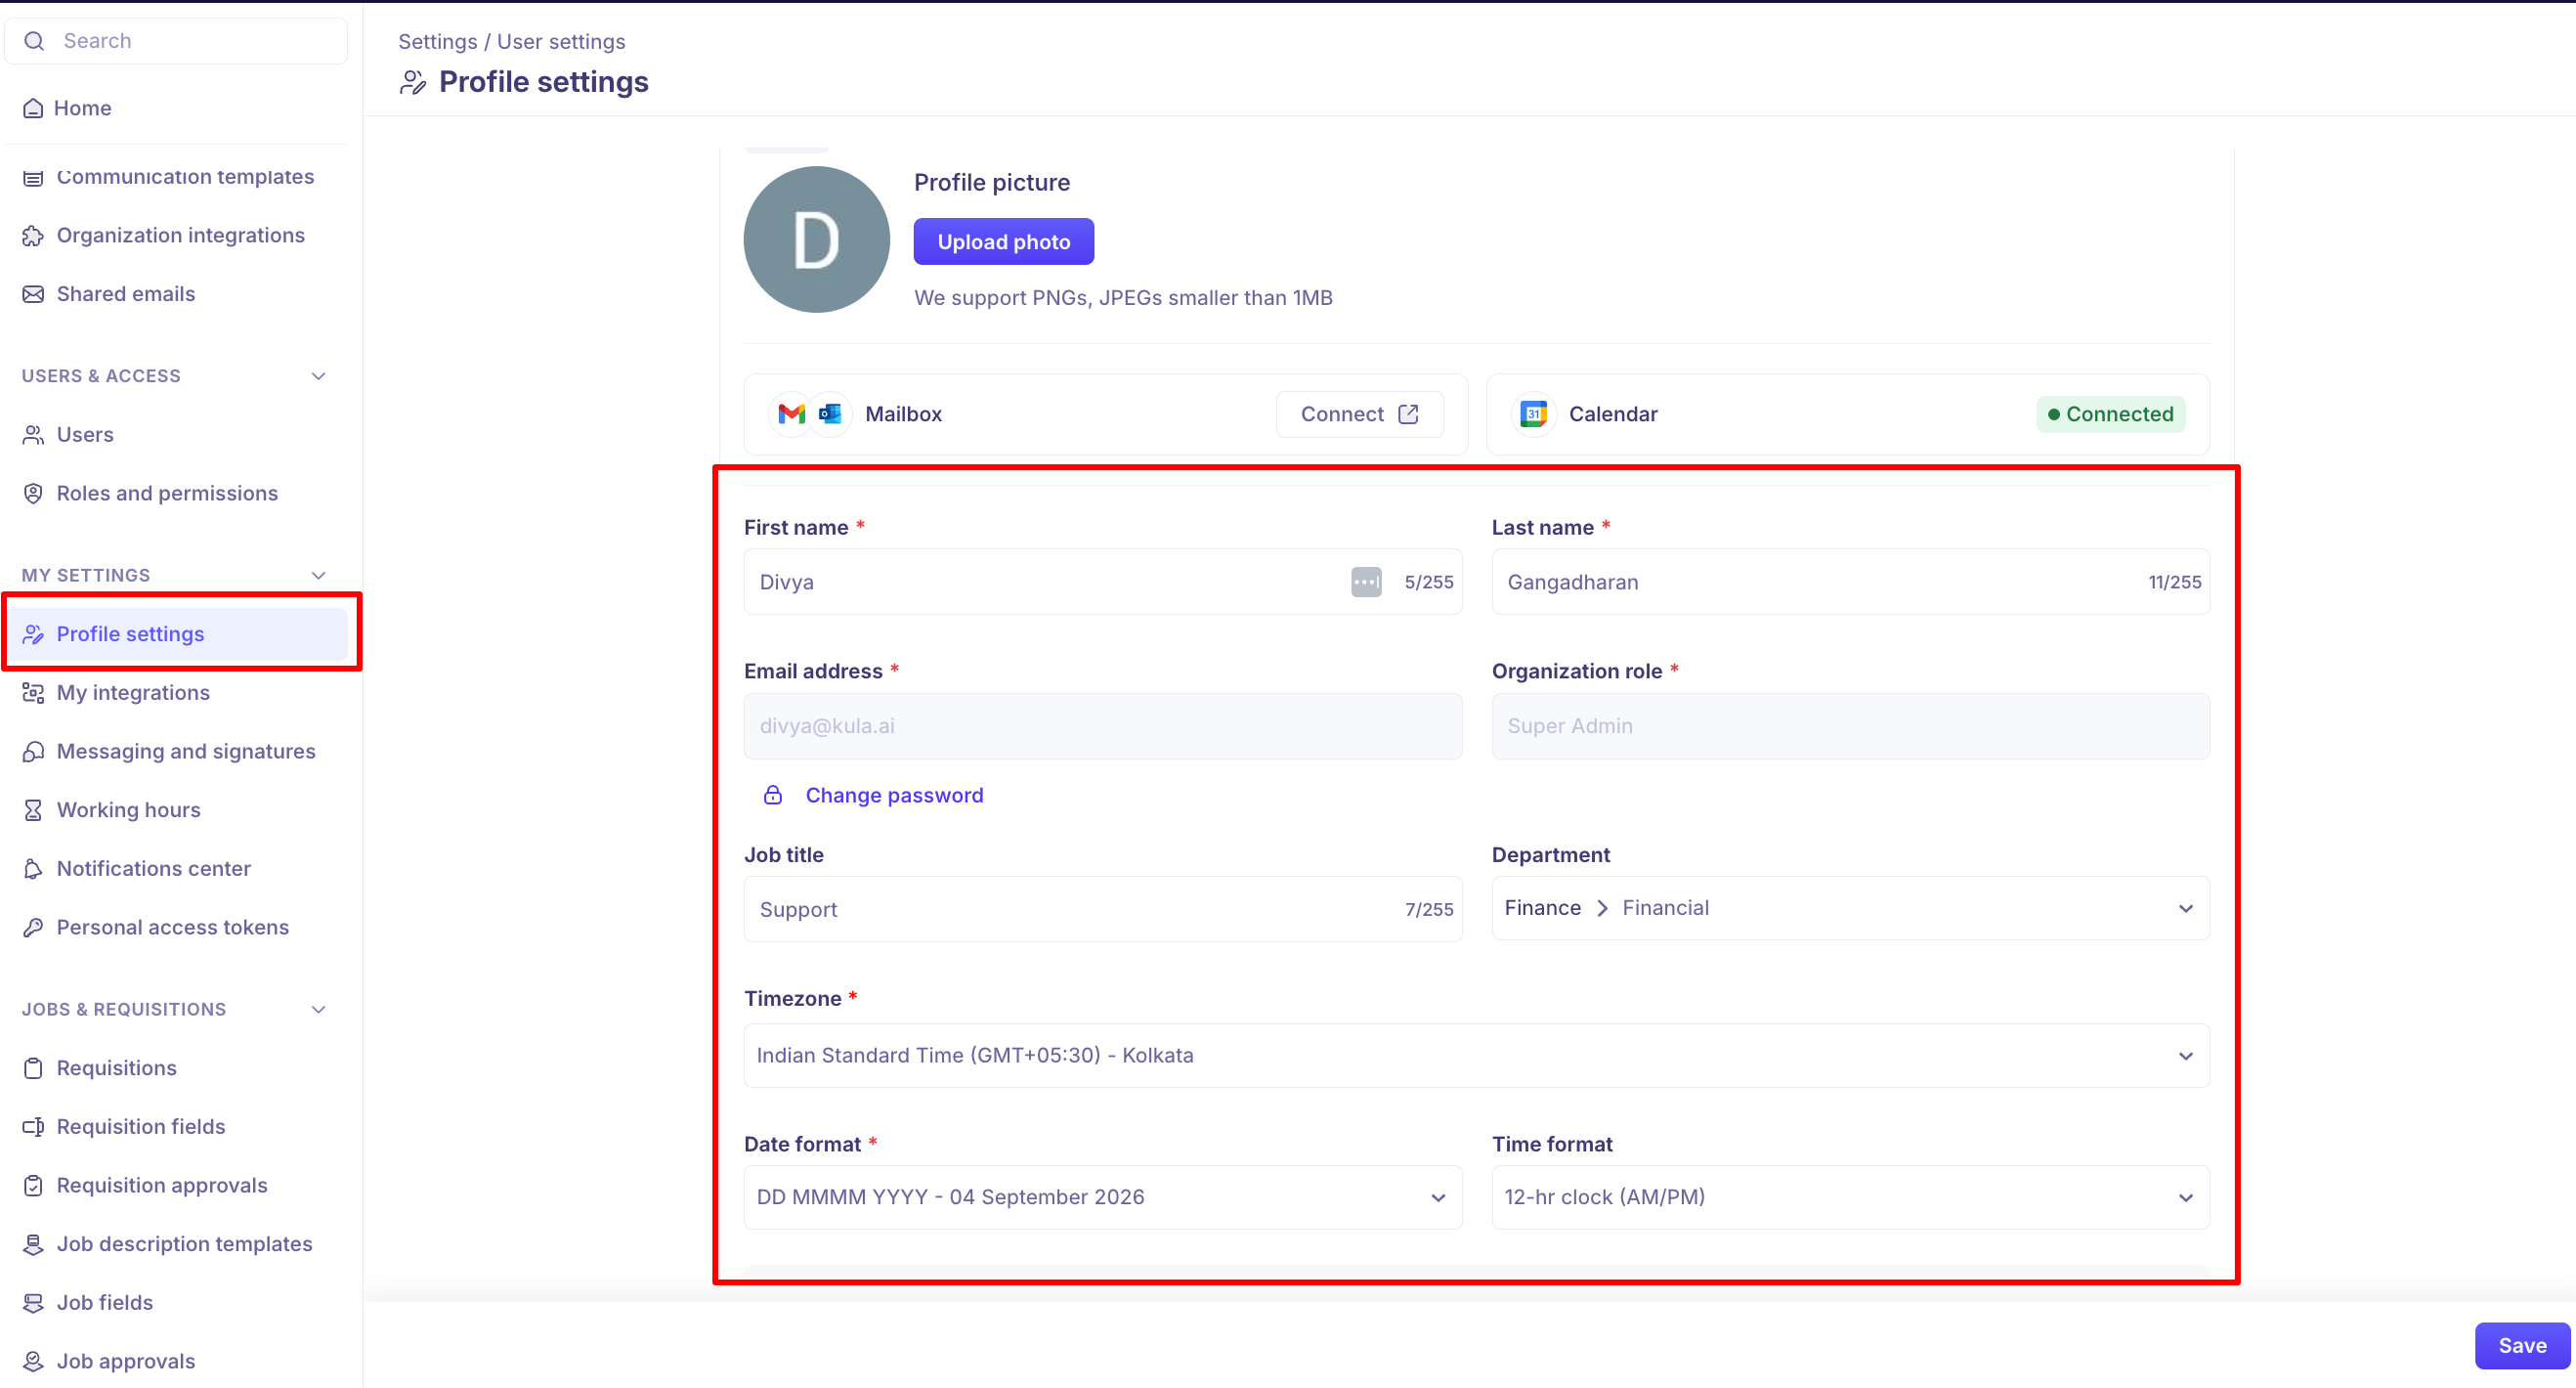
Profile picture | PNG or JPEG, under 1 MB. |
Mailbox and Calendar | Status only. Connecting happens on My integrations — see below. |
First name, Last name | Required. Up to 255 characters each. |
Email address | Read-only. This is your login email — contact support to change it. |
Organization role | Read-only. An admin changes it under Settings → Organization → Users. |
Job title | Optional. Up to 255 characters. |
Department | Optional. Pick from your organisation's departments. |
Timezone | Required. Kula reads your working hours in this timezone. |
Date format | Required. Six options, from |
Time format | 12-hr clock (AM/PM) or 24-hr clock. |
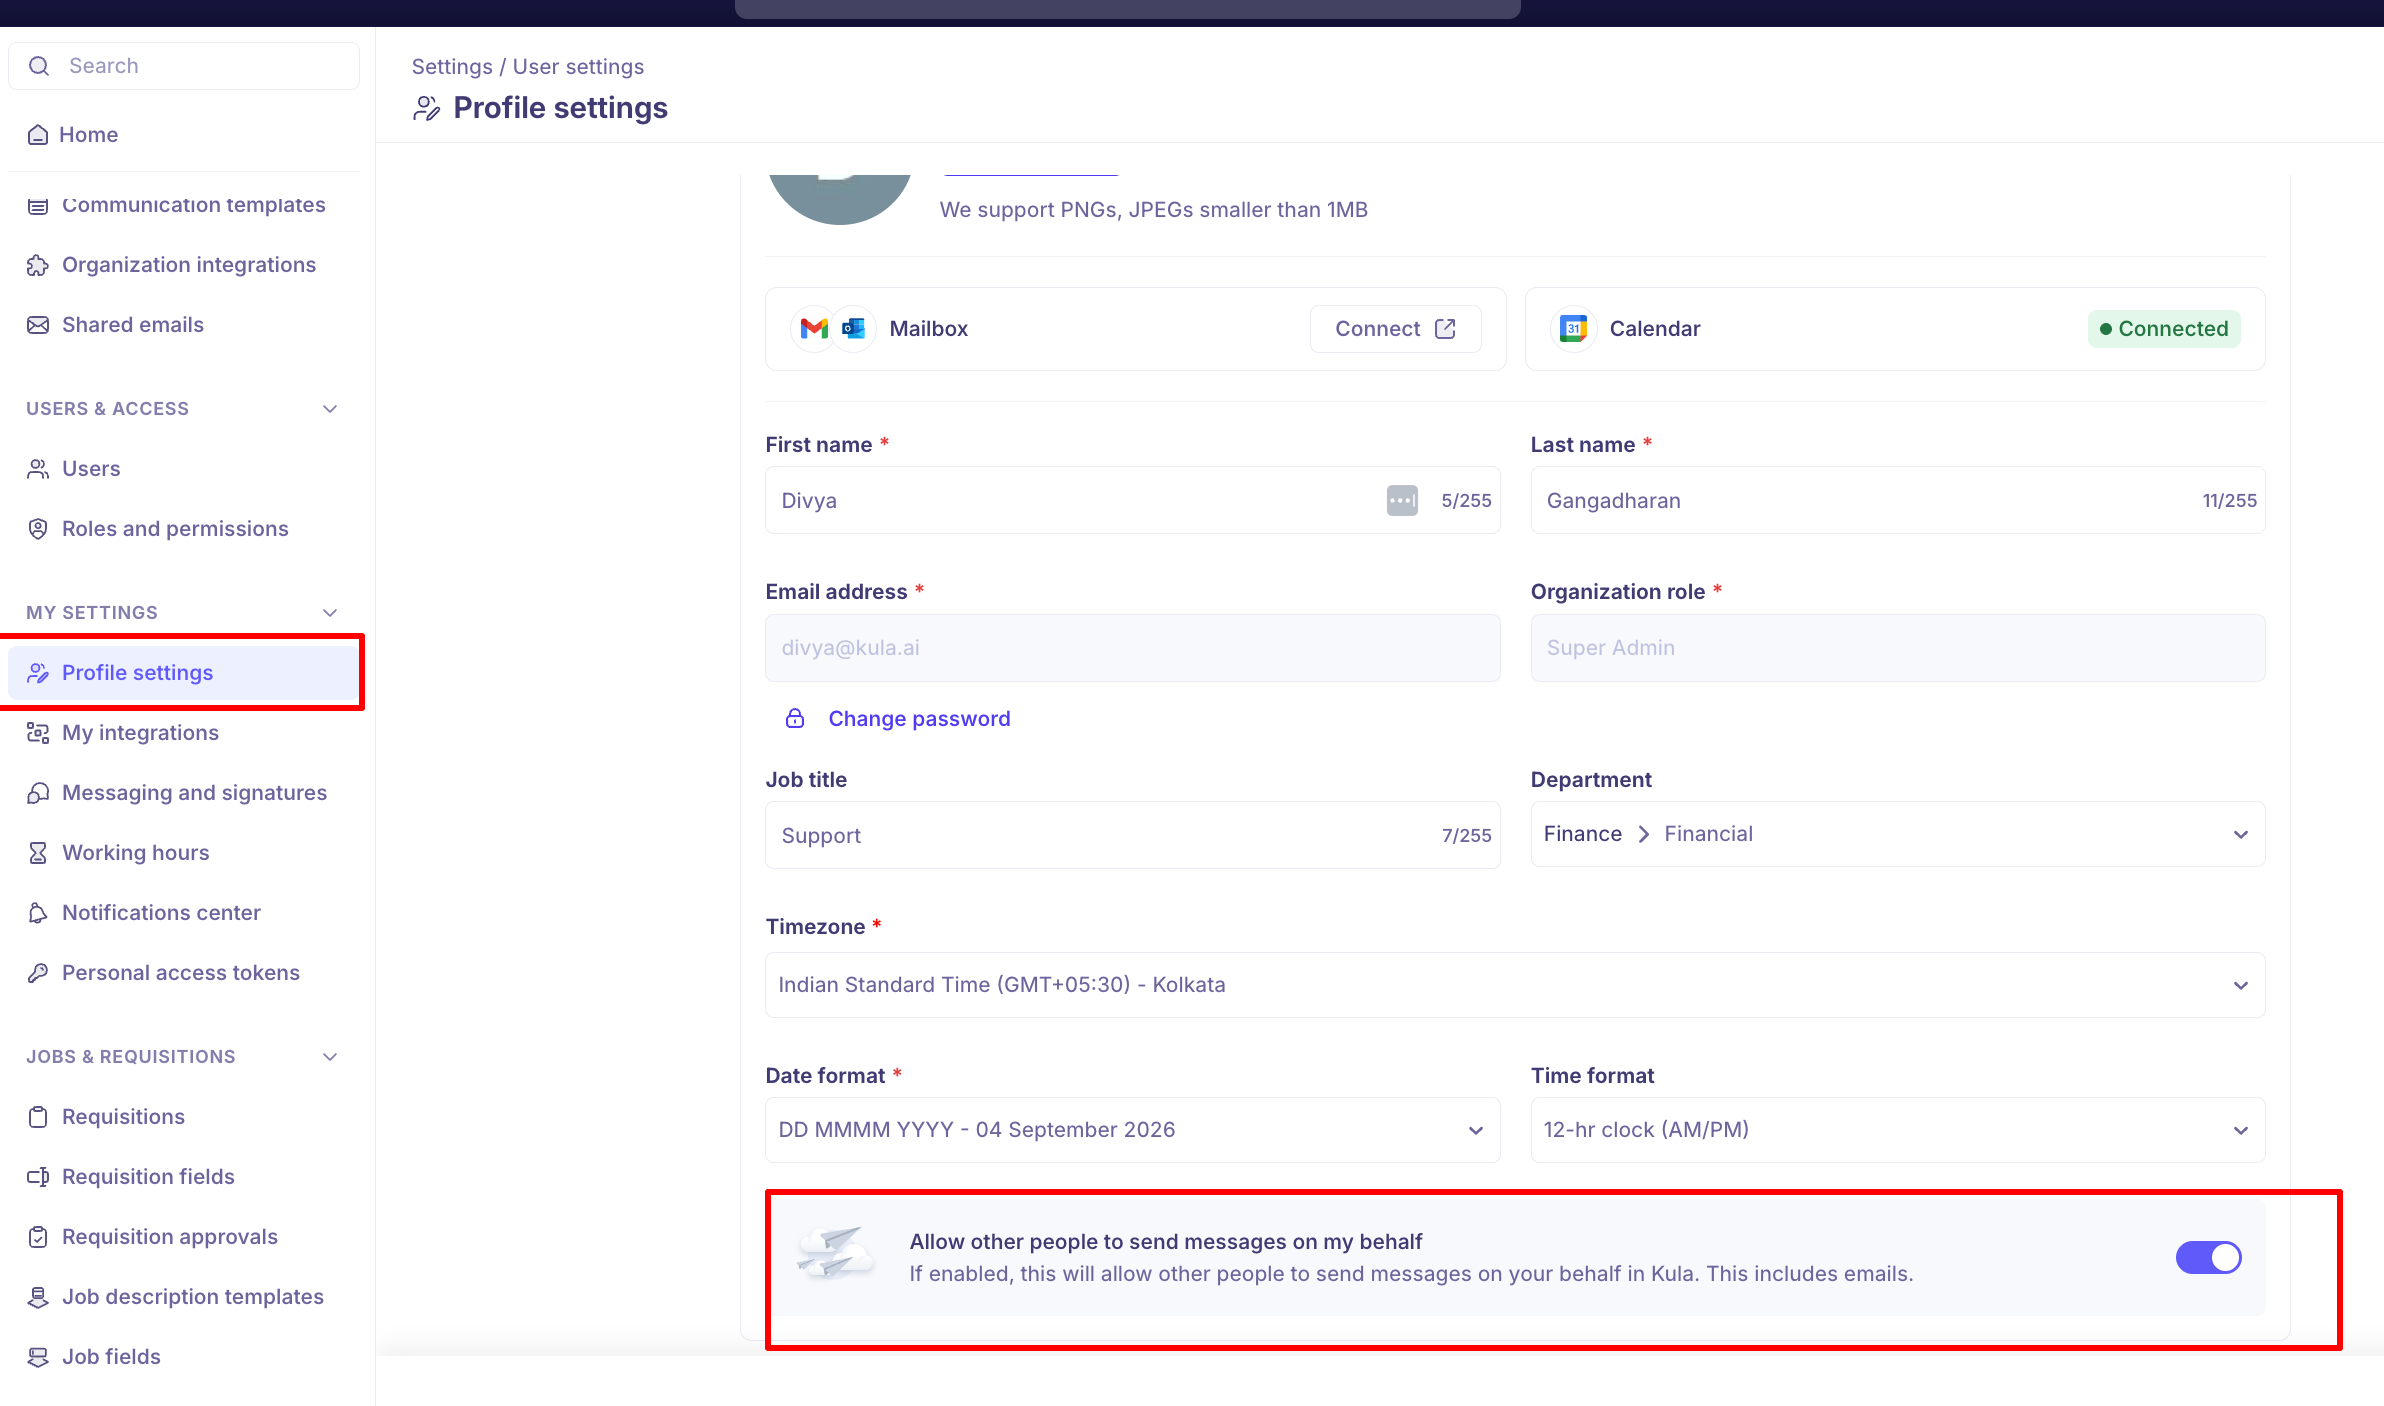
Allow other people to send messages on my behalf | Off unless you turn it on. Needs a connected mailbox. |
Update your profile
Go to Settings → My Settings → Profile settings.
Change the fields you want.
Click Save.
To change your photo, click Upload photo and pick a PNG or JPEG under 1 MB.
Change your password
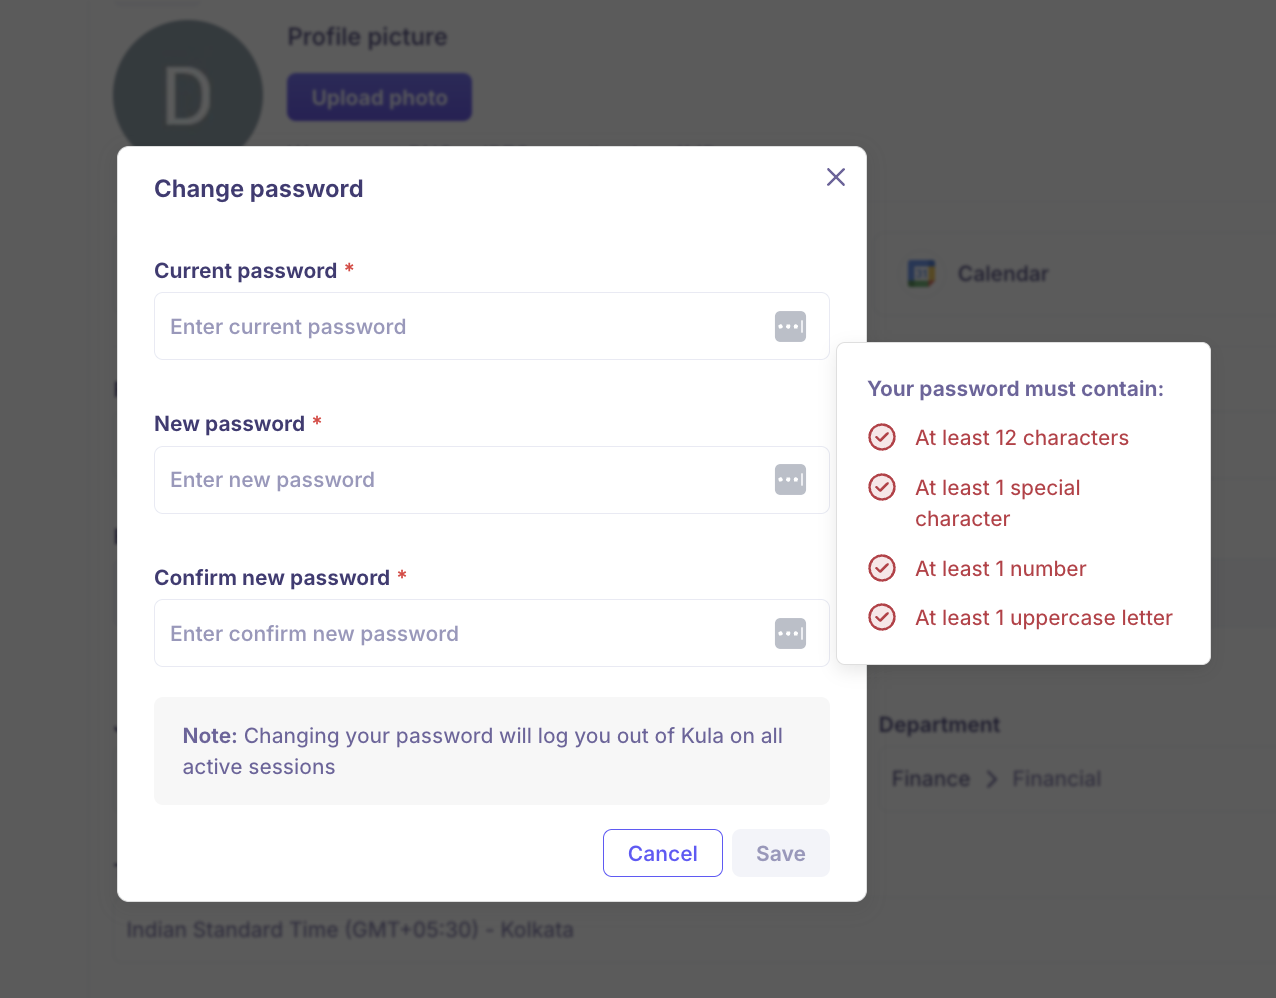
Click Change password.
Enter your current password.
Enter and confirm your new one.
Click Save.
Your new password needs all of the following:
Requirement |
|---|
At least 12 characters |
At least one uppercase letter |
At least one number |
At least one special character |
Different from your current password |
Saving a new password signs you out of Kula everywhere, on every device. Sign back in with the new one.
Let someone send emails as you
Turn on Allow other people to send messages on my behalf if you want colleagues to be able to pick you as the sender on candidate emails, offers and interview invites — for example, a coordinator emailing candidates from a hiring manager's name.
Connect your mailbox first. Kula will not let you turn the toggle on without one, and saving fails with "Connect your mailbox to allow others to send emails on your behalf".
The setting is yours alone. Each person decides for themselves, and there is no organisation-wide switch that turns it on or off for everybody.
Connect your mailbox and calendar
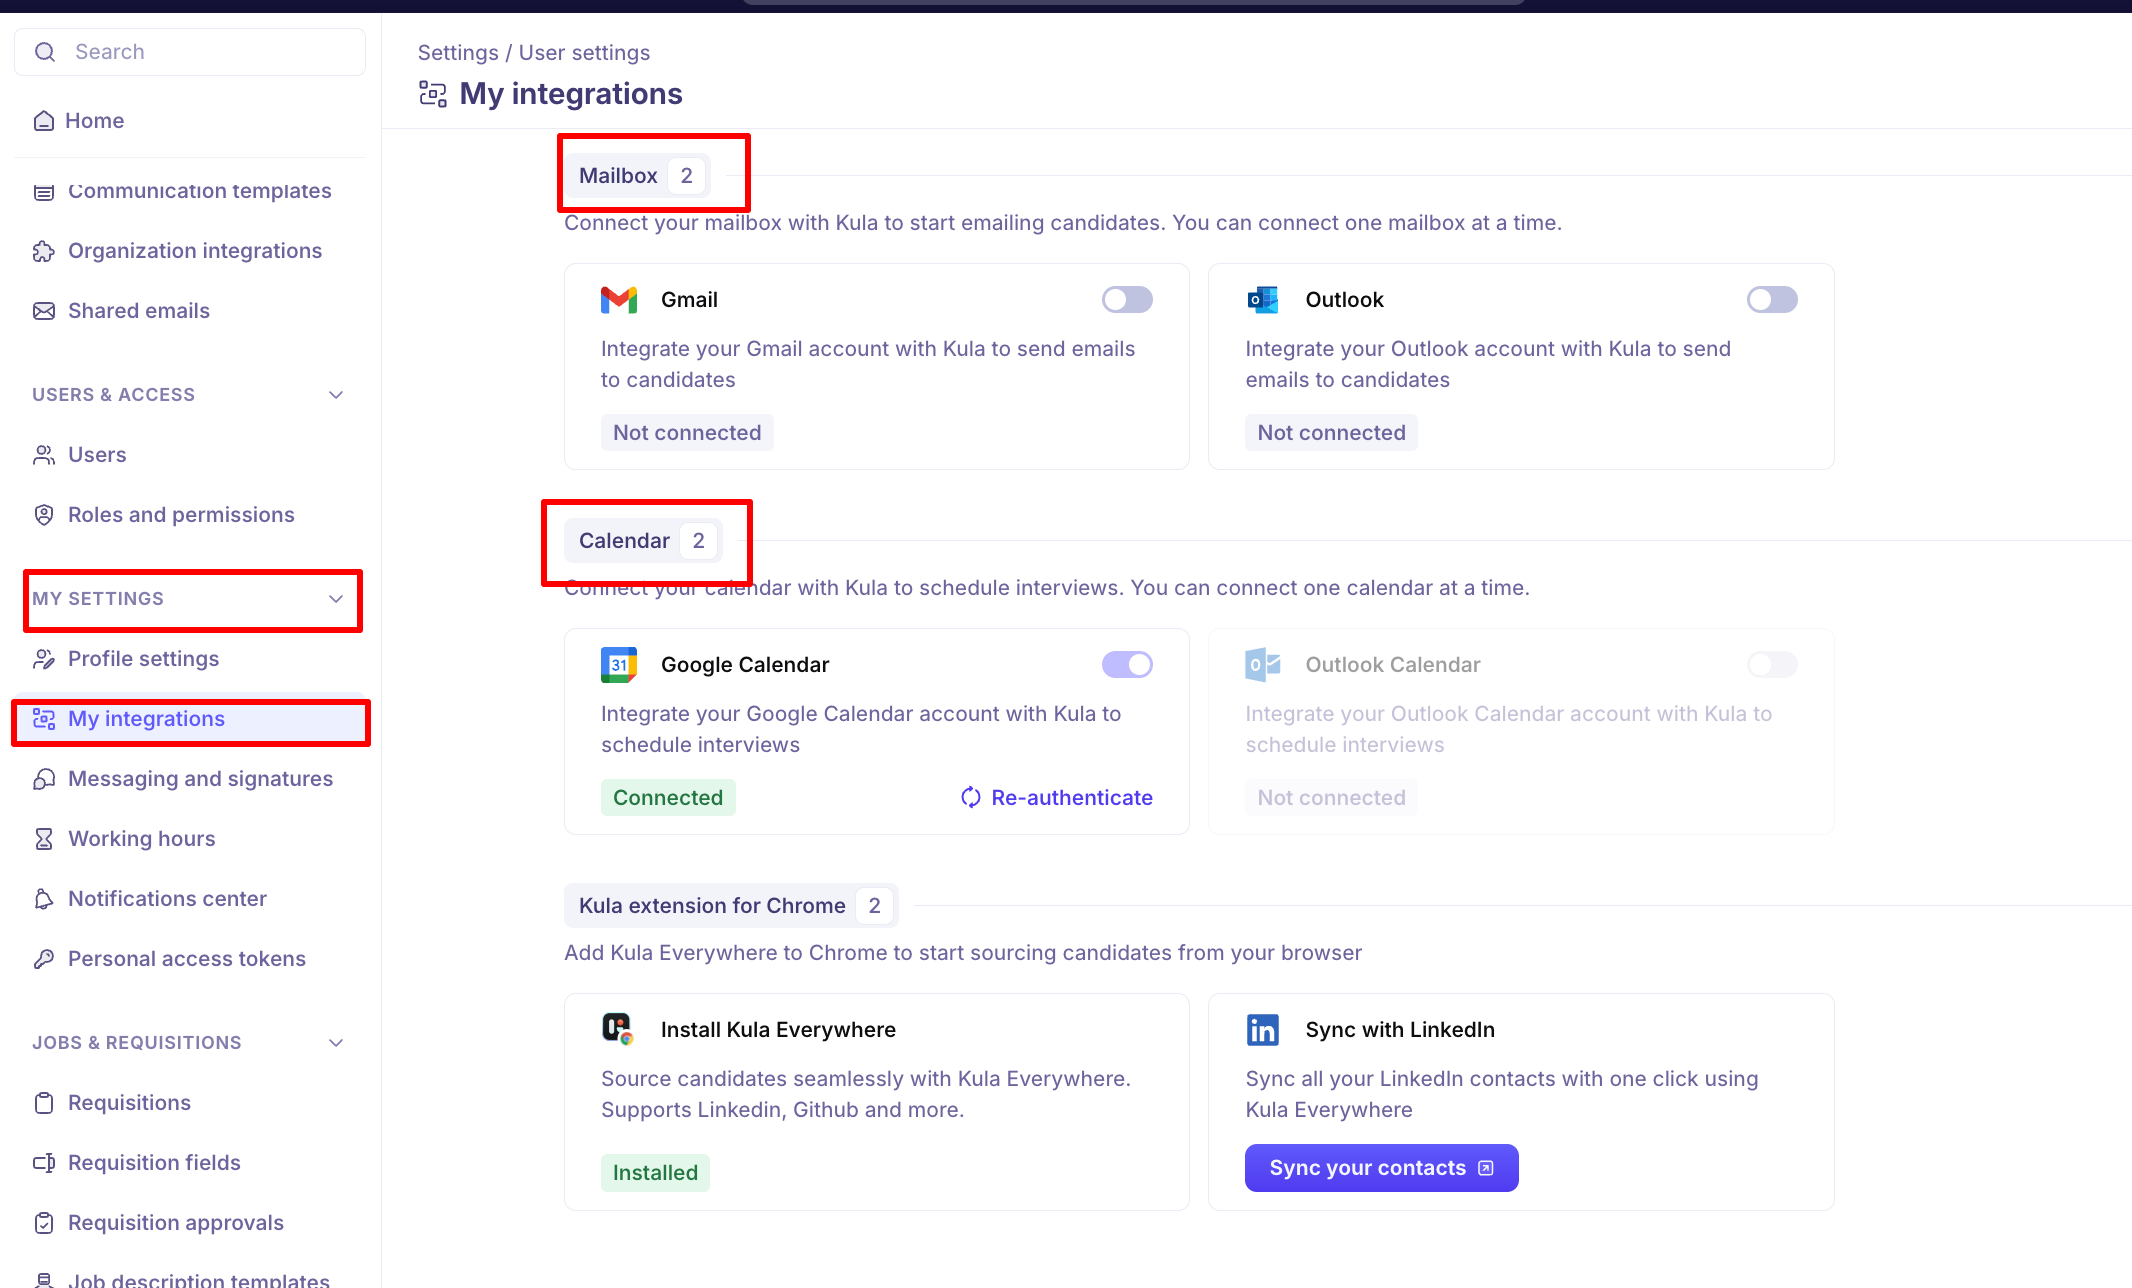
Where to find it: Settings → My Settings → My integrations
The Mailbox and Calendar cards on Profile settings only report whether you are connected — connecting happens on My integrations. The steps for each provider are in .
Why you need to connect them
Your mailbox is the address candidate emails actually go out from. Without it connected you cannot be picked as the sender on an email, you cannot turn on Allow other people to send messages on my behalf, and any flow step that names you as sender will not send.
Your calendar is how Kula sees when you are already busy. Working hours say when you are bookable in principle; your calendar is what stops a candidate booking over a meeting you already have. Without it, Kula has no conflicts to work around and will offer slots you are not actually free for.
Who needs to connect what
If you | Connect |
|---|---|
Email candidates, or run flows | Your mailbox — Gmail or Outlook |
Get booked for interviews | Your calendar — Google Calendar or Outlook Calendar |
Do both — most recruiters and coordinators | Both |
A disconnection is not silent. Kula notifies you by email and Slack when either integration drops, with a re-authentication link in the notification, and flow owners are told when a sender in their flow disconnects. Until you reconnect, you cannot send emails, affected flows may stop, and your self-schedule links show "No slots available".
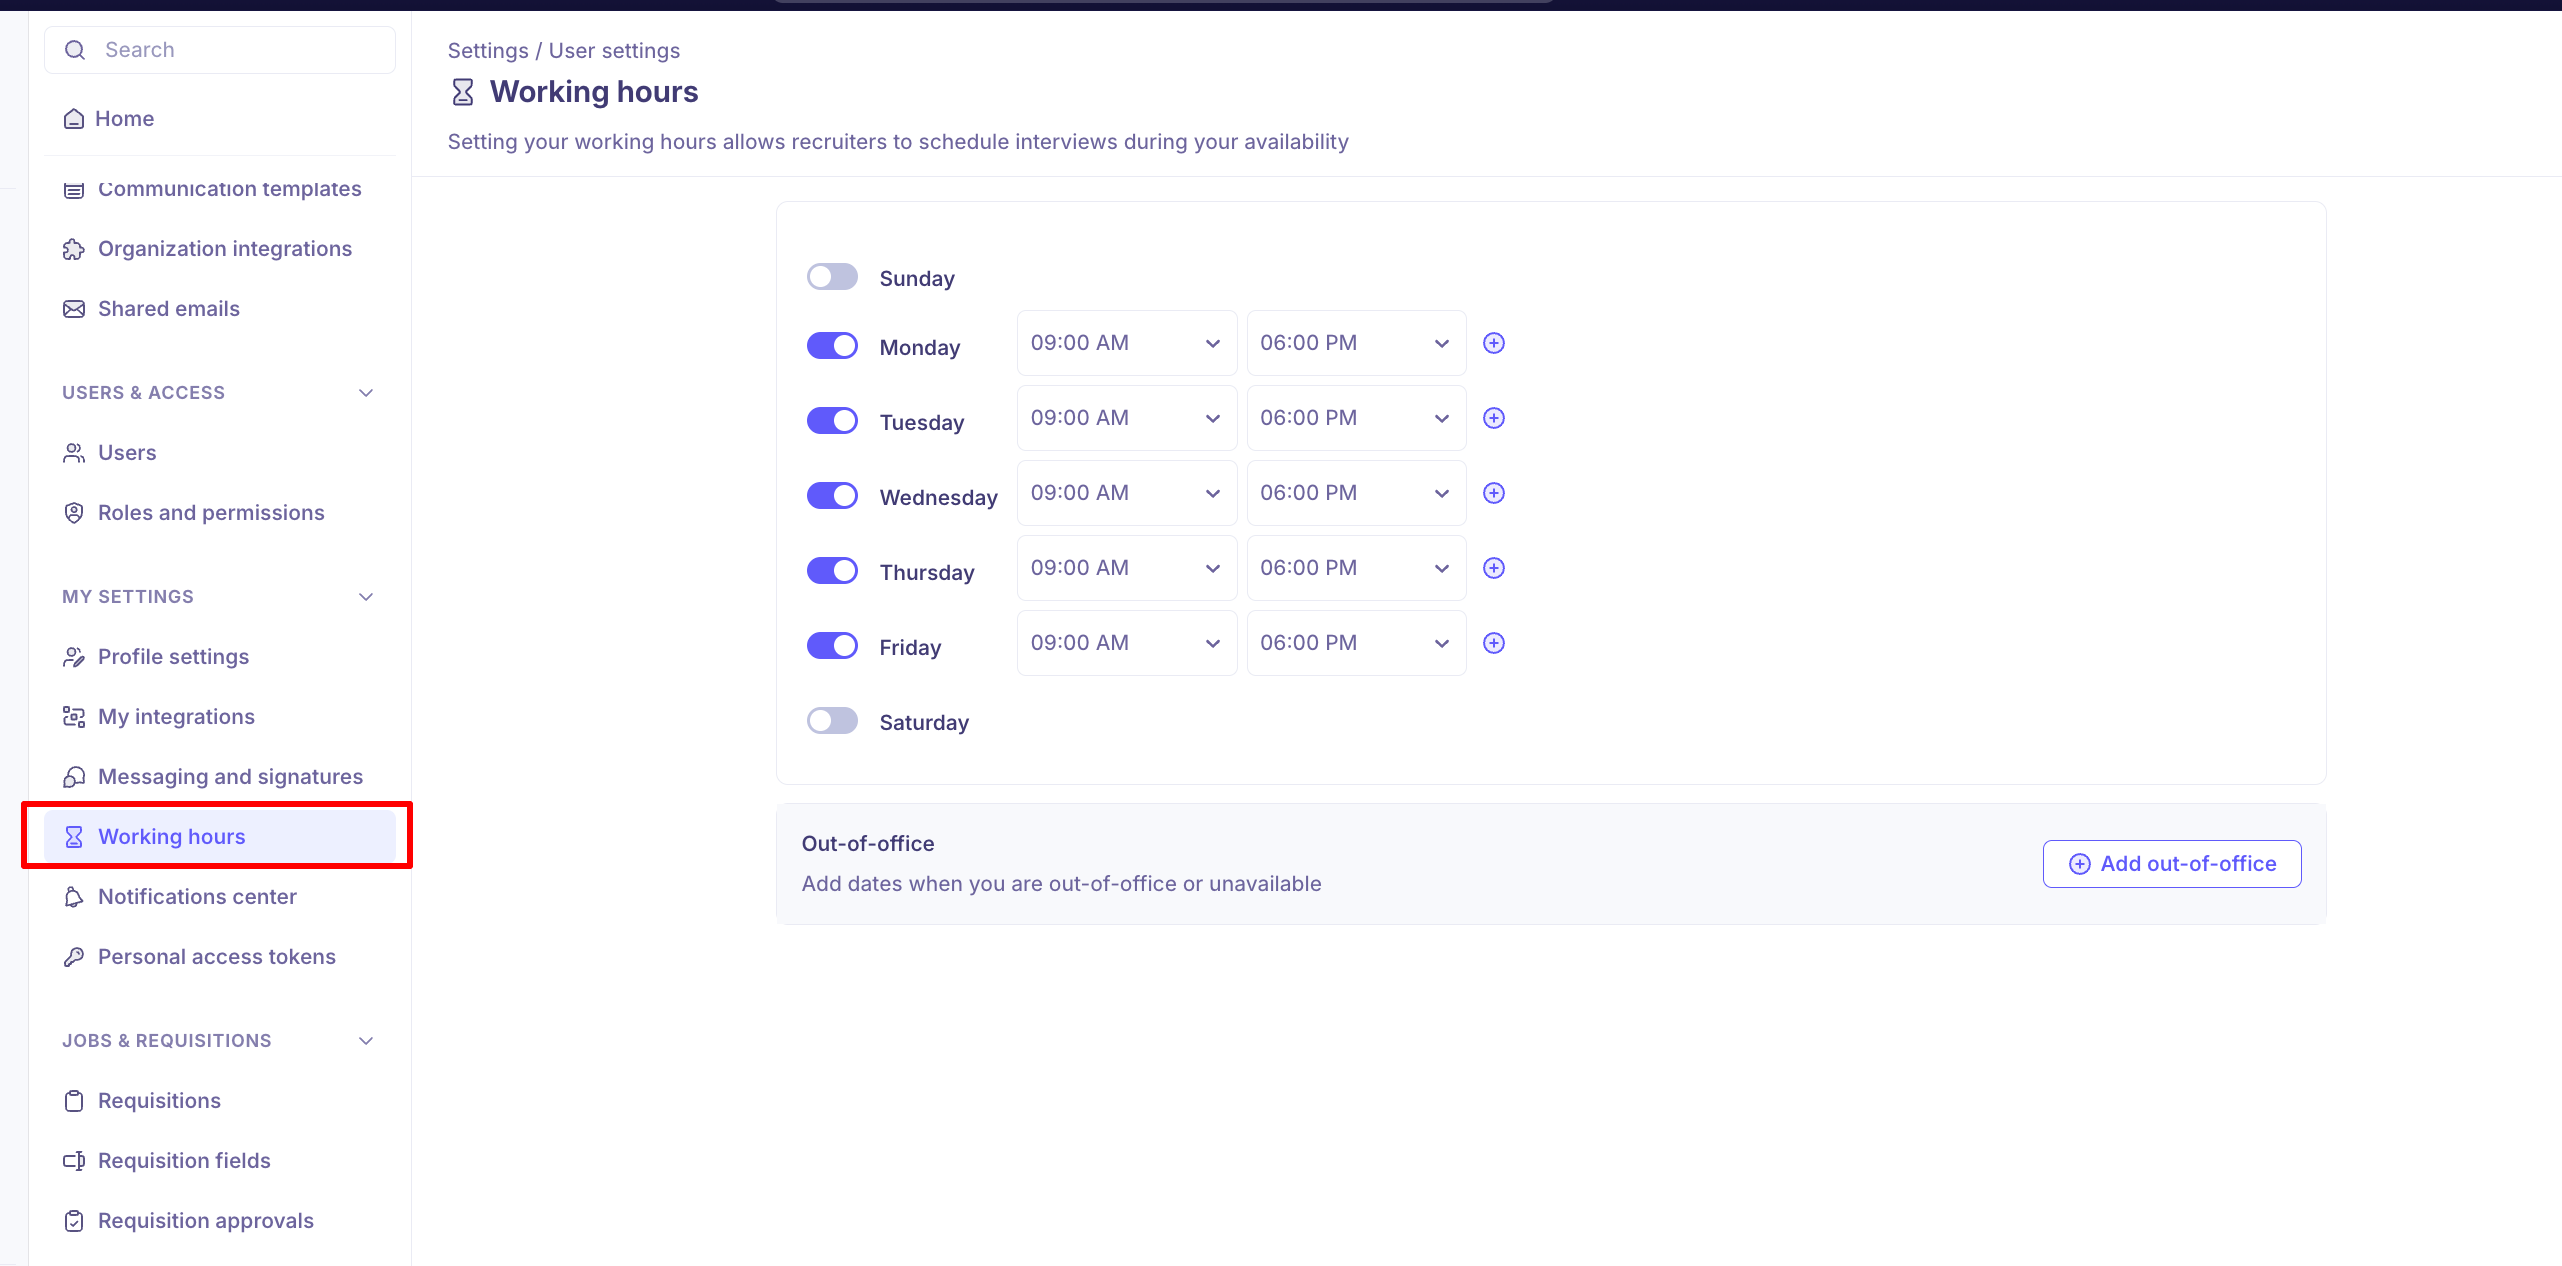
Working hours
Where to find it: Settings → My Settings → Working hours
Why this matters
Your working hours are the only hours Kula will let anyone book you for an interview. They are read every time Kula works out when you are free:
Self-schedule links. A candidate picking their own slot sees only times inside your working hours.
Manual scheduling. The slot suggestions a recruiter sees when booking you come from them.
Schedule All. Panel recommendations are built from interviewer availability, working hours and calendar events.
Interviewer recommendations. When Kula picks an interviewer from a pool, it weighs working hours, calendar events and weekly interview load.
The AI Coordinator and Kula's public availability API read the same schedule.
Working hours are interpreted in the Timezone on your Profile settings. Since January 2026 Kula enforces this strictly: a self-schedule link will not send until every interviewer on the interview has a timezone set. If yours is blank, set it before anything else.
Write your email signature
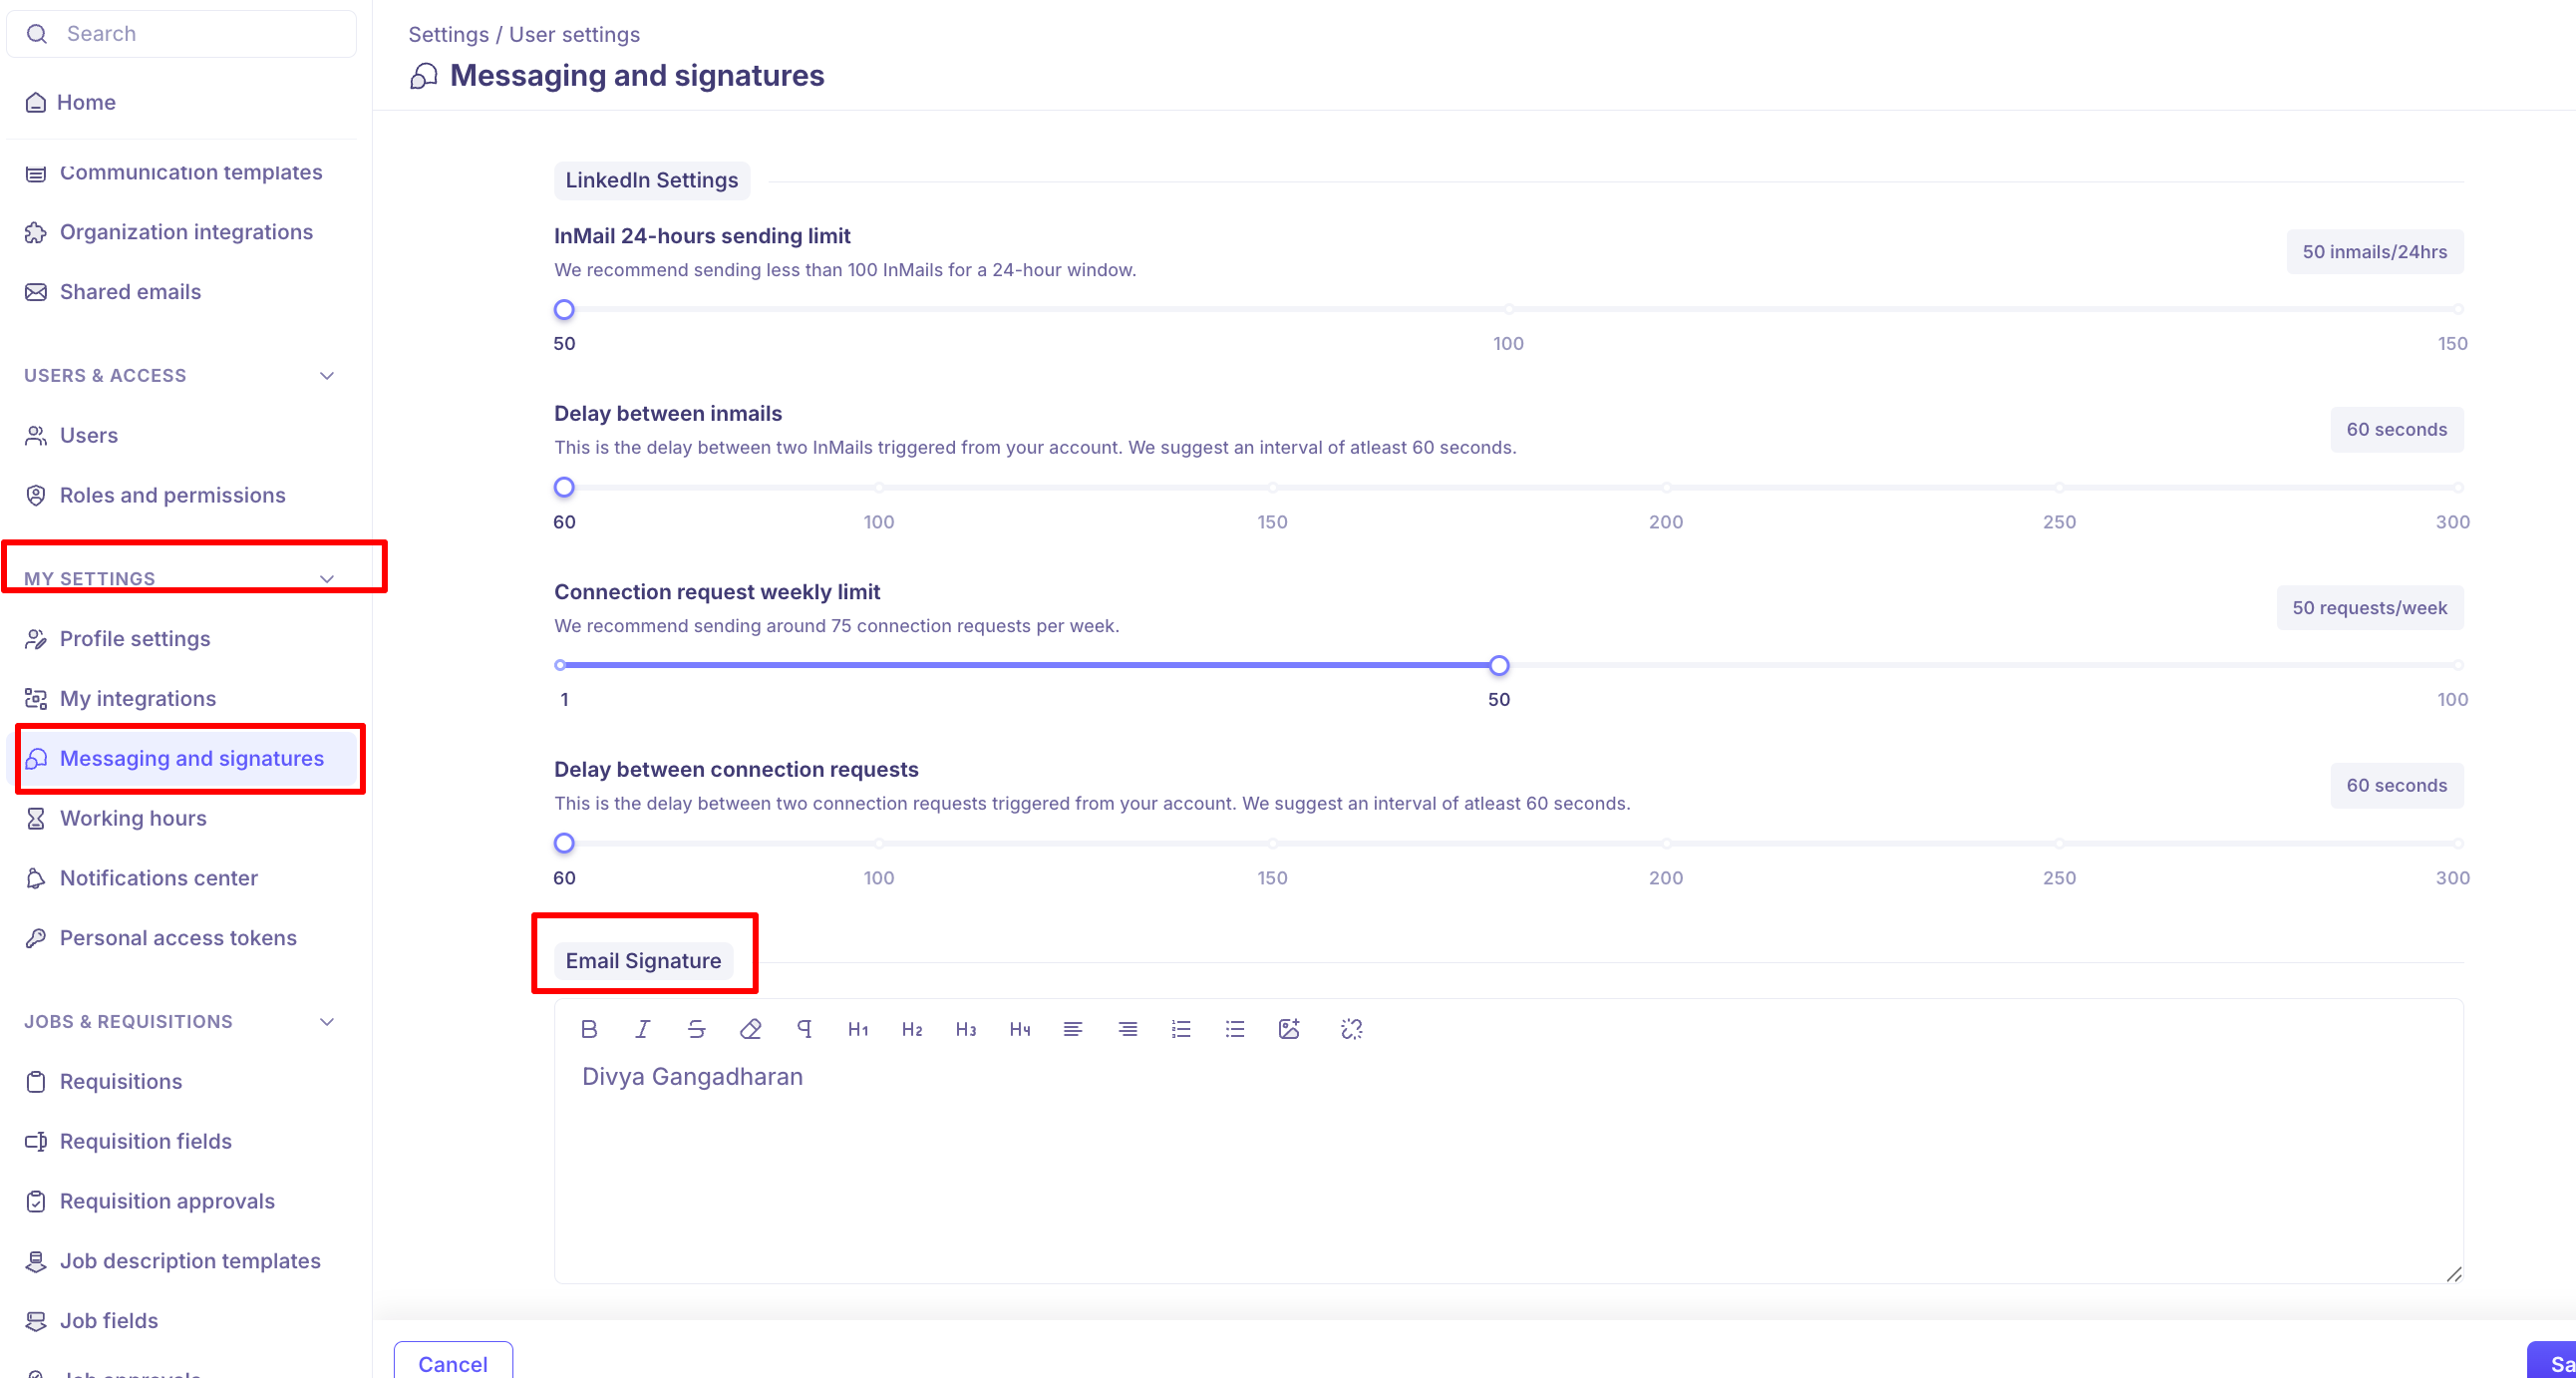
Go to Settings → My Settings → Messaging and signatures.
Scroll to Email Signature.
Type your signature in the editor. You can use bold, italics, headings, lists, links and images.
Click Save.
One Save covers your email limits, your LinkedIn limits and your signature together.
Your signature is not appended to every email automatically. It appears wherever a template includes the {{sender.email_signature}} variable — Kula's own default flow and communication templates already do, so a signature you save here shows up in them straight away. If you write a template from scratch, add the variable where you want the signature to sit.
Set your working hours
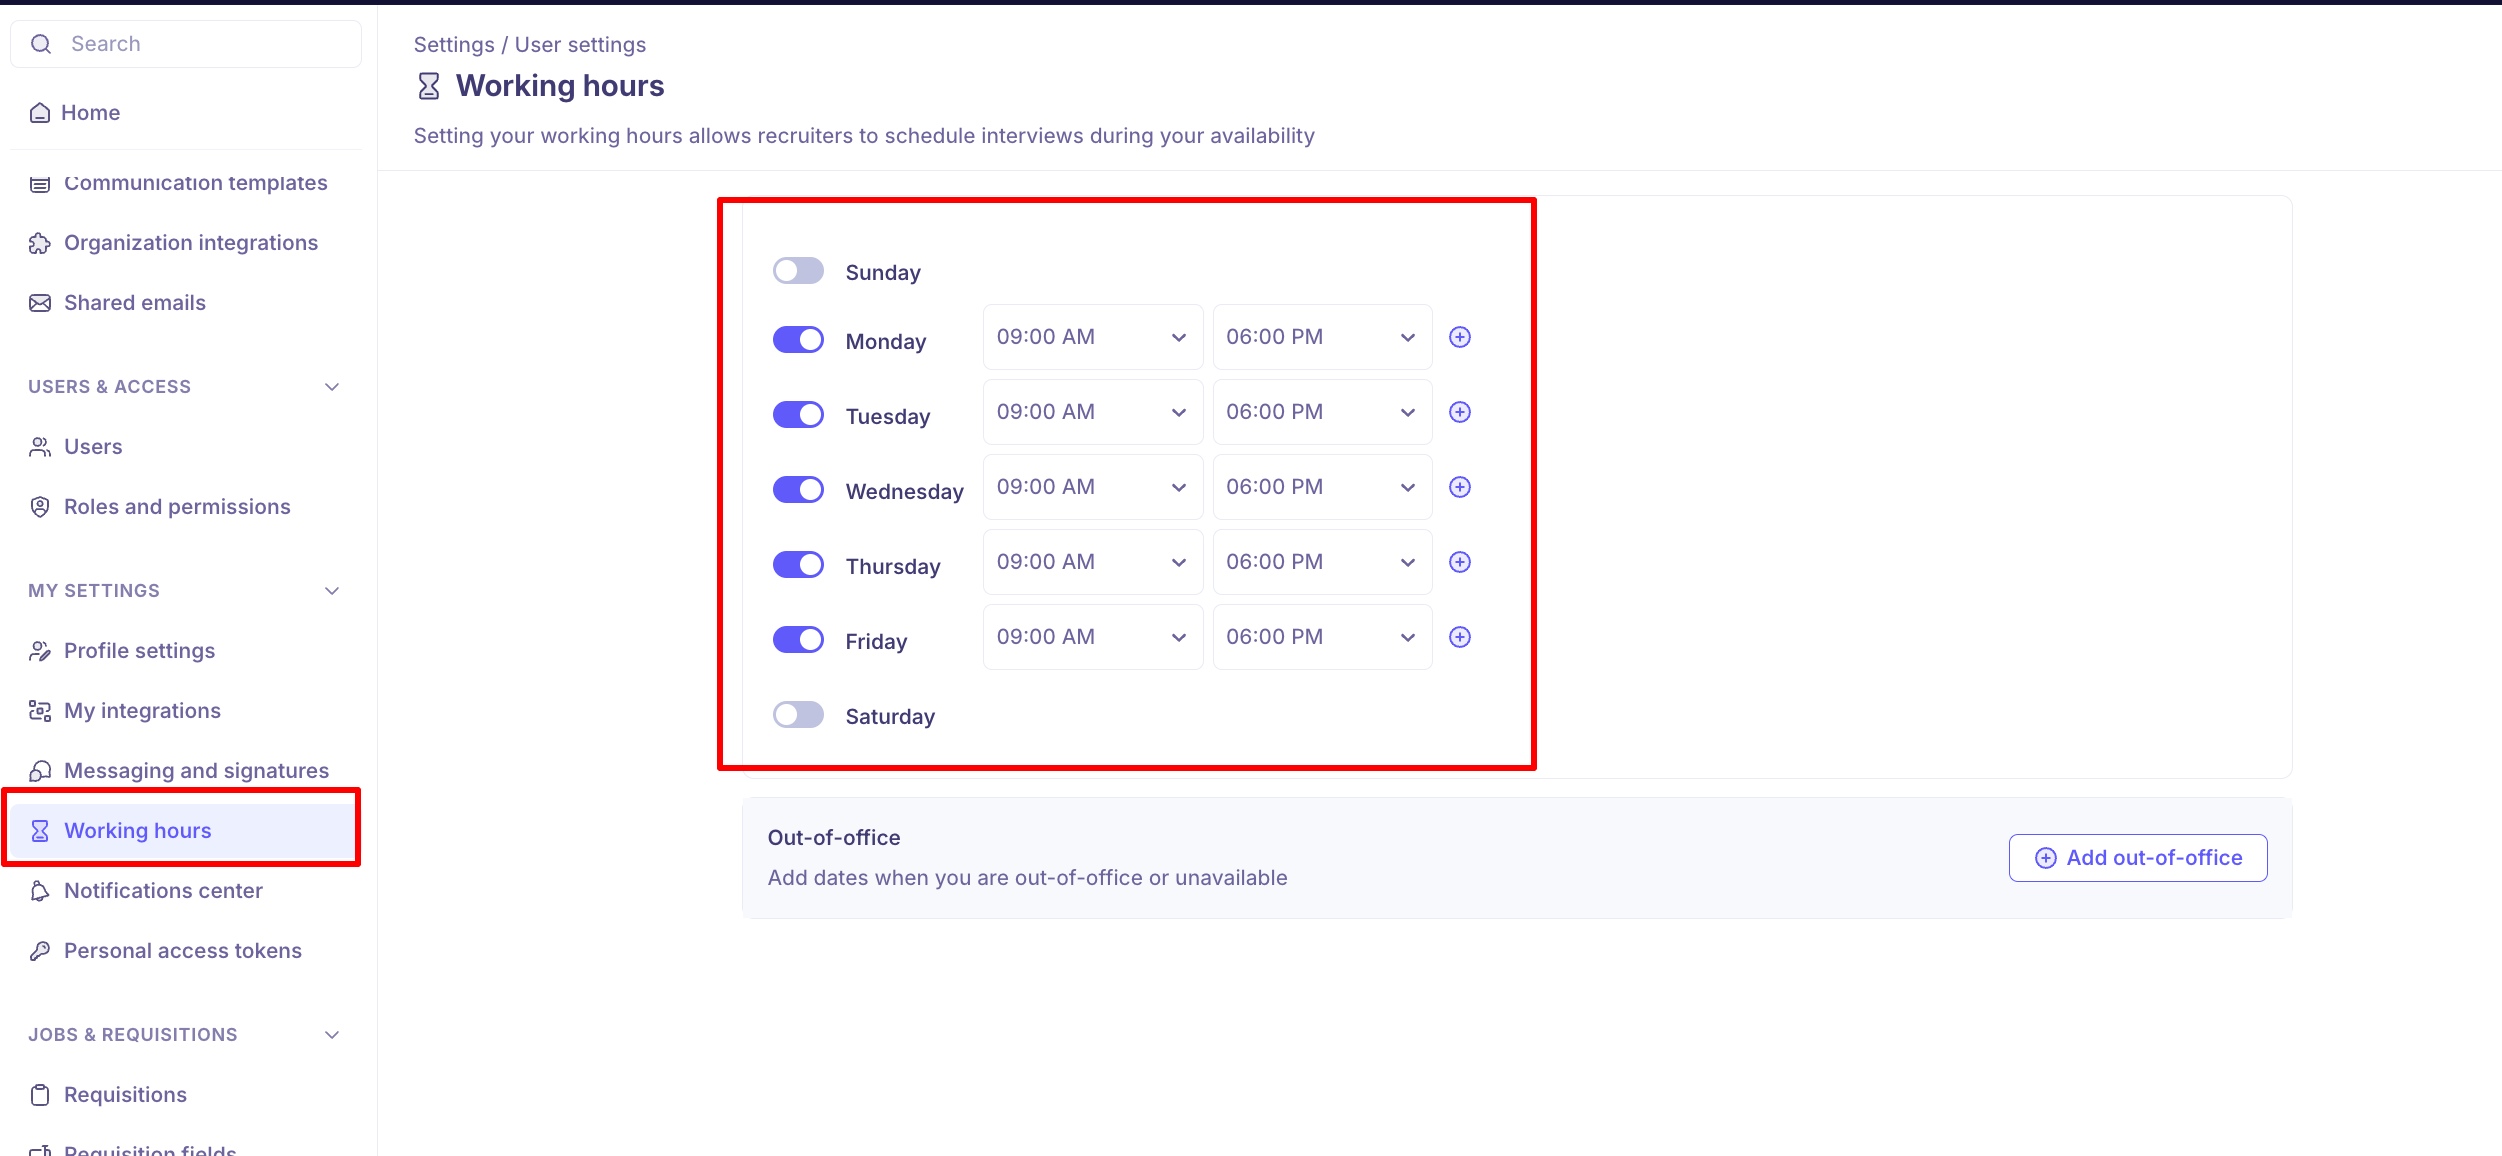
Every account starts on the same default pattern, and it is unlikely to match your actual day. Setting your own is what stops interviews landing at 8am when you start at 10, or on a Friday you never work. It is also the only way to be bookable at all outside the default — if you work weekends or a split shift, Kula will not offer those times until you say so.
Go to Settings → My Settings → Working hours.
Switch a day on or off using the toggle next to it.
Pick a start and end time for each day you have switched on.
Click the + next to a day to add a second block — for example, to leave a lunch break out.
Click Save.
New accounts start on Monday to Friday, 09:00 to 18:00, with weekends off.
Notifications centre
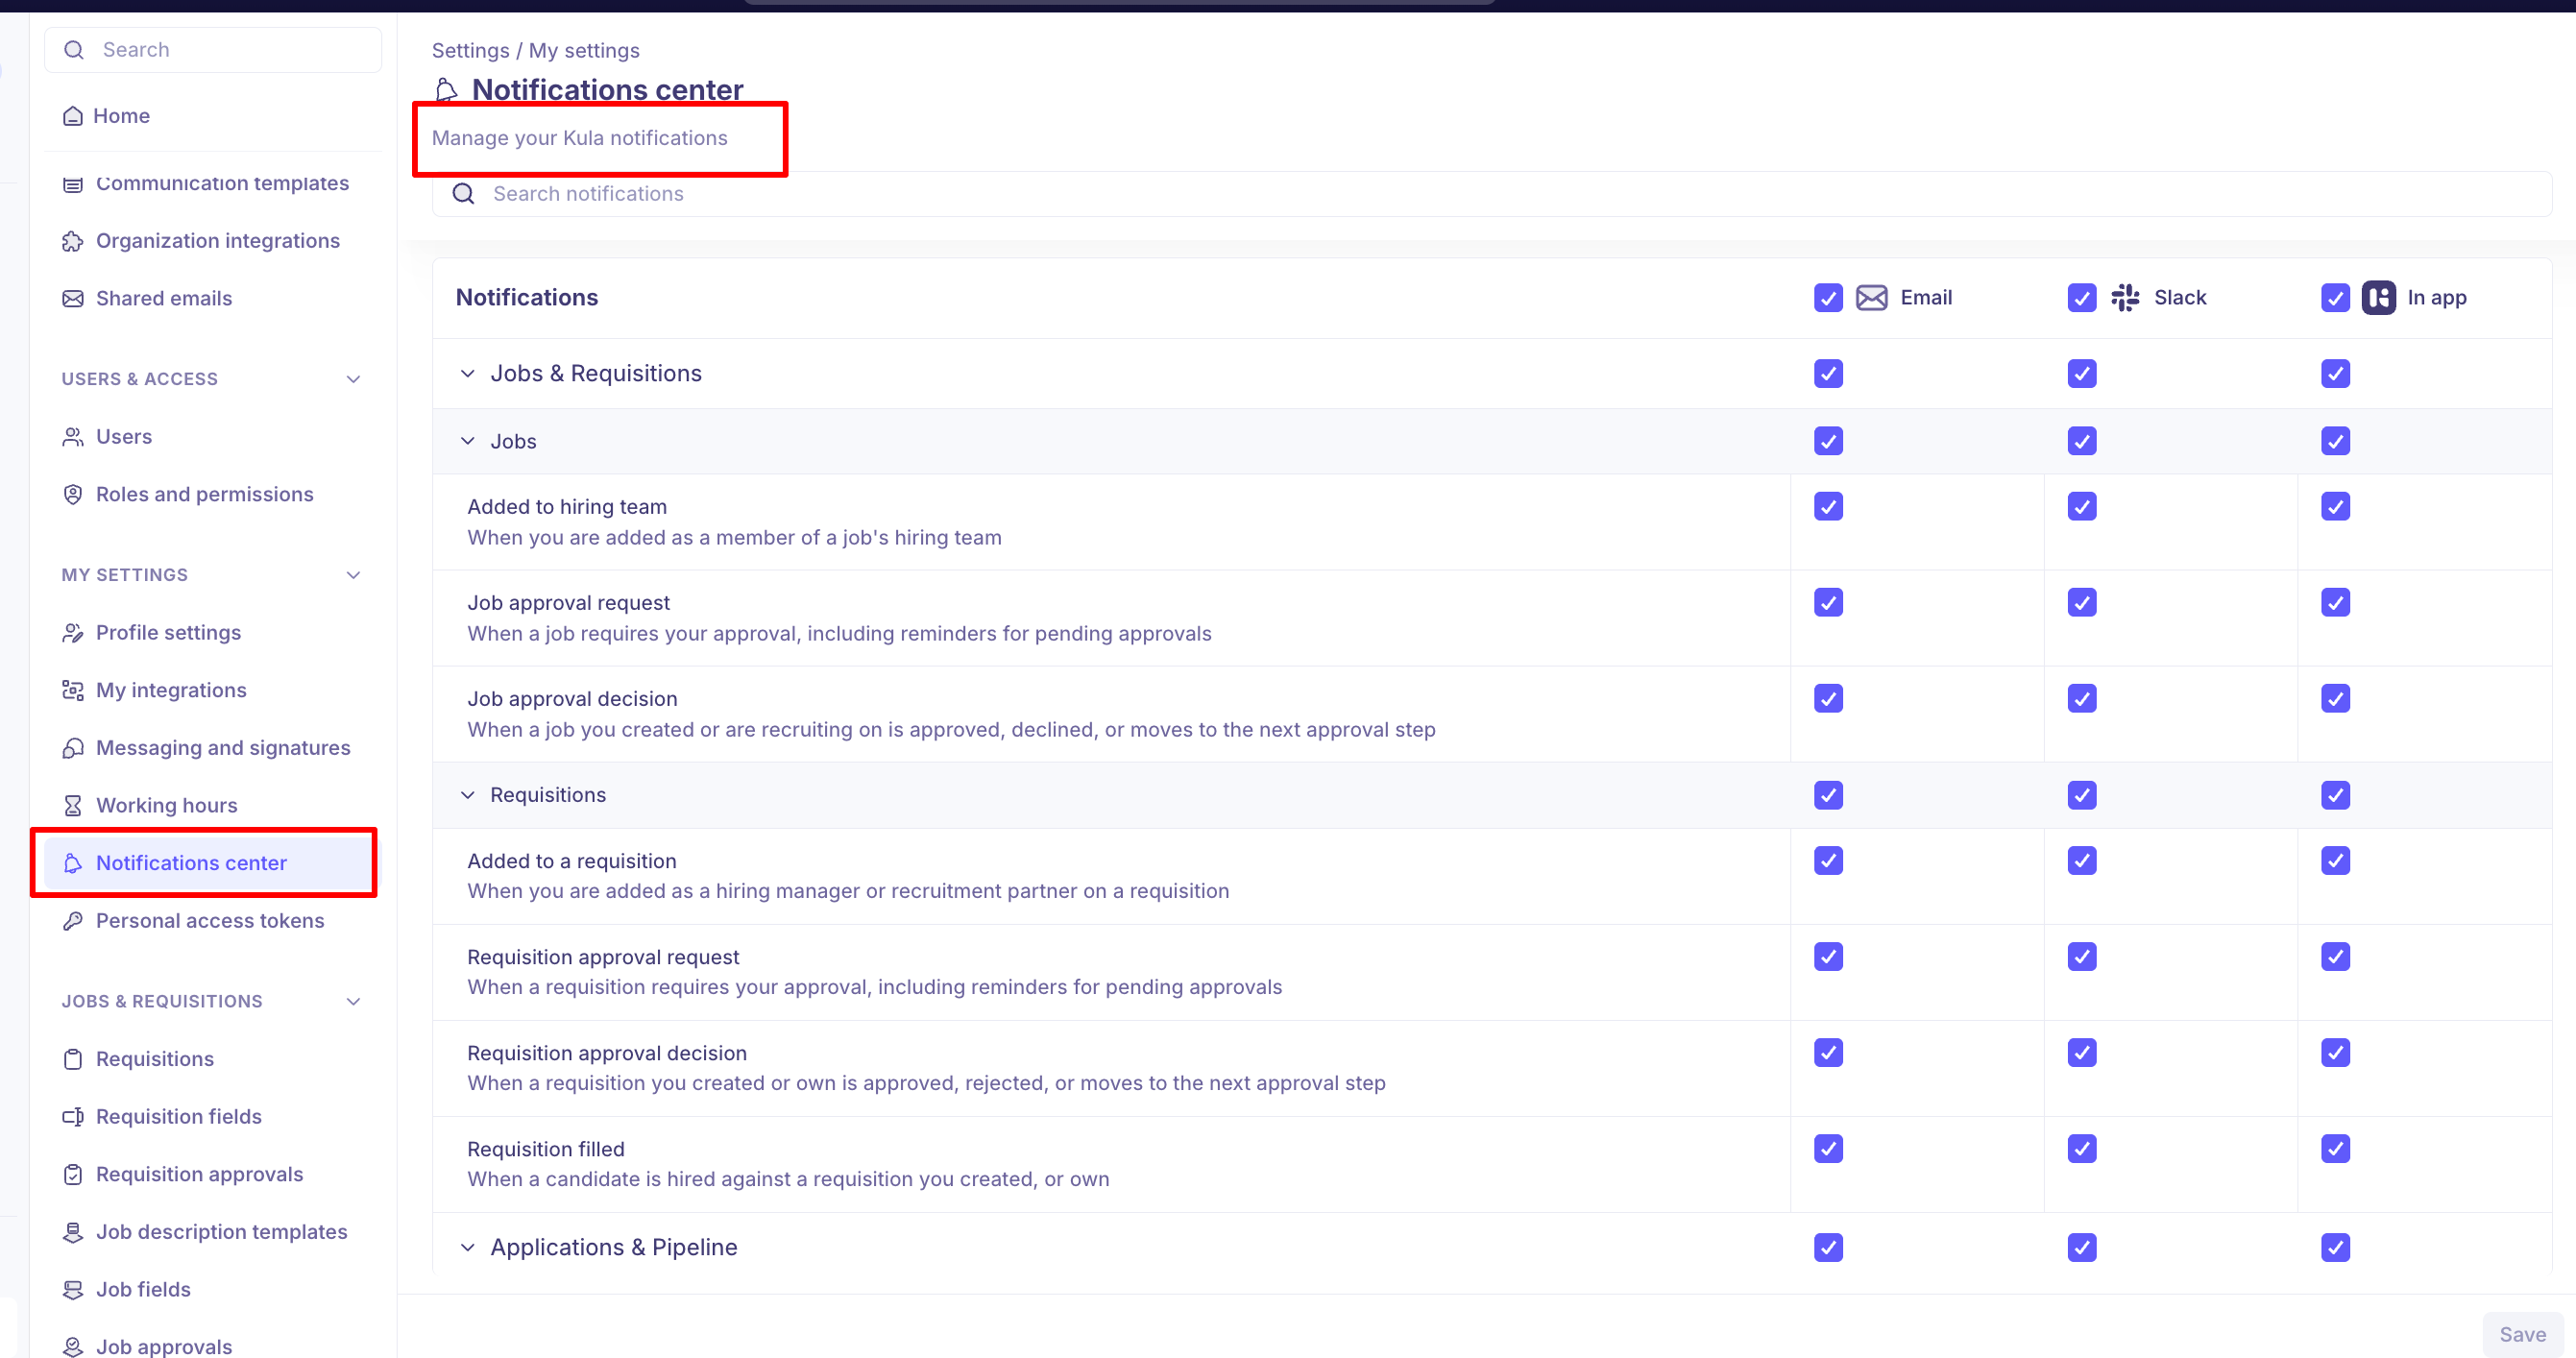
Where to find it: Settings → My Settings → Notifications center
This is where you choose which Kula events reach you and on which channel — email, Slack or in-app — so you hear about the things you act on and not the rest. Worth setting once when you join, and again whenever your role changes and a different set of things becomes yours to chase. For the full list of notifications and how to set them, see .
Good to know
Your own date format, time format and timezone override the organization's defaults. What you set here is what you see.
Set your timezone before anything else. Your working hours are read in it, and a self-schedule link won't send until every interviewer on it has a timezone.
Saving a new password signs you out everywhere. Sign back in on each device with the new password.
You can't change your email address or role here. Contact support to change your login email; an admin changes your role.
Your signature isn't added to every email. It appears where a template includes
{{sender.email_signature}}— Kula's default templates already do."Send on my behalf" needs a connected mailbox. Connect it on My integrations first, or saving fails.
New accounts start on Monday to Friday, 09:00 to 18:00. Change your working hours if that isn't your day, or you'll be offered for interviews at the wrong times.
FAQ
Candidates can book me at times I don't work. How do I stop that? Set your working hours under Settings → My Settings → Working hours, and check your timezone on Profile settings is right. Kula only offers slots inside your working hours, read in your timezone.
My self-schedule links say "No slots available". What's wrong? Usually your calendar has disconnected, or your working hours leave no free time. Reconnect your calendar on My integrations and check your working hours.
Why doesn't my signature show on an email I sent? The template didn't include {{sender.email_signature}}. Add it to the template where you want the signature to appear.
How do I change the email address I log in with? You can't change it yourself — it's read-only. Contact support.
Why can't I turn on "Allow other people to send messages on my behalf"? Your mailbox isn't connected. Connect it on My integrations, then turn the toggle on and save.
Need help? If you have questions or need assistance with setup, reach out to us at support@kula.ai or use the in-app chat.